Advertisement
PORTFOLIO® and PORTFOLIO & Design™ are
trademarks or registered trademarks of LF, LLC.
All rights reserved.
PORTFOLIO® y PORTFOLIO & Design™ son marcas
o marcas registradas de LF, LLC. Todos los derechos
reservados.
Questions?/¿Preguntas?
Call customer service at 1-800-643-0067, 8 a.m. - 6 p.m.,
EST, Monday - Thursday, 8 a.m. - 5 p.m., EST, Friday.
Llame al Servicio al Cliente al 1-800-643-0067 de lunes
a jueves de 8 a.m. a 6 p.m., y los viernes de 8 a.m. a 5 p.m.,
hora estándar del Este.
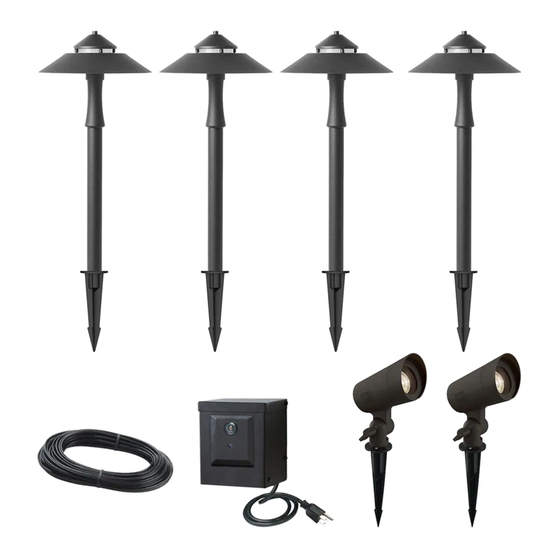
PACKAGE CONTENTS/CONTENIDO DEL PAQUETE
A
Power pack
16# low voltage cable
Bloque de
Cable #16 de bajo voltaje
alimentación
x 1
HARDWARE CONTENTS/ADITAMENTOS
Note: Hardware shown actual size./Nota: Los aditamentos se muestran en tamaño real.
AA
x 3
Plastic anchor
Ancla de expansión
de plástico
PH18828
C
B
Cover
Cubierta
x 4
D
Washer
x 1
Arandela
x 4
BB
JUEGO DE ILUMINACION
Serial Number/Numero de serie
Purchase Date/Fecha de compra
E
Lampholder
Portalámpara
x 4
F
Post
Poste
x 4
x 3
Phillips screw
Tornillo Phillips
1
ITEM/ARTÍCULO #0884501
8 PC LANDSCAPE
LIGHTING KIT
PARA EL JARDÍN
MODEL/MODELO #7404280540
ATTACH YOUR RECEIPT HERE
ADJUNTE SU RECIBO AQUI
Fixture Housing
Carcasa de
la lámpara
H
Connector
Conector
x 6
G
Fixture Wire
Cable de la lámpara
x 6
CC
x 1
Mounting template (not shown to size)
Plantilla para montaje
(no se muestra en tamaño real)
I
J
x 2
Stake
Estaca
x 6
Advertisement
Table of Contents

Related Manuals for Portfolio 7404280540


Summary of Contents for Portfolio 7404280540
- Page 1 PARA EL JARDÍN trademarks or registered trademarks of LF, LLC. All rights reserved. MODEL/MODELO #7404280540 PORTFOLIO® y PORTFOLIO & Design™ son marcas o marcas registradas de LF, LLC. Todos los derechos reservados. Questions?/¿Preguntas? Call customer service at 1-800-643-0067, 8 a.m. - 6 p.m., EST, Monday - Thursday, 8 a.m.
- Page 2 SAFETY INSTRUCTIONS/INSTRUCCIONES DE SEGURIDAD Please read and understand this entire manual before attempting to assemble, operate or install the product. WARNING RISK OF FIRE OR ELECTRICAL SHOCK: • This power pack is for use with low-voltage landscape lighting systems ONLY. •...
- Page 3 Lea y comprenda completamente este manual antes de intentar ensamblar, usar o instalar el producto. ADVERTENCIA RIESGO DE INCENDIO O DESCARGA ELÉCTRICA: • Este bloque de alimentación es SOLO para uso con sistemas de iluminación para el jardín de bajo voltaje. •...
- Page 4 PREPARATION/PREPARACIÓN Before beginning assembly of product, make sure all parts are present. Compare parts with package contents list and hardware contents list. If any part is missing or damaged, do not attempt to assemble the product. Estimated Assembly Time: 30-40 minutes Tools Required for Assembly (not included): Phillips screwdriver, Drill, 1/4 in.
- Page 5 Loosen the terminal screws located on the bottom of the power pack (A) and insert one of the pre-stripped wires under the terminal clamping plate and securely tighten the terminal screw. Repeat this process for the other side of the wire, inserting it into the second wire terminal.UTIONF7 CAUTION: To reduce the risk of fire, electrical shock or damage to the power pack (A), ensure there is no wire insulation under the terminal clamping plate...
- Page 6 Attach the stake (J) to the fixture housing (I). Fije el estaca (J) a la carcasa de la lámpara (I). Push the assembled fixture into the ground. CAUTION: DO NOT use a hammer. • • NEVER push the fixture into the ground by the head. Instead, hold the post and push the fixture into the ground.
- Page 7 Insert wire (B) from low-voltage power pack (A) into the bottom base of connector (G) and then re-tighten the top cover removed in step 11 until the contact pins completely pierce the plastic shield of the wire (B). Top cover Coloque el cable (B) del bloque de alimentación de bajo voltaje (A) en la Cubierta base inferior del conector (G) y luego vuelva a apretar la cubierta superior...
- Page 8 CARE AND MAINTENANCE/ CUIDADO Y MANTENIMIENTO ● Before attempting to clean the fixture, disconnect the power to the fixture by unplugging the fixture. ● To clean the fixture, use a dry or slightly dampened clean cloth. ● DO NOT use any cleaners with chemicals, solvents, or harsh abrasives as damage to the fixture may occur. ●...
- Page 9 WARRANTY/GARANTÍA The manufacturer warrants this lighting fixture against defects in materials and workmanship for a period of one year from the date of purchase. If within this period the product is found to be defective in material or workmanship, the product must be returned, with a copy of the bill of sale as proof of purchase, to the original place of purchase.
Need help?
Do you have a question about the 7404280540 and is the answer not in the manual?
Questions and answers
1 of my pathway lights has gone out. the se was purchased at Lowes 2-02-2019. Is there a way it can be fixed or replaces?
The manual states that the LEDs in the product are not replaceable. This means if the light stops working due to LED failure, it cannot be repaired by replacing the LED. However, the product comes with a manufacturer’s warranty against defects in materials and workmanship, so it may be possible to get a replacement if it is defective and within the warranty period.
This answer is automatically generated