Table of Contents
Advertisement
Available languages
Available languages
Quick Links
Advertisement
Chapters
Table of Contents

Related Manuals for Westfield Outdoors Jupiter Series

Summary of Contents for Westfield Outdoors Jupiter Series
- Page 1 PREMIUM SERIES » « JUPITER SERIE « Modell-Nr.12020393800000...
-
Page 2: Table Of Contents
WILLKOMMEN Vielen Dank, dass Sie sich für dieses Westfield Outdoors Vorzelt entschieden haben. Bitte lesen Sie diese Gebrauchsanweisung vollständig durch. Beachten Sie die Pflege- und Sicherheitshinweise. ZUSAMMENFASSUNG STÜCKLISTE ALLGEMEINE EMPFEHLUNGEN UND VERWENDUNG DIE LUFTGESTÄNGE AUFBLASEN/ENTLEEREN ERSETZEN EINES TPU-LUFTSCHLAUCHES UNDICHTE VENTILE UND WIE MAN DIESE REPARIERT AUFBAUANLEITUNG 6-12 ALLGEMEINE PFLEGE- UND BEDIENUNGSHINWEISE... -
Page 3: Stückliste
Modell-Nr. 12020393800000 STÜCKLISTE Windschürze und Pumpe mit Plastikspanner Stahlerdnägel Tragetasche Radblende Sicherheitsventil 1.Clean repair area thoroughly 2.Press patch fiemly over puncture 3.Do not inflate for four(4)hours to allow repair to set Sturmbänder Elastikspanner ABS Heringe Leitergummis TPU Reparaturset Frontgestänge Frontstützen Andruckstangen Abspanngurt OPTIONAL... -
Page 4: Allgemeine Empfehlungen Und Verwendung
ALLGEMEINE EMPFEHLUNGEN UND VERWENDUNG Wir empfehlen die Verwendung einer zusätzlichen Bodenplane oder einer zusätzlichen Abdeckung, um Schäden an Ihrem Vorzelt zu vermeiden, welche während der Montage an Ihrem Wohnwagen, Wohnmobil oder Fahrzeug entstehen können. Bitte machen Sie sich mit dem Vorzelt vertraut, bevor Sie Ihre erste Reise antreten. Wir empfehlen einen Probeaufbau. -
Page 5: Aufblasen/Entleeren
DAS AUFPUMPEN UND ENTLEEREN Das Aufpumpen, die Pumpe ist mit einem Überdruckventil ausgerüstet, dieses verhindert das überfüllen der Luftschläuche. Safety Der Ideale Luftdruck liegt bei 7 PSI (0,48 Bar). Verbinden sie den Pressure Pumpenschlauch mit dem Anschlussstück. Valve Öffnen Sie die Schraubkappe des Rückschlagventiles und Pressure Gauge verbinden Sie den Pumpenschlauch mit dem Ventil. -
Page 6: Ersetzen Eines Tpu-Luftschlauches
Der Austausch eines reparierten/neuen TPU Luftschlauchs Entleeren Sie die komplette Luft aus dem Luftschlauch. Hierzu schrauben Sie das gesamte Ventil aus dem Luftkanal, um die komplette Luft zu entleeren. Öffnen Sie beide Reißverschlüsse und tauschen/ reparieren Sie den TPU Luftschlauch. Setzen Sie den neuen bzw. -
Page 7: Undichte Ventile Und Wie Man Diese Repariert
UNDICHTE VENTILE UND DEREN REPARATUR Ermitteln Sie das undichte Ventil und lösen Sie es durch Drehen gegen den Uhrzeigersinn aus dem Gewinde. Hierbei entweicht ein Teil der Luft, bis das Ventil komplett gelöst und entfernt ist. Das verbleibende Ventil, welches sich noch im Schlauch befindet, riegelt nun sofort den Luftverlust ab. -
Page 8: Aufbauanleitung
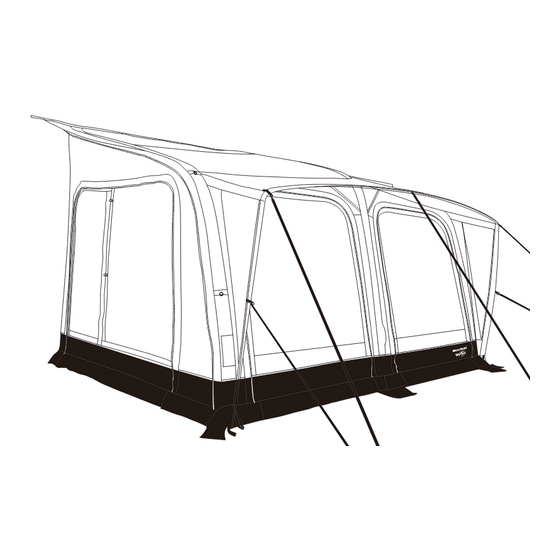
AUFBAUANLEITUNG Bei Bedarf schieben Sie die Windschürze in die dafür vorgesehene Kederschiene unten am Fahrzeug. Befestigen Sie dann die Radabdeckung in der vorgesehenen Halterung oder verbinden Sie diese mit der Windschürze mittels der mitgelieferten Doppelkederschiene. Für einen erleichterten Aufbau beim einkedern, empfehlen wir alle Wandelemente zu entfernen. - Page 9 AUFBAUANLEITUNG Andruckstangen...
- Page 10 AUFBAUANLEITUNG...
- Page 11 AUFBAUANLEITUNG Sturmbänder...
- Page 12 AUFBAUANLEITUNG (Optional) OPTIONAL OPTIONAL OPTIONAL OPTIONAL...
- Page 13 AUFBAUANLEITUNG (Optional) Optionales Sonnendach OPTIONAL Optionaler Dachhimmel OPTIONAL...
- Page 14 PFLEGEANLEITUNG Nähte Die Hauptnähte Ihres Zeltes sind gegen Undichtigkeit mittels Nahtbandes verschweißt. Die restlichen Nähte oder Beschädigungen an Nahtbändern bzw. undichte Nähte können mit Nahtdichter behandelt werden. Für Nahtdichter kontaktieren Sie bitte Ihren Fachhändler. UV-Strahlung Das Zelt ist nicht für den Dauereinsatz entwickelt. Durch permanente UV Bestrahlung, wird das Material geschwächt.
-
Page 15: Allgemeine Pflege- Und Bedienungshinweise
Westfield Outdoors GmbH Siemesdyk 60 47807 Krefeld Germany Die Zeichnungen in dieser Bedienungsanleitung dienen nur zu Anschauungszwecken. Das tatsächliche Produkt kann vom Aussehen von den Zeichnungen abweichen. Der Hersteller behält sich das Recht vor, Änderungen in den Spezifikationen und den Funktionen vorzunehmen, ohne diese vorher anzukündigen. - Page 16 WELCOME Thank you for purchasing this Westfield Outdoors awning. Please read these instructions for use fully and carefully before using your awning. Please observe the care and safety instructions. SUMMARY ASSEMBLY PARTS LIST GENERAL RECOMMENDATIONS AND USAGE THE AIR TUBES...
-
Page 17: Assembly Parts List
Model No. 12020393800000 ASSEMBLY PARTS LIST Draft Skirt & Pump & Safety Plastic spanner Steel pegs Carry Bag Wheel Cover Pressure Valve 1.Clean repair area thoroughly 2.Press patch fiemly over puncture 3.Do not inflate for four(4)hours to allow repair to set Storm Strap Elastic Ring Plastic Peg... -
Page 18: General Recommendations And Usage
GENERAL RECOMMENDATIONS AND USAGE We recommend the use of an additional groundsheet or covering to avoid any damage to your awning whilst fitting it to your caravan, motor home or vehicle. Please familiarize yourself with the awning before you go on your first trip. We recommend a test set-up before your trip. -
Page 19: Inflating/Deflating
INFLATING/DEFLATING Inflation The included pump is equipped with an over pressure valve. This Safety prevents you from overfilling the air tube. The ideal air pressure is Pressure 7 PSI (0.48 bar). To inflate your awning: Valve Pressure Gauge not kink the valve seals when screwing them together as this can lead to damaging the valve. -
Page 20: Replace A Tpu Air Tube
REPLACING A TPU AIR TUBE Replacing or Repairing an Air Tube Deflate the air tube fully. NEVER replace or repair a tube before deflating it fully. Break the plastic ties on the sleeve of the air tube and unzip the sleeve. Then remover the protective cover and air tube from inside the sleeve. -
Page 21: Leaking Vales And How To Fix Them
LEAKING VALVES AND HOW TO FIX THEM... -
Page 22: Pitching Instructions
PITCHING INSTRUCTIONS If required fit the draft skirt sliding it into the lower rail on the bottom of your caravan, motor home or vehicle. The wheel cover either slides into the rail on the wheel arch or uses the figure of eight tubing and connects to the top of the draft skirt. - Page 23 PITCHING INSTRUCTIONS Rear Pole Kit...
- Page 24 PITCHING INSTRUCTIONS the sleeve. place. Close the zip and then peg the Canopy in Correct Place. the canopy by locating the cutouts on the front sleeve. Then pushing the short canopy pole into place so it clips onto the front canopy pole and sits against the front air beam.
- Page 25 PITCHING INSTRUCTIONS Storm straps Storm straps...
- Page 26 PITCHING INSTRUCTIONS (OPTIONAL) OPTIONAL OPTIONAL OPTIONAL OPTIONAL...
- Page 27 Optional Canopy OPTIONAL OPTIONAL...
-
Page 28: General Care And Usage Instructions
GENERAL CARE AND USAGE INSTRUCTIONS Canvas Seams The main seams of this awning are taped to ensure water protection. These can become damaged over time but can be repaired and re-sealed by using seam sealer. For the best results, we recommend contacting your dealer to find out which products to use. UV degradation UV degradation causes the material to go brittle, fade or change color. - Page 29 Westfield Outdoors GmbH Siemesdyk 60 47807 Krefeld Germany Drawings in this manual are for illustration purposes only, actual product may vary. Manufacturer reserves the right to change any specification or features without prior notice. Should you have any questions about your product or experience any difficulties, please contact the retailer from which you purchased the product.
Need help?
Do you have a question about the Jupiter Series and is the answer not in the manual?
Questions and answers