Advertisement
Quick Links
Advertisement

Related Manuals for TouMei C800 Series


Summary of Contents for TouMei C800 Series
- Page 1 C800 series Smart Projector...
- Page 2 WARNING 1. Use this unit only for its intended use as described in this manual. 2. Unplug this unit during lightning storms or when unused for long periods of time. 3. The unit should be situated away from direct sunlight or heat sources such as radiators, electricheaters, heatregisters, stoves, or other units (including amplifiers) that produce heat.
- Page 3 IR sensor Projector Tripod Remote Quick Adapter user manual...
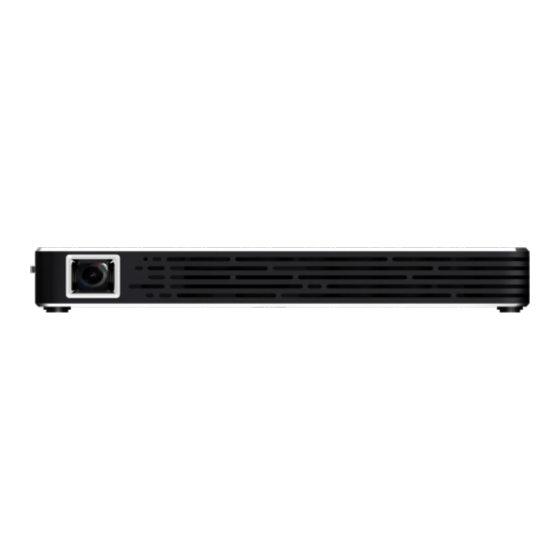
- Page 4 2A above 3.5mm audio port HD IN USB2.0 port Power button Reset port (press 3s) MicroSD card Speaker IR sensor Lens Focus wheel Air in Tripot adapter...
-
Page 5: Device Connection
DEVICE CONNECTION Laptop/PC HD cable DC IN Power button micro SD card USB flash drive Earphone/external speakers... - Page 6 Setting Power Mute Setting Switch Mouse Left Right Down Home Device setting Return Volume- Volume+ Setting Mouse (optional) helps control the smart projector conveniently. 1.Click the Left button to enter the menu. 2.Click the Right button to close the window.
-
Page 7: Powering On/Off
POWERING ON/OFF 1. Connect to power: Plug the DC adapter into the projector's DC IN (5V) power outlet. We present you a USB-4.1mm portable source charging cable to make you can use portable source to power supply.Remember the portable source must be 5V-2A outp- ut above. - Page 8 INTREFACE Access USB SD card operation 1.This machine has only one USB 2 interface because of the size limit.If you need to expand, you can extend the USB using HUB. 2.The built-in resource management software, when inserted into the external device, you can go to the explorer, open the U disk, or SD card content to play.
- Page 13 Tips:1.Long press the OK key to uninstall the selected APK. 2. In the main interface state, press the menu button, you can change the bac- kground picture.
- Page 14 SAME SCREEN AirPlay Mirroring and third-party same screen applications like HappyCast, WifiDisplay,etc. HappyCast, WifiDisplay and other APK can make your phone available to use wi fito connect with the projector. And with Airplay Mirroring, you can display your phone screen on your projector.
- Page 15 HappyCast HappyCast Operation Guide 1. Main menu > Mobile screen > HappyCast Or Main Menu > My Applications > HappyCast 2. You can download HappyCast and other APK by scanning the two-dimensional code with the mobile phone or visit the website. 3.
-
Page 16: Airplay Mirroring
Airplay Mirroring IOS system AirPlay mirror operation guide 1. Connect your IOS device and projector to a common Wi-Fi network. 2. Slide from bottom to top,open the “Control Center” on the IOS device. 3. Click the “AirPlay”. 4. Click the required name of the projection equipment, such as cast07, the common screen can be realized after 5 seconds. - Page 17 Airplay Mirroring Attentions: At present, only the following devices can support the AirPlay functions: iPhone5 and other above devices, iPad 2 and other above devices, iPod touch(5generations and above)devices.
- Page 18 Wifidisplay Android Mobile Phone Wireless Mirroring-Screen 1.Turn on wifi both your phone and projector,needn’t connect to the network . 2.Turn on Wifidisplay,and stay on this interface.
- Page 19 Wifidisplay 3. Open the "wireless sharing" or"multi screen interaction"function of the mobile phone (Android system phones are to many,the name of this function may different.) At this time on the phone will automatically search, and display the name of the projector equipment.
- Page 20 Click Home > Setting to find all the tools for customizing and configuring your device. Including: WLAN, Bluetooth, USB, display, storage, application, language and input method, backup and reset, date and time, and projector.
- Page 22 Connection of the HD high definition multimedia interface The first method: 1. Main menu > high definition import > HD icon > Click to enter 2. Connect the high definition multimedia HD line to the HD interface of the equi- pment.
- Page 23 Connect to the BT device BT is a kind of short-distance wireless technology. This equipment is the agreeme- nt of the BT single launch, the projector only can connect to the BT stereo equipm- ent, it can not realize the same screen function by connecting the mobile phone. 1.
- Page 24 Application Management You can browse and manage apps on your device. You can do things like stop, move storage, unmount, clear data and cache on the device. Display: You can select the brightness, font size, screen zoom and screen mode. 1.
- Page 25 USB: Connect your PC (Notebook) Storage: View storage capacity App: Check downloaded app information Language and input method: including the system language, keyboard, mouse 1. Keyboard: including Android keyboard, Google Pinyin input method and Japanese input method 2. Mouse: Adjusts the pointer speed Backup and Reset: Back up data and restore factory settings Date and time: Select the time and date and format About the Projector: System updates and legal information...
-
Page 26: Download Application
DOWNLOAD APPLICATION After the Wi-Fi is connected, you can log in Google play store by the network, and download your required APK applications. 1. Log in Google store by the account. 2. Select the TV version of APK is required, the projector is used by the platform of Android TV version, all the downloaded APK must be the TV version. - Page 27 View the device status,legal information and other informantion. You can also update your system with an updated package copied intothe USB flash disk.
- Page 28 THANK YOU FOR CHOOSING US The product provides year free warranty service. If you encounter any questions about the product during the using time,the first step is to contact the seller directly at the following email address to resolve your concerns.We will reply within 24 hours after receiving the email.
- Page 29 changes or modifications not expressly approved by the party responsible for compliance could void the user’s authority to operate the equipment. This device complies with Part 15 of the FCC Rules. Operation is subject to the following two conditions: (1) this device may not cause harmful interference, and (2) this device must accept any interference received, including interference that may cause undesired operation.
Need help?
Do you have a question about the C800 Series and is the answer not in the manual?
Questions and answers