Advertisement
Quick Links
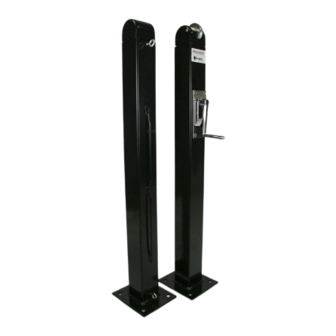
Douglas® Pickleball Premier™ SQ
Surface Mount
Set
Screw
NOTE:
Ensure pulley on
cap is facing away
from the court and
the net cable is
installed down the
side of the post
and into gears.
It should NOT be
installed down
through the cap.
Hardware is located inside the end of take up post and
Includes (1) removable chrome handle and (4) eyebolts.
POST INSTALLATION:
1. Use 1/2" Bolts (not included) to
secure posts to the court surface.
Posts should be square to the
playing surface 22' apart,
measured inside-to-inside.
2. Install hardware to post
3. Adjust set screw to tighten
tennis post caps.
4. Screw on the top and bottom
eyebolts to each post.
CARE & MAINTENANCE
During the off season, it is best to
winterize your court by removing
the tennis posts and storing them
indoors.
Cap
Take Up Post
POST & BOLT PLATE
7"
Pickleball Post Locations
22' apart, measured Inside-to-Inside
Existing Center Anchor
9/16"
3/4"
Plate: 6" x 7"
Holes: 9/16"
Hole Pattern: 4-1/2" x 5"
Install with 1/2" Bolts
(not Included)
6"
Item # 63080
Eyebolts
Dummy Post
1"
4-1/2"
(Post side with gears and lacing rods)
6"
36"
NOT TO SCALE
5"
7"
Advertisement

Related Manuals for Douglas Pickleball Premier SQ


Summary of Contents for Douglas Pickleball Premier SQ
- Page 1 Douglas® Pickleball Premier™ SQ Surface Mount Item # 63080 Screw NOTE: Eyebolts Ensure pulley on cap is facing away from the court and Pickleball Post Locations the net cable is 36” 22’ apart, measured Inside-to-Inside installed down the side of the post and into gears.
- Page 2 Douglas® Pickleball Premier™ SQ Item # 63080 Surface Mount to top eyebolt. Next, use the black cord and start by tying the 1. Stretch out the net across the court. top of the black cord to the top eyebolt, and proceed in lacing 2.
Need help?
Do you have a question about the Pickleball Premier SQ and is the answer not in the manual?
Questions and answers