
Related Manuals for Appotronics Business Series


Summary of Contents for Appotronics Business Series
-
Page 1: User Manual
Laser Projector - Business Series User Manual - Please read this manual carefully before using this equipment and keep it for future reference. - Please read "Important Safety Instructions" carefully before using this product. -
Page 2: Declaration
Proof of purchase date must be provided when you require the warranty service. If the product is found to be defective during the warranty period, the sole obligation of Appotronics Corporation and the exclusive remedy are to replace any defective parts (including labor service). When you find the product is defective, immediately notify the dealer to obtain the warranty service. -
Page 3: Table Of Contents
Contents Declaration ..........2 Video Device .........25 Connecting to the S-video Device ..25 Contents ........... 3 Connecting to the Composite Video Important Safety Instructions ....4 Device ...........25 General Safety Instructions ....4 Operation ..........26 Security Tips ........4 Powering On the Projector ....26 FCC Statement........4 Menus ..........26 Safety Precautions .......5... -
Page 4: Important Safety Instructions
Important Safety Instructions General Safety Instructions Please read this manual carefully before using this equipment and keep it for future reference. The device shall be installed, operated and maintained by a qualified professional authorized by the company. All warnings listed on this projector and listed in this manual should be observed. ... -
Page 5: Safety Precautions
Important Safety Instructions Terms: Maintenance personnel: Refer to the professional personnel who may use the training and skills to avoid possible harms to themselves or others when they are in the maintenance contact area or the device in the restricted contact area has obvious dangers. - Page 6 Important Safety Instructions Preventing personal injury To prevent personal injury and physical damage, refer to this manual and all the labels on the system before plugging the power plug into the electrical outlet, or commissioning the projector. To prevent injury, ensure that the lens and all covers are installed correctly. ...
- Page 7 Important Safety Instructions Preventing fire The design and manufacture of the projector conforms to the most stringent safety requirements. Putting the flammable material near the projector may cause the material to ignite itself, causing a fire. Once fire occurs, be sure to use sand, CO2 or dry powder fire extinguishers.
-
Page 8: Weee Directive
Important Safety Instructions WEEE Directive <Waste Electrical and Electronic Product Recycling Management Regulations> Send the product to the local qualified recycling units when it is discarded. <Waste battery> This product contains the battery. Send the product to the local qualified recycling units when it is discarded. -
Page 9: Overview
However, as the product continues to improve, the information in this document is subject to change without notice. Appotronics Corporation is not responsible for omissions or inaccurate information. The updated version of this document is issued on a regular basis as needed. Please contact Appotronics Corporation to obtain the latest version. -
Page 10: Projector Features
Overview Projector Features Thank you for purchasing Appotronics laser projector. This product adopts a displacement lens and Appotronics new-generation laser light source technology. High-efficiency light machine and long-lifetime laser light source make the projector display pictures in a highlighted manner throughout the lifetime. It uses advanced laser fluorescence display technology, which achieves a great breakthrough on color performance. -
Page 11: Packaging Overview
Overview Packaging Overview This product is delivered with all the items shown below. Check the packaging to ensure that the items are complete. If any items are missing, please contact the dealer immediately. Projector Power cable VGA cable User Manual CD-ROM Quick Start Guide Warranty card MENU... -
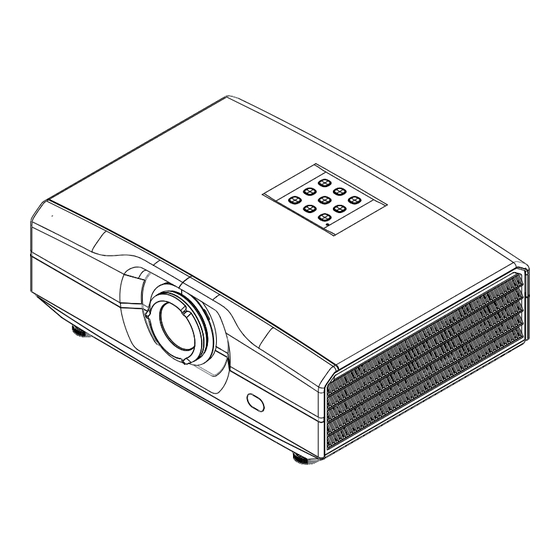
Page 12: Projector Appearance
Overview Projector Appearance Main unit ④ ① ② ⑤ ③ ⑥ ① Control panel ④ Input and output panel ② Projection lens ⑤ Adjustment feet ③ Power interface ⑥ Horn hole I/O panel ① ② ③ ④ ⑤ ⑥... - Page 13 Overview Control panel ② ③ ① ⑤ ④ ④ ⑦ ⑥ ② ① POWER button (power-on/off) Press the button to power on the device. In the power-on state, press the button twice to power off the device. ② Arrow keys ( Up, Down) When the user menu is displayed, you can press ...
-
Page 14: Remote Control
Overview Remote Control ① ② MENU ③ ⑫ EXIT SOURCE ④ ④ ⑤ ⑥ ⑬ ⑦ ⑭ INSTALLATION BLANK SCREEN ⑧ ⑧ KEYSTONE+ PICTURE MODE ASPECT RATIO KEYSTONE- ⑮ ⑨ ⑨ ⑯ VOLUME+ VOLUME- MUTE ⑩ ⑰ ⑪ SMART ECO LANGUAGE 1 POWER button In standby mode, if you press this key, the device is powered on;... - Page 15 Overview 4 ← ↑ ↓ → (arrow keys) You can use ↑ and ↓ to scroll up and down, ← to select from the left or decrease the value, and → to select from the right or increase the value. 5 OK button Press to select or confirm the current value or item.
-
Page 16: Replacing The Battery Of The Remote Control
Overview Replacing the Battery of the Remote Control To open the battery cover, turn the remote control with the back facing up, and pull the battery cover as indicated by the arrowhead in the figure to remove the battery cover. ... -
Page 17: Lens Shift
Overview Lens shift If the projector is not in the center of the screen, you can adjust the projected picture position by moving the lens shift lever within the lens shift range. 1. Rotate the lens shift lever (counterclockwise) in the direction indicated in the figure to release the lock. -
Page 18: Installation
Installation Projection mode The projector supports four projection modes. You can install the projector according to the installation position. Before changing the projection mode, shut down the projector, change the projection mode, and then start up the projector. The preset projection mode is set to table front. You can change the projection mode in Menu >... -
Page 19: Adjusting The Projected Picture
Installation Adjusting the Projected Picture Adjusting the protector position To determine the position where the projector is placed, consider the size and shape of the screen, the location of the power outlet, and the distance between the projector and other devices. The following are general principles: ... - Page 20 Installation Schematic diagram of vertical offset when the lens is centered The above table describes the vertical offset ranges (V1/V2) when the lens in different models. 100% Lens center 镜头中心 Projector screen Schematic diagram of horizontal offset when the lens is centered Lens center 镜头中心...
-
Page 21: Device Connection
Device Connection Before connecting the signal source to the projector, confirm the following: Disable all devices before any connection operation. Select the appropriate signal cable for each signal source. Ensure that the power cable is securely inserted. Connecting the Projector to the PC or Laptop Computer Connecting to the Audio or Video Device... -
Page 22: Connecting The Projector To The Computer Or Display
Device Connection Connecting the Projector to the Computer or Display Connecting the project to the computer The projector can be connected to a laptop computer or a desktop computer. If the projector needs to be connected to a computer in an earlier version, configure the corresponding adapter. Connect the projector to the laptop computer or desktop computer. -
Page 23: Connecting The Projector To The Video Source Device
Device Connection Connecting the Projector to the Video Source Device You can connect the projector to a variety of video signal source devices with the following ports: HDMI Component video S-video Video (composite video) You can connect the projector to the video signal source device using any of the preceding connection methods. -
Page 24: Connecting The Projector To The Audio Source
Device Connection Connecting the Projector to the Audio Source The projector has a mono speaker designed to provide basic audio features, with commercial data demonstrations. They are not dedicated to stereo audio reproduction and are intended for home cinemas. Any stereo audio input (if provided) is mixed through the projector speaker into a common mono audio output. -
Page 25: Video Device
Device Connection Connecting to the Component Video Device Check the video source device to determine whether it has an unused component video output port. If available, you can continue to use the program. If not, you need to reevaluate the methods that can be used to connect to the projector. -
Page 26: Operation
Operation Powering On the Projector Insert the power cable to the projector and the wall socket. Switch on the wall socket (if available). Check whether the power indicator on the projector is on red. Press the power button on the projector or remote control to power on the projector. After the projector is on, the indicator is steady on green. -
Page 27: Display
Operation DISPLAY DISPLAY DISPLAY ASPECT RATIO FILL KEYSTONE ADJUST >> PICTURE DIGITAL ZOOM H-POSITION V-POSITION SOURCE PHASE ADJUST CLOCK OVERSCAN SETUP ASPECT CROP AUTO KEYSTONE AUTO REVERSE ADVANCE ABOUT DISPLAY Function Attribute Value ASPECT RATIO FILL, 4:3, 16:9, NATIVE KEYSTONE ADJUST -40~40 DIGITAL ZOOM >>... -
Page 28: Picture
Operation PICTURE PICTURE DISPLAY PICTURE MODE BRIGHTNESS PICTURE CONTRAST TINT COLOR SOURCE SHARPNESS WARM COLOR TEMPERATURE GAMMA SETUP BRILLIANT COLOR >> 3D COLOR MANAGE ENHANCE CONTRAST ADVANCE ABOUT PICTURE Function Attribute Value PICTURE MODE STANDARD, CINEMA, DEMO, ECO, DICOM SIM, sRGB and CUSTOMER BRIGHTNESS 0~100 CONTRAST... -
Page 29: Source
Operation SOURCE SOURCE DISPLAY AUTO DETECT COLOR SPACE AUTOMATIC PICTURE TEST PATTERNS NONE BLANK SCREEN BLACK > RE-SYNC SOURCE SETUP ADVANCE ABOUT SOURCE Function Attribute Value AUTO DETECT ON/OFF COLOR SPACE AUTOMATIC, RGB, YPbPr, and YCbCr NONE, RGB RAMPS, COLOR BARS, STEP BARS, CHECKERBOARD, GRID, TEST PATTERNS HORIZONTAL LINES, VERTICAL LINES, DIAGONAL LINES, HORIZONTAL RAMP, VERTICAL RAMP... -
Page 30: Setup
Operation SETUP SETUP DISPLAY LANGUAGE VOLUME SMART ECO PICTURE LOGO >> SECURITY SOURCE KEYPAD LOCK HIGH LAND INSTALLATION TABLE REAR SETUP STANDBY MODE NOMAL > SYSTEM RESET FILTER TIME ADVANCE > FILTER TIME CLEAR ABOUT SETUP Function Attribute Value LANGUAGE >>... - Page 31 Operation LANGUAGE refers the language displayed on the menu. The projector supports English, French, German, Simplified Chinese, Traditional Chinese, Japanese, Korean. SMART ECO: When this function is enabled, the system automatically enters the power-saving mode if there is no input and operation in five consecutive minutes. In this mode, the current is about 80% of the normal mode, in order to achieve power-saving purposes;...
-
Page 32: Advance
Operation ADVANCE ADVANCE DISPLAY >> ETHERNET >> PICTURE BAUDRATE 9600 SOURCE SETUP ADVANCE ABOUT ADVANCE Function Attribute Value ETHERNET >> >> BAUDRATE 9600 ETHERNET SETTING IP ADDRESS SUBNET MASK GATEWAY MAC ADDRESS 00-00-00-00-00-00 DHCP 3D SETTING VSYNC_SEPARATED_HALF VSYNC_SEPARATED_FULL FORMAT VERT_PACKCD_HALF VERT_PACKCD_FULL HORIZ_PACKED_HALF HORIZ_PACKED_FULL... -
Page 33: About
Operation ABOUT ABOUT DISPLAY HDMI1 ACTIVE SOURCE INPUT RESOLUTION HOURS PICTURE ELAPSED TIME SOFTWARE VERSION SERIAL NUMBER SOURCE FILTER RUN TIME HOURS SETUP ADVANCE ABOUT ABOUT Function Attribute Value ACTIVE SOURCE >> INPUT RESOLUTION > ELAPSED TIME HOURS SOFTWARE VERSION SERIAL NUMBER APPO1234567 FILTER RUN TIME... -
Page 34: Serial Port
Serial Port Serial Port The serial port on the interface board of the projector complies with the RS-232 interface specifications. Therefore, you can control the projector through the personal computer connected to this port. (电脑) (激光投影机) (Computer) (Laser projector) RS-232 connection diagram Computer Projector *Pin 1 and pin 2 are not connected. -
Page 35: Reference Command List
Serial port Reference Command List Control Content Description Hexadecimal Control Code STARTUP 5A 00 00 00 03 00 00 00 01 00 00 00 00 00 00 5A SHUTDOWN 5A 00 00 00 03 00 00 00 00 00 00 00 00 00 00 5A HDMI 1 5A 00 00 00 04 00 00 00 01 00 00 00 00 00 00 5A HDMI 2... -
Page 36: Maintenance
Maintenance Projector Maintenance The projector needs to be maintained. You need to regularly clean the lens. You can power on the projector only after the surface water is dried if you clean the lens or enclosure. Do not disassemble any parts of the projector. To replace the parts, please contact the dealer. ... -
Page 37: Troubleshooting
Troubleshooting The projector fails to power on. Cause Solution Insert one end of the power cable to the AC port on the projector, and insert the The power cable other end to the electrical outlet. If the electrical outlet has a switch, ensure that supplies no power. -
Page 38: Indicator
Troubleshooting Indicator Light State and Indication Green Course light Power-off Standby mode Power-on state Blinking Protection state upon safety switch anomalies Blinking Protection state upon running anomalies System protection [Safety protection]: When the projector is powered on, safety protection is triggered when the top cover is opened, regardless of whether the projector Blinking is in the standby state or the power-on state. - Page 39 Appotronics USA, Inc. Address: 1607 McCarthy Blvd, Milpitas, CA 95035 Website: www.appotronicsusa.com P/N: D08000000048 Version: Rev01 Implemented corporate standards: Q/GF 001-2016...
Need help?
Do you have a question about the Business Series and is the answer not in the manual?
Questions and answers