Table of Contents
Advertisement
S
I
AFETY
NSTRUCTIONS
1.
Please read these safety instructions carefully.
2.
Please keep this User's Manual for your reference.
3.
Please disconnect the equipment from your AC outlet before cleaning.
Do not use liquid or sprayed detergent for cleaning.
Use moist sheet or cloth for cleaning.
4.
For pluggable equipment, the socket-outlet shall be installed near the equipment and
shall be easily accessible.
5.
Please keep this equipment away from humid areas.
6.
Install this equipment on a reliable surface. If the equipment is not on a reliable surface,
it may drop and cause injury.
7.
The openings on the enclosure are for air convection. Please protect the equipment from
overheating . DO NOT COVER THE OPENINGS.
8.
Make sure the voltage of the power source is appropriate when connecting the
equipment to the power outlet.
9.
Place the power cord where people will not step or trip on it. Do not place objects over
the power cord.
10. All Cautions and Warnings on the equipment should be noted.
11. If the equipment is not in use for several days, disconnect the equipment from the power
outlets to avoid damage by transient power surges.
12. Never pour any liquids into the openings, this could cause fire or electrical shock.
13. Never open the equipment. For safety reasons, the equipment should only be opened by
qualified service personnel.
14. If one of the following situations arises, get the equipment checked by a qualified
service personnel:
(a) The power cord or plug is damaged.
(b) Liquid has penetrated into the equipment.
(c) The equipment has been exposed to moisture.
(d) The equipment has not worked well or you can not get it to work according to the
user's manual.
(e) The equipment was dropped and damaged.
(f) If the equipment has obvious signs of damage.
15. DO NOT LEAVE THIS EQUIPMENT IN AN ENVIRONMENT UNCONDITIONED;
STORAGE TEMPERATURE ABOVE 60℃(140℉), IT MAY DAMAGE THE
EQUIPMENT. The sound pressure level at the operators position according to IEC704-
1:1982 is equal or less than 70dB(A)
16. DANGER: Invisible laser radiation when opened. Avoid direct exposure to beam.
Complies with FDA radiation performance standards,21 CFR, subchapter J.
Laser power: Wave Length: 783±3nm (CD); 658±3nm (DVD)
Emission power:0.7mW
Laser diode: class 3b
1
ENGLISH
Advertisement
Table of Contents

Subscribe to Our Youtube Channel
Related Manuals for LiteOn DX-20A4PU


Summary of Contents for LiteOn DX-20A4PU
- Page 1 ENGLISH AFETY NSTRUCTIONS Please read these safety instructions carefully. Please keep this User’s Manual for your reference. Please disconnect the equipment from your AC outlet before cleaning. Do not use liquid or sprayed detergent for cleaning. Use moist sheet or cloth for cleaning. For pluggable equipment, the socket-outlet shall be installed near the equipment and shall be easily accessible.
- Page 2 ENGLISH FCC C OMPLIANCE TATEMENT Note: This equipment has been tested and found to comply with the limits for a Class B digital device, pursuant to Part 15 of the FCC Rules. These limits are designed to provide reasonable protection against harmful interference in a residential installation.
- Page 3 ENGLISH RECAUTIONS !! Do not attempt to open the drive and service it. Removing the cover may cause exposure to harmful laser beams and electrical voltage. User is recommended to get service by returning the defective drive back to the original vendor where the drive was purchased.
-
Page 4: Table Of Contents
ENGLISH ABLE OF ONTENTS INTRODUCTION What the DVD Writer Does…………………………………………5 Format Compatibility…………………………………………………5 Recording Modes………………………………………………………6 What You Can Do with the DVD Writer……………………………7 System Configuration System Requirements…………………………………………………8 Features and Controls Front View……………………………………………………………9 Rear View…………………………………………………………10 INSTALLATION USB 2.0 Users …………………………... …….……………………………11 Connection …………………………………………………………………….12 Installing the Drive ……………………………………………………..13... -
Page 5: What The Dvd Writer Does
ENGLISH NTRODUCTION Thank you for purchasing this DVD Writer, a reliable, high-performance recordable DVD and CD writer, rewriter and player. Please read this manual carefully and keep it handy for easy reference. Use the manual for installation, operation and troubleshooting for this drive. What the DVD Writer Does The DVD Writer is a recordable DVD/CD-ReWritable drive that provides professional quality DVD and CD performance for writing, rewriting and reading. -
Page 6: Recording Modes
ENGLISH For DVD write function, this drive confirms to DVD+R Version 1.3 / DVD+R9 Version 1.0 (only for a Double Layer DVD+R writing support drive) / DVD-R9 Version 3.0 (only for a Dual Layer DVD-R writing support drive) / DVD+RW Version 1.3 / DVD-R Version 2.1 / and DVD-RW Version 1.2, DVD-RAM Version 2.2 (only for a DVD-RAM rewriting support drive) For read function, it is capable to read all of the following media: DVD single/dual layer (PTP, OTP), DVD-R, DVD+R, DVD+R9, DVD-R9, DVD-RW, DVD+RW, DVD-RAM (only for a... -
Page 7: What You Can Do With The Dvd Writer
ENGLISH What You Can Do with the DVD Writer Record digital video or slide shows onto DVD+R, DVD+RW, DVD-R, and DVD- RW discs. *A Double Layer DVD+R writing support drive will be able to write DVD+R9 disc. **A Dual Layer DVD-R writing support drive will be able to write DVD-R9 disc. Play DVD+R, DVD+RW, DVD-R, and DVD-RW discs. -
Page 8: System Configuration
ENGLISH YSTEM ONFIGURATION System Requirements for USB 1.1 This drive has a high-speed Universal Serial Bus (USB) 2.0 interface. You can also use it with USB version 1.1. To ensure stable read/write/rewrite performance, an IBM compatible PC system with the following features is recommended. Pentium 4 1.3GHz or higher with built-in USB 1.1 controller (some USB controllers or motherboards may not support all types of USB devices.) -
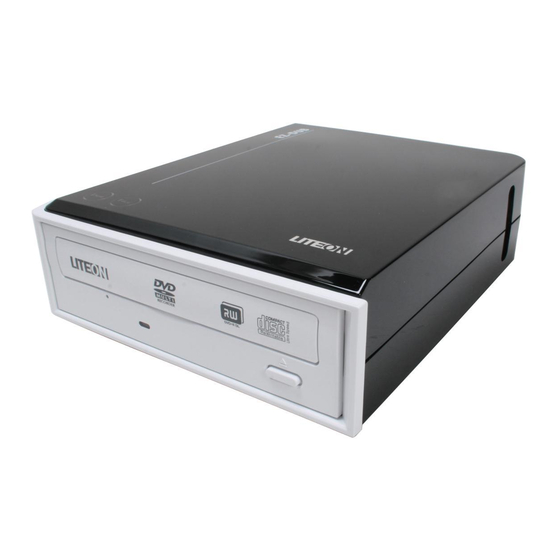
Page 9: Features And Controls
ENGLISH EATURES AND ONTROLS Front View Figure: Front view of DVD Writer Eject/Close Button Push button to eject/close the tray. Busy / Write LED Indication of drive's operation status. The light lit stands for Busy; the light blinking stands for Write/Rewrite. Emergency In case the Eject button isn’t working, insert a small stick or paper clip into this hole to eject the tray. -
Page 10: Rear View
ENGLISH Rear View Figure: Rear view of DVD Writer Five-pin connector for DC power input. Power Connector USB Connector Standard USB B type jack. Power Switch... -
Page 11: Usb 2.0 Users
ENGLISH 2.0 U SERS USB 2.0 is a very new technology. Therefore, most computers do not have native support for USB 2.0. You must install a USB 2.0 adapter card for your External drive to run at USB 2.0 speeds. If you do not have a USB 2.0 card installed, this drive will still work connected to a standard USB 1.1 connection, but the speed will be limited to USB 1.1 speed. -
Page 12: Connection
ENGLISH ONNECTION Connecting the Power Supply Cable. Connecting Hi-Speed USB 2.0 Cable. -
Page 13: Installing The Drive
ENGLISH NSTALLING THE RIVE Before you start, please make sure you have installed the proper software for Recording CDs, DVDs and Playing DVDs. The Recording software and the DVD Playback software are in different CD kits included in the package. Start your computer. -
Page 14: Operation
ENGLISH PERATION Installing Necessary Device Drivers In Windows, the DVD Writer acts as a “CD-ROM Drive” for purpose of installation and setup. In some cases, you will need to install additional software to make use of all the features of the DVD Writer. To use the DVD Writer on a computer: As a CD-ROM drive: Most Windows Operating Systems (Windows Vista, Windows XP, Windows 2000) supply a generic CD-ROM device driver that allows... -
Page 15: Recording Cds & Dvds
ENGLISH & DVD ECORDING Before you start, please make sure you have installed the proper software for Recording CDs, DVDs and Playing DVDs. The Recording software and the DVD Playback software are in different CD kits included in the package. About Software &... - Page 16 ENGLISH DVD+R CMC, MBI, Mitsubishi, Taiyo-Yuden, TDK, Sony(16X) Media: DVD+R9 Mitsubishi, Ricoh, Ritek Media: DVD+RW Infodisc, MBI, MCC, Philips, Prodisc, Ricoh, Ritek, Sony Media: CD-R: HP, CMC, MCC, MBI LightScribe Media DVD+R: HP, CMC, MCC, MBI NOTE: (1) ) Only when your drive supports Double Layer DVD+R writing can write DVD+R9 media;...
-
Page 17: Playing Cds & Dvds
ENGLISH & DVD LAYING Playback Software You must install the DVD playback software to your computer first. If you do not have any DVD playback software installed in your computer, the included DVD playback software in the CD kit will bring you the best playback result. You can immediately play Audio CDs and pre-recorded DVD discs, including movies and other DVDs. -
Page 18: Lightscribe User Guide
ENGLISH IGHT CRIBE UIDE The following LightScribe chapters are instruction for which support LightScribe disc labeling drive. Please refer to your drive’s original package to verify if your drive supports LightScribe disc labeling function. Figure: LightScribe Logos How to use LightScribe To label your CDs and DVDs with LightScribe, you need three components: Your LightScribe-enabled drive LightScribe labeling software (included with your drive;... -
Page 19: Creating And Burning Lightscribe-Labeled Discs
ENGLISH REATING AND BURNING IGHT CRIBE LABELED DISCS Start the LightScribe labeling software. Your labeling application may be part of your disc-burning software, or it may be a stand-alone application. Choose the appropriate LightScribe setting(s) for your design. Most LightScribe-enabled labeling applications require you to select the “LightScribe” option before designing your label. -
Page 20: Frequently Asked Questions About Lightscribe
ENGLISH REQUENTLY ASKED QUESTIONS Q: How does LightScribe work? A: The coating on a LightScribe disc changes color when it’s exposed to the CD/DVD drive’s laser. The process is similar to film exposure, except that the LightScribe surface reacts specifically to the intense light of the laser. Q: What happens if I try to use LightScribe to label a non-LightScribe disc? A: The software prevents you from sending a label image to a non-LightScribe disc. -
Page 21: Troubleshooting
ENGLISH ROUBLESHOOTING If you meet any trouble during installation or normal use of your drive, please refer to the following information. Read Problems Symptom Possible Causes Solutions No operation. No power. Check if the power cord is connected securely to the connector. USB cable isn't connected Ensure that the USB cable and connectors properly. -
Page 22: Write Problems
ENGLISH Write Problems Symptom Possible Causes Solutions Cannot write. Using other authoring Use the authoring software provided with software which does not the drive. When using other software, support your drive. ensure your drive is supported by contacting the software supplier. Disc inserted upside down. - Page 23 ENGLISH Symptom Possible Causes Solutions USB drive is not recognized Please refer to the USB 2.0 Users chapter by the Windows Operating and check if the USB driver is installed System. properly. Using other authoring Use the authoring software provided with software which does not your drive.
Need help?
Do you have a question about the DX-20A4PU and is the answer not in the manual?
Questions and answers