Table of Contents
Advertisement
FlightStab Guide
FlightStab Guide
WIP WIP WIP manual being revamped WIP WIP WIP
Open Flight Stabilizer (FlightStab)
updated 07/072013
rcgroups thread
http://www.rcgroups.com/forums/showthread.php?t=1794672
source code
https://github.com/noobee/FlightStab
build images
https://github.com/noobee/FlightStab/tree/master/Builds
Key Features
3-axis gyro-based stabilization.
WING mode mixing (single aileron and flaperons).
DELTA mode mixing.
VTAIL mode mixing.
throttle and flap channels pass through in CPPM.
gyro-based attitude hold.
configurable mixer limits to prevent servo binding.
stick-based configuration for options.
EEPROM storage for configurations (can be reset through jumpers on bootup)
LED flashes for status and errors.
RX calibration during startup to determine neutral stick positions.
IMU calibration during startup to remove sensor offsets.
AUX channel controls master gain linearly from 0% to 100%
AUX channel also controls RATE and HOLD modes
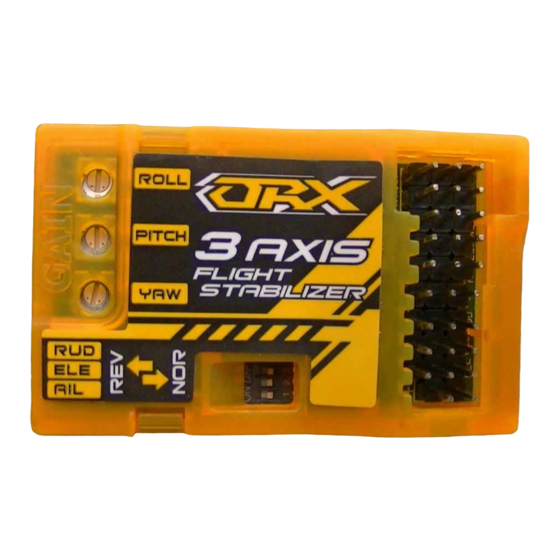
VRs on RX3S control axis gain and direction.
DIP switches on RX3S control the mix mode.
HOLD mode for attitude hold
stick-controlled rotation rate in HOLD mode, optional in RATE mode
inflight RX calibration to reset RX neutral values
PID parameters adjustable through program box
stick position controls gain, which prevents overcorrection or "fighting" commanded stick movement during
manoeuvres.
allows side mounting on flat fuselage foamies (by rolling 90° left or 90° right and then mounting to the
fuselage side)
optional AVRootloader to allow firmware update without usbasp ISP.
use pre-built firmware or build your own from the source code.
support the AQUASTAR or DLUX programming box
note that some features are currently only in the dev/beta image.
Supported Devices
RX3S V1
http://www.hobbyking.com/hobbyking/store/uh_viewitem.asp?idproduct=25448
RX3S V2 or V3 (they use the same firmware)
idproduct=28456
http://www.hobbyking.com/hobbyking/store/uh_viewitem.asp?idproduct=31586
NanoWii
ITG-320x, MPU-6050 sensors
Aquastar Programming Box
http://www.hobbyking.com/hobbyking/store/uh_viewitem.asp?idproduct=25492
https://docs.google.com/document/d/1Wu7kNyU2rjOpttHuphGEAHgbkrqj7dtaAC7H...
http://www.hobbyking.com/hobbyking/store/uh_viewitem.asp?
Page 1 of 16
10/07/2013
Advertisement
Table of Contents

Related Manuals for HobbyKing OrangeRX RX3S


Summary of Contents for HobbyKing OrangeRX RX3S
- Page 1 AQUASTAR or DLUX programming box note that some features are currently only in the dev/beta image. Supported Devices RX3S V1 http://www.hobbyking.com/hobbyking/store/uh_viewitem.asp?idproduct=25448 RX3S V2 or V3 (they use the same firmware) http://www.hobbyking.com/hobbyking/store/uh_viewitem.asp? idproduct=28456 http://www.hobbyking.com/hobbyking/store/uh_viewitem.asp?idproduct=31586...
- Page 2 FlightStab Guide Page 2 of 16 DLUX Programming Box http://www.hobbyking.com/hobbyking/store/uh_viewitem.asp?idproduct=17619 Flashing the Firmware (for non Arduino-based boards) use an USBasp programmer capable of operating at 3.3v (highly recommended) search ebay for “usbasp 3.3v”. ensure that it supports both 5v or 3.3v to the target.
- Page 3 FlightStab Guide Page 3 of 16 later) select Write from the menu bar then Flash. the program will write the updated firmware to the flash. sometimes it will fail to recognize the chip ID. try again 2-3 times and it would usually succeed. disconnect the ISP connector from the RX3S.
- Page 4 FlightStab Guide Page 4 of 16 Steps to flash the bootloader (note: for RX3S only): if flashing for the first time, follow earlier instructions to erase the chip and clear the lock bits. flash the hex file at .\FlightStab\AVRootloader\AVR\default\AVRootloader_AILR_OUT.hex update the EXTENDED FUSE setting from 0xF9 to 0xFC. This enables the atmega168pa to boot a 512-byte bootloader on reset.
- Page 5 FlightStab Guide Page 5 of 16 C:\users\<user>\My Documents\Arduino\Libraries\I2Cdev C:\users\<user>\My Documents\Arduino\Libraries\ITG3200 run Arduino.exe and select Board as `Arduino Pro or Pro Mini (5V, 16MHz) w/ ATmega 168` load `FlightStab.ino` uncomment `#define RX3S_V1` for RX3S V1 and check all other devices are commented out. verify/compile the program.
- Page 6 FlightStab Guide Page 6 of 16 Connecting the RX3S V1 with CPPM https://docs.google.com/drawings/d/1OSFdJhFkyxzuxppBQuRJt8MLZkH4-uPX9_TsbjsJbFA/pub?w=1036&h=1138 https://docs.google.com/document/d/1Wu7kNyU2rjOpttHuphGEAHgbkrqj7dtaAC7H... 10/07/2013...
- Page 7 FlightStab Guide Page 7 of 16 Connecting the RX3S V2 https://docs.google.com/document/d/1Wu7kNyU2rjOpttHuphGEAHgbkrqj7dtaAC7H... 10/07/2013...
- Page 8 FlightStab Guide Page 8 of 16 Connecting the RX3S V2 with CPPM https://docs.google.com/drawings/d/17n4bOpNZL-B_cwbcNCIPpM4CLkEAdrxoobJhFI5-300/pub?w=1086&h=1272 https://docs.google.com/document/d/1Wu7kNyU2rjOpttHuphGEAHgbkrqj7dtaAC7H... 10/07/2013...
- Page 9 FlightStab Guide Page 9 of 16 Connecting the NanoWii https://docs.google.com/drawings/d/10f_17nVnECrE8oCDNfB_Dw8DAffwjvNOaXWew73Y3qs/pub?w=739&h=637 https://docs.google.com/document/d/1Wu7kNyU2rjOpttHuphGEAHgbkrqj7dtaAC7H... 10/07/2013...
- Page 10 FlightStab Guide Page 10 of 16 Basic Instructions connect the device based on the connection diagrams. for RX3S, the DIP switches set the WING mode (single aileron, dual ailerons or flapperons, delta or vtail). for NanoWii, the stick configs will set WING mode. if you change any DIP switch settings, power cycle the device to enable the new setting to take effect.
- Page 11 FlightStab Guide Page 11 of 16 5 SHORT device init error (gyro) 20 VERY SHORT low SRAM 50 VERY SHORT EEPROM has reset, power cycle device now RX and IMU Calibration on Startup after powering up, the device will try to calibrate the RX input and IMU sensor simultaneously. during RX calibration, keep the AIL/ELE/RUD sticks in the neutral (centered) position.
- Page 12 FlightStab Guide Page 12 of 16 orientation, you can either roll the device 90 degrees to the left and mount it to the left side of the fuselage or 90 degrees to the right and mount it to the right side of the fuselage. in this way there is no need to rearrange all the RX and servo channel wires.
- Page 13 FlightStab Guide Page 13 of 16 To reset the EEPROM to default values, use a jumper to short the pin pairs for the device and then power up. Device Pin pair to apply jumper RX3S AIL_OUT and ELE_OUT NanoWii D6 and D5 (in the Motor Output group) On reboot, the device will clear the EEPROM and flash the LED rapidly in 3 sec bursts, which indicates that you can now power off the device and remove the jumper.
- Page 14 FlightStab Guide Page 14 of 16 Read the fuse settings. The following table shows the expected fuse values. The calibration value is not important (and should not be changed): Fuse Aquastar DLUX 0xAE 0xAE HIGH 0xCF 0xCF LOCK 0xFF 0xFC On the Aquastar, the LOCK fuses are NOT set (0xFF), so you can read and save the flash image at this time in case you want to restore the factory functionality.
- Page 15 FlightStab Guide Page 15 of 16 MIXER_EPA MODE limit servo correction output to 2 ail FULL * 1000-2000 us 1 ele NORM 1100-1900 us 2 ele TRACK never exceed RX input 3 ele CPPM_MODE allow combined PPM input from RX 3 ail NONE * no CPPM, use separate RX (PWM) channels...
- Page 16 FlightStab Guide Page 16 of 16 Erase Stats Erase 1/2/R Stats in EEPROM to 0/0/0 Pubblicato da Google Drive – Segnala una violazione – Aggiornato automaticamente ogni 5 minuti https://docs.google.com/document/d/1Wu7kNyU2rjOpttHuphGEAHgbkrqj7dtaAC7H... 10/07/2013...
Need help?
Do you have a question about the OrangeRX RX3S and is the answer not in the manual?
Questions and answers