Advertisement
Advertisement
Table of Contents

Related Manuals for TEFAL Uno xl


Summary of Contents for TEFAL Uno xl
- Page 1 Uno xl electronic Turnspit www.tefal.com...
-
Page 3: Before Use
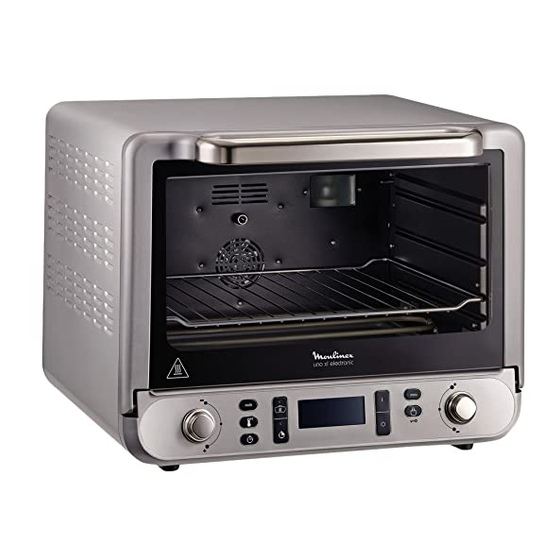
DESCRIPTION A Interior light F7e Time display B Non-stick walls F7f Temperature unit C Convection fan F7g Weight D Heating elements F8 Start cooking E Double glass door F9 Stop/change during cooking F Control panel F10 Automatic menu selection F1 Left rotating knob F11 Food weight selection/child safety F2 Manual mode selector F12 Right rotating knob... -
Page 4: Setting The Time
Slide-in crumb tray Slide the crumb tray into the oven above the lower element g.7. Leave the crumb tray in place while the appliance is in operation g.8. Do not touch the crumb tray during use or immediately afterwards. Always give it time to cool down g.9. - Page 5 First use while empty Before first use the oven must be operated while empty for 20 minutes to remove any possible manufacturing residue. The oven is now plugged in and the time has been set. Press « mode » - g.19. Select «...
-
Page 6: Automatic Mode
AUTOMATIC MODE Using the programmed menus The oven is plugged in and the time set. Press « menu » g.36. The menu and the cooking time will flash g.37. Select your menu using the right rotating knob g.38. Press « menu » again to validate g.39. - Page 7 Description of programmed menus* Weight Kg 0,5 0,6 0,7 0,8 0,9 1,0 1,1 1,2 1,3 1,4 1,5 1,6 1,7 1,8 1,9 2,0 2,1 2,2 2,3 2,4 2,5 Mode Shelf N° Program height T°C Selection Time in minutes Beef 0,5 - 24 27 30 33 37 40 43 46 49 52 54 57 60 62 65 67 70 72 75 77 79 rare 2,5 kg...
-
Page 8: Manual Mode
MANUAL MODE Description of manuals menus Natural convection (or conventional oven): Natural convection (or conventional oven): the heat is generated by the oven’s upper and lower elements. This traditional cooking mode is suitable for cooking meat, fish and puddings. Grill (upper element): the heat is generated by the oven’s upper element. This can be used for traditional grilling/barbecuing and also to brown dishes. - Page 9 The temperature will flash - g.52. Select the temperature using the left rotating knob - g.53. PLEASE NOTE: the temperature cannot be changed in defrost mode. Validate by pressing « temperature » - g.54. The cooking time will flash - g.55 set the time by turning the left rotating knob g.56, validate by pressing the clock button...
- Page 10 Using the turnspit function To install the turnspit, place the two turnspit frames on the rack g.65-66-67. Then place the tray on the rack g.68. Place string around the meat and poultry before skewering. Slide the skewers into the poultry g.69, then slide the two forks on to the skewers (with the points facing outwards)
- Page 11 Tableau de cuisson : mode manuel* Program Mode Level Preheat T °C Time 233°C 37 min Fruit cake 185°C 45 min Quiche 233°C 37 min Clafoutis 193°C 45 min 185°C 23 min Sponge cake 185°C 25 min Roast pork 193°C 1 h 20 min (1 kg) * The cooking chart is for information purposes only and is not to be taken as a reference.
-
Page 12: Delayed Start
DELAYED START The delayed start function allows you to program the start of cooking from 5 minutes to 24 hours later. WARNING! Do not confuse the delayed start button and the clock button The cooking mode, time and temperature have already been set using manual mode or the programmed menu mode (see appropriate chapters on programming). -
Page 13: General Remarks
The cooking parameters have been set. Press the « keep warm » button - g.85. The « keep warm » pictogram and the clock will flash - g.86. Set the required time for keeping the oven warm using the left rotating knob - g.87. -
Page 14: Troubleshooting Guide
TROUBLESHOOTING GUIDE ERROR CODE CAUSES SOLUTIONS Consult an After-Sales ERR1 Faulty temperature probe Service Centre. Consult an After-Sales ERR2 Electrical problem Service Centre. Temperature regulation Consult an After-Sales ERR3, ERR4 problem Service Centre. CLEANING AND CARE Do not allow grease to build up on the appliance. Before any maintenance, cleaning or storage unplug the appliance and allow it to cool down g.94-95. -
Page 15: What Not To Do
WHAT NOT TO DO NOTES ______________________________________________________________________________ ______________________________________________________________________________ ______________________________________________________________________________ ______________________________________________________________________________ ______________________________________________________________________________ ______________________________________________________________________________ ______________________________________________________________________________ ______________________________________________________________________________ ______________________________________________________________________________ ______________________________________________________________________________ ______________________________________________________________________________ ______________________________________________________________________________ ______________________________________________________________________________...
Need help?
Do you have a question about the Uno xl and is the answer not in the manual?
Questions and answers