Advertisement
Table of Contents
Advertisement
Table of Contents

Summary of Contents for Shenzhen Pulansi Technology XM 1200
- Page 1 User Manual Model No.: 1200 MPPT Solar 2400 MPPT Solar 800W/ 1500W V. 1.0...
-
Page 2: Table Of Contents
Table of Contents 1. Introduction ..............................1 2. Important Safety Warning (SAVE THESE INSTRUCTIONS) ..............2 3. Product Overview ............................3 4. Installation ..............................3 5. Operation ..............................6 6. Trouble Shooting ............................12 7. Specifications ............................. 13... -
Page 3: Introduction
1. Introduction Thank you for purchasing the solar inverter. This simple solar inverter is designed to power your home appliances or precious 3C electronics. It also can handle motor-type loads with high surge power such as vacuums, small freezers, or drills. With built-in solar charger, it can convert solar power to battery power and provide continuous power to connected equipment during night time. -
Page 4: Important Safety Warning (Save These Instructions)
2. Important Safety Warning (SAVE THESE INSTRUCTIONS) Before using the inverter, please read all instructions and cautionary markings on the unit, this manual and the batteries. Conventions used: WARNING! Warnings identify conditions or practices that could result in personal injury; CAUTION! Caution identify conditions or practices that could result in damaged to the unit or other equipment connected. -
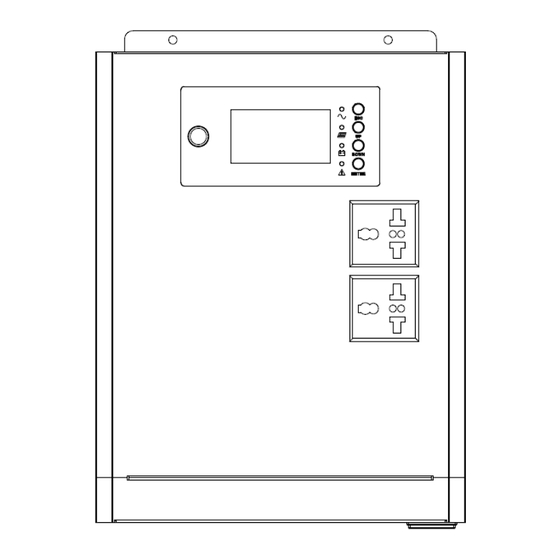
Page 5: Product Overview
3. Product Overview Power switch Status indicators (please see the Operation section for the details) LCD display Output receptacles AC input Input AC fuse External battery connector Solar panel connector 4. Installation NOTE: Before installation, please inspect the unit. Be sure that nothing inside the package is damaged. Mounting the unit The unit ONLY can be mounted vertically to a wall surface. - Page 6 1) Single battery connection (Refer to Fig. 2): When using a single battery, its voltage must be equal to the Nominal DC Voltage of the unit (see below Table 1). Table 1 Model Nominal Battery DC Voltage XM 1200 12 VDC XM 2400 24 VDC Fig. 2 2) Multiple batteries in series connection(Refer to Fig.
- Page 7 PV Module Selection: When selecting proper PV modules, please be sure to consider below requirements first: 1. Open circuit Voltage (Voc) of PV modules not exceeds max. PV array open circuit voltage of inverter. INVERTER MODEL XM1200 XM2400 Charging Current (MPPT) 40Amp MPPT rated power 500W...
-
Page 8: Operation
5. Operation Power On/Off Once the inverter has been properly installed, press the power switch to turn on the unit. The unit will work automatically in line mode or inverter mode according to input utility power's status. When press the power switch again, the unit will be turned off. - Page 9 In AC mode, it will present battery charging status. Status Battery voltage LCD Display < 11Vdc/pcs 4 bars will flash in turns. Bottom bar will be on and the other three 11Vdc ~ 11.5Vdc/pcs Constant bars will flash in turns. Current mode / Bottom two bars will be on and the other Constant...
- Page 10 If “User-Defined” is selected, battery charge voltage and low DC cut-off voltage can be set up in program 05, 06 and 07. XM 1200 default setting: 14.1V XM 2400 default setting: 28.2V Bulk charging voltage (C.V voltage) If self-defined is selected in program 04, this program can be set up.
-
Page 11: Display Setting
XM 2400 default setting: 19.8V Low DC cut-off voltage Setting range is from 9.9V to 12.0V for XM 1200 model and 19.8V to 24.0V for XM 2400 model. Increment of each click is 0.1V. Low DC cut-off voltage will be fixed to setting value no matter what percentage of load is connected. - Page 12 When connected load is lower than 1kVA, load in VA will present xxxVA like below chart. Input frequency=50Hz Input frequency Load in VA When load is larger than 1kVA (≧1KVA), load in VA will present x.xkVA like below chart. When load is lower than 1kW, load in W will present xxxW like below chart.
-
Page 13: Operating Mode Description
Operating Mode Description Operation mode Description LCD display Charging by utility. Standby mode Utility input bypass to Note: output, charger *Standby mode: The inverter is available, LCD backlight not turned on yet but at this is off time, the inverter can charge Charging by PV energy. -
Page 14: Trouble Shooting
6. Trouble Shooting Use the table below to solve minor problems. Problem LCD/LED/Buzzer Explanation / Possible cause What to do Charge the unit at least 8 Battery voltage is too low. When power fails, hours. Battery low alarm the backup time is Battery capacity is not full even Check the date code of the issue quickly. -
Page 15: Specifications
7. Specifications MODEL XM 1200 XM 2400 CAPACITY 800 W 1500 W INPUT Voltage 230 VAC Voltage Range 170-280 VAC (UPS mode) 90-280 VAC (INV. Mode) OUTPUT Voltage Regulation (Batt. Mode) +/-10% Transfer Time 20 ms typical Waveform Simulated Sine Wave...
Need help?
Do you have a question about the XM 1200 and is the answer not in the manual?
Questions and answers