Table of Contents
Advertisement
Advertisement
Table of Contents

Related Manuals for birddog PTZ KEYBOARD


Summary of Contents for birddog PTZ KEYBOARD
- Page 1 USER MANUAL...
- Page 2 Contents IMPORTANT INFORMATION ................................4 WHAT’S IN THE BOX ..................................5 Overview ......................................5 Features ......................................5 Camera Diagrams ....................................6 Remote Controller ....................................7 System Configuration ..................................8 Obtain Video Signal ...................................8 Audio IN / OUT ....................................9 Camera Control Methods and System Configurations ........................9 Use the Infrared Remote Controller ..............................9 Use RS-232 (VISCA) ....................................9 Use RS-422(VISCA) / RS485 (PELCO P/D) ............................
-
Page 3: Operating Instructions
Before operating the unit, please read this manual thoroughly and retain it for future reference. Copyright Copyright 2019 BirdDog Australia all rights reserved. No part of this manual may be copied, reproduced, translated, or distrib- uted in any form or by any means without prior consent in writing from our company. -
Page 4: Important Information
IMPORTANT INFORMATION • Do not aim the camera lens at the strong light such as sun or incandescent lamp. The strong light can cause fatal Legal Notice damage to the camera. Attention: Maintenance Precautions: To ensure account security, please change the password af- ter your first login. - Page 5 Up to 6 selectable ASSIGN function key, additional func- tions can be assigned to ASSIGN buttons. • Multi-color Key/Button illumination indicator. • Full compatibility is provided with all BirdDog PTZ cam- eras and Sony BRC, SRG series PTZ cameras and most...
- Page 6 Home Screen PTZ cameras in the market that support RS232/RS422/ RS485/IP control. • Control firmware upgrade is available via USB to keep the performance of the controller up to date. CAM: 1 ONVIF 9600 Title: • * Available via firmware upgrade. 192.168.0.1.3 L/R: OFF U/D: OFF...
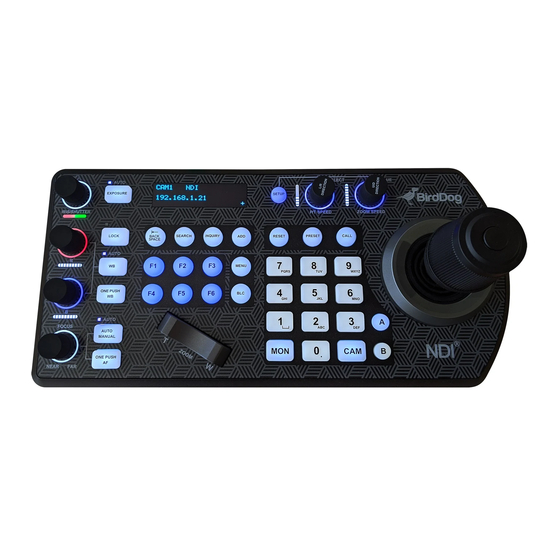
- Page 7 Keyboard White Balance, (Auto, Manual) 15. Manual Focus • Press once for Auto • Press again to activate manual adjustments 16. One-Push Focus Lock – locks all image adjustment buttons and dials 17. Focus Auto/ Manual Toggle Exposure, (Auto, Iris PRI, Shutter PRI) 18.
-
Page 8: System Overview
Junction Box RJ45 port for connection between Junction Box and The Keyboard Controller 12V DC Power Port Connect the supplied DC power adaptor and cord Junction Box body Terminal Contact connection for RS422 or RS232 RJ45 port for connection between Junction Box and the camera. - Page 9 Cross Protocol Mix Control Cross Protocol Mix-control and Power Over Control. 12V DC Power Supply RS422 Camera(s) - A Ethernet Cables RS422 Camera(s) - B Serial Control Cables IP Cameras (ONVIF / VISCA over IP) Power Supply via Junction Box / PoE RS232 Camera(s) 12V DC Power Supply When the junction box is powered, it will provide power to...
- Page 10 Connection 12V DC Power Adaptor The controller supports serial RS232/RS422 and IP Cross pro- tocol mix-control. It allows you to use RS232/RS422/IP con- Connect to camera trol on one controller to control cameras (Protocol support: VISCA, PELCO D/P, ONVIF, VISCA over IP, CGI*) in a single system.
- Page 11 Connector Pinout Definition DC 12V TALLY/CONTACT RS232 B-RS422-A USB 2.0 FOR FIRM WARE UPGRADE ONL Y TALLY/CONTACT RS232 RS422 (A/B) Pin No. Function Pin No. Function Color Pin No. Function Color Pin No. Function Color CAMERA1 Orange/White Orange/White Orange/White CAMERA2 Orange Orange Orange...
- Page 12 IP port to network switch RS232 • Used for logging in to web interface of PTZ Keyboard • Used to control the following PTZ protocols: VISCA over IP and ONVIF IP...
- Page 13 MIni Din RS232 serial connector. connector adaptor (not included). RS422 connection Use for the controller with Non-BirdDog camera connection. For BirdDog camera connection see the separate section fol- lowing. RS232 Daisy Chain Multiple Camera connection: Follow the diagram below for the following options:...
- Page 14 Use Junction Box, 1 to 1 connection - Follow the pinout RS422 Daisy Chain Multiple Cameras connection for the RS422 port on the keyboard and Junction Box to use CAT5/6 cable (follow T-568B standar pinout between RS422 Daisy Chain Connection - Via Junction Box - Cam- keyboard and Junction Box) to make a cable sutable for era with RS422 Serial Port controlling your camera via Junction Box.
- Page 15 RS485 serial connector RS485 connection RS422 (A/B) Toggle Use for the controller with Non-BirdDog camera connection. BirdDog camera connection see the separate section following. RS422 Follow the diagram below for the following options: RS485 Connection using network cable (follow T-568B...
- Page 16 RS485 Daisy Chain Multiple Cameras connection RS485 Daisy Chain connection using RJ45 to Phoenix connector adaptor (Not included) RS485 Daisy Chain Connection - Via Junction Box - Cam- era with RS485 Serial Port. RS485 Daisy Chain Connection - Via RJ45 to RS422 Adap- tor - Camera with RS485 Serial Port.
- Page 17 IP Control Cross-Protocol Mix Control Use ONVIF IP Control: Using VISCA, PELCO, VISCA OVER IP, ONVIF IP Control Pro- tocol in one single system. IP Connection - Using ONVIF IP Control Protocol - with IP Streaming Camera. Use VISCA OVER IP Control: IP Connection - Using VISCA OVER IP Control Protocol - with Visca Over IP ready Camera.
- Page 18 Tally Light GPI I/O connection Keyboard Configuration GPI connection with RS422 VISCA control Interacting with the BirdDog PTZ Keyboard connection Setup: Tally Light GPI Connection P/T Speed Dial: • Rotate: Move Cursor • Click: Select • Long Press: Invert L/R (pan axis)
- Page 19 IP Setup Button Light The IP address can be set to either STATIC or DHCP. The Button Light value affects the brightness of the button backlight. MAIN SETUP MENU KBD SETTING MENU • Rotate the Zoom Speed dial to adjust the value. CAMERA SETTING IP CONFIGURATION KEYBOARD SETTING...
-
Page 20: Factory Default
Tally - GPI I/O Mute – Mute the audio from the selected camera • Picture Freeze – Freeze the image of the selected GPI I/O Menu is used to configure the Tally settings • camera Picture Flip – Flip the image of the selected camera KBD SETTING MENU TALLY SETTING MENU •... - Page 21 Password Setting TION button lights up for about 1 second.) The selected CAMERA button will flash in red and yellow alternately. • Old Password: Enter the current password. • If two or more numbers are received from the • New Password: Enter the password you would like to set. TALLY/ CONTACT connector, CAMERA buttons which are not selected will light in red.
- Page 22 Model Info Adding an ONVIF camera to Keyboard The Model info screen contains the current IP address and Adding manually from Local Area Network (LAN) Firmware Version of the unit. Selecting ONVIF as the protocol and clicking the P/T Speed KBD SETTING MENU MODEL INFO MENU dial will cause the ONVIF Camera Setup menu to appear.
- Page 23 LAN Address: 192.168.0.1 LAN Address: 192.168.0.1 Port-forward port: 80 (default) Port-forward port: 80 (default) Repeat this process for each discovered camera that you wish to add to the PTZ Keyboard. IP Address: 192.168.0.13 ONVIF CAMERA SET UP MENU IP Address: XXX.XXX.XXX.XXX Subnet Mask: 255.255.255.0...
- Page 24 PROTOCOL: VISCAIP EXIT EXIT Repeat this process for each discovered camera that you wish to add to the PTZ Keyboard. Adding VISCA over IP cameras to be controlled • Rotate the P/T Speed dial to move the cursor between via WAN the IP address octets.
- Page 25 • Contact the network administrator at the Keyboard loca- Select a protocol tion to create a port-forwarding rule in the router allow- ing commands to flow through the necessary ports using Scroll through the list using the Zoom Speed dial these values: Move the cursor to “Call”, and click the P/T Speed •...
- Page 26 • response to commands from the keyboard Resetting / Clearing presets: • The Zoom Seesaw can be engaged to zoom in / Zoom PRESS Enter the number of the preset you would like to clear Press the Reset button Adjusting image parameters Setting and calling presets The following image parameters can be set/adjusted by us- ing the Image Adjustment Panel...
- Page 27 Load a flash drive with the “.bin” firmware file in the root directory (not inside of a folder), and place the flash drive into the USB port on the back panel of the PTZ Keyboard • Hold down the L/R Direction knob and the U/D Direction Knob •...
- Page 28 WELCOME TO THE FUTURE. bird-dog.tv hello@bi rd-dog.tv...
Need help?
Do you have a question about the PTZ KEYBOARD and is the answer not in the manual?
Questions and answers