Advertisement
Quick Links
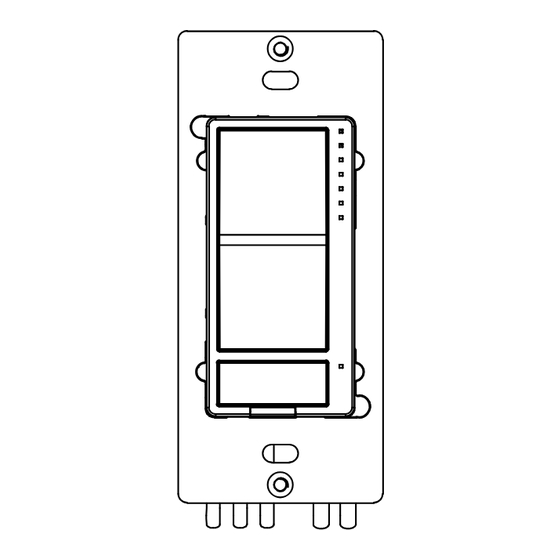
USER MANUAL
DOUBLE SWITCH
ZEN30
FIRMWARE VERSION 1.03
FEATURES
Manual or Z-Wave control of 2 separate loads (dimmer + relay)
Ÿ
Perfect replacement for a fan / light combo (neutral wire required)
Ÿ
Scene control for multi-tap scenarios on select hubs
Ÿ
Quick and easy pigtail wire installation (single pole only)
Ÿ
4-color LED indicator and air-gap switch for added safety
Ÿ
Packed with advanced dimming features including ramp rate control,
Ÿ
custom on brightness level, and double tap to full brightness
Remembers and restores on/off status a er power failure
Ÿ
Built-in Z-Wave Plus signal repeater to extend network range
Ÿ
S2 security protocol and 500 Z-Wave chip
Ÿ
SPECIFICATIONS
Model Number: ZEN30
Ÿ
Z-Wave Signal Frequency: 908.42 MHz
Ÿ
Power: 120 VAC, 60 Hz
Ÿ
Dimmer Max Load: 75 W LED, 250 W incandescent; DON'T use with
Ÿ
tube lights, DC powered fixtures, or chandeliers
Relay Max Load: 15 A (1/2 HP)
Ÿ
Operating Temperature: 32-104° F (0-40° C)
Ÿ
Installation and Use: Indoor only
Ÿ
CAUTION
This is an electrical device - please use caution when installing and
operating the switch. Remote control of appliances may result in
unintentional or automated activation of power.
Do not use this Z-Wave device to control electric heaters or other
appliances which produce the risk of fire, burns, or electrical shock when
unattended.
To reduce risk of overheating and possible damage to other equipment,
do not install the dimmer part to control a receptacle; a motor-operated
appliance; a fluorescent lighting fixture; or a transformer-supplied fixture.
BEFORE YOU INSTALL
This switch is intended for installation in accordance with the
National Electric Code and local regulations. It is recommended
that a licensed electrician perform this installation.
WIRING: READ IT!
1. CHECK THE LOAD: Lights only for dimmer (75W for LED's, 250W for
incandescent), 15 A resistive load / 1/2 HP motor for relay
2. POWER OFF: Turn the circuit power off in the breaker panel before
you start. If installing in a multi-switch box with multiple circuits, turn
power off at all of the circuits.
3. CHECK THE WIRES: Mark load 1 (most o en black), load 2 (most
o en black), line (most o en black), neutral (most o en white), and
ground (most o en bare). 14 AWG wires only! Don't rely exclusively on
color code or your multimeter to identify the wires!
NOT SURE WHAT YOU'RE SEEING?
WE'LL HELP: SUPPORT.GETZOOZ.COM
4. REMOVE THE OLD SWITCH: Disconnect the wires and label them.
5. CONNECT THE Z-WAVE SWITCH: Use electrical pliers and the
included wire nuts to connect pigtail wires with line, load, and neutral
EXACTLY like in the appropriate diagram. Always connect ground!
WIRING TIPS
µ
TAKE PICTURES
Before you disconnect any wires, document your set-up and send us
images of your existing installation so we can help if needed.
@
GATHER YOUR TOOLS
Use appropriate electrical tools when cutting, prepping, and stripping
electrical wires. If you don't have the necessary tools to perform the
installation or are not sure which tools to use or how, please hire an
electrician to complete the installation for you.
~
SAFETY FIRST
Follow the National Electrical Code and your local safety regulations
when performing the installation, including (but not limited to), separa-
ting low voltage and high voltage wires, grounding the switches, and
capping any unused or exposed wires.
PAGE 1
USE THIS DIAGRAM FOR BATHROOM EXHAUST FAN /
LIGHT, CEILING FAN / LIGHT, OR VENTILATION FANS
ALWAYS CONNECT GROUND
www.getzooz.com
ask@getzooz.com
ALWAYS CONNECT GROUND
ALWAYS CONNECT GROUND
Ground
ZOOZ ZEN30
POWER SOURCE
Ground
ZOOZ ZEN30
POWER SOURCE
REMOTE CONTROL & SCENES
18 scenes available for custom
multi-tap scenarios. Even if your
Ground
hub doesn't support scenes,
create simple "if... then..."
ZOOZ ZEN30
rules for single taps on
each button!
POWER SOURCE
PAGE 2
ZOOZ ZEN30 FAN/LIGHT WIRING DIAGRAM
1. POWER OFF:
Cut power to circuits for all switches in the box.
2. PREP WIRES:
Strip at 1/2"-5/8" and straighten.
3. CONNECT:
Use electrical pliers to splice wires and wire nuts to
cap them. Add electrical tape if needed. Don't leave
bare wires out.
4. ARRANGE:
Carefully arrange wires in the box to make room for
NEUTRAL
the switch.
FAN LIGHT
5. COMPLETE:
FAN MOTOR
Screw the switch to the electrical box and install the
wall plate. Restore power and test the switch.
NEED HELP? Don't experiment!
ask@getzooz.com / www.support.getzooz.com
STOP!
Wire colors and romex layout are for illustration
only. You should not follow the colors and
positioning in the illustration blindly. Always
identify all wires prior to installing Zooz switches
and make sure you can match the diagrams to
your set-up exactly. Don't experiment or attempt a
"trial-and-error" installation for your own safety.
ZOOZ ZEN30 2 LOAD WIRING DIAGRAM
1. POWER OFF:
Cut power to circuits for all switches in the
box.
2. PREP WIRES:
Strip at 1/2"-5/8" and straighten.
3. CONNECT:
Use electrical pliers to splice wires and wire
nuts to cap them. Add electrical tape if
DIMMER LIGHT
RELAY LIGHT
needed. Don't leave bare wires out.
(BRIGHTNESS
(ON/OFF CONTROL)
4. ARRANGE:
CONTROL)
Carefully arrange wires in the box to make
room for the switch.
5. COMPLETE:
Screw the switch to the electrical box and
install the wall plate. Restore power and test
the switch.
RELAY CONTACT 2:
Unless you're using the relay part of the Double Switch in a dry
contact installation, always connect the blue Relay Contact 2
pigtail to the power source (line). Ask us about dry contact
applications if you're not sure what we mean!
WHAT ABOUT 3-WAY?
THE DOUBLE SWITCH IS SINGLE POLE ONLY BUT:
You can easily create a virtual 3-way or 4-way using the Double
Switch and any other Zooz Z-Wave switch/dimmer. The benefits
include the ability to dim and trigger scenes from all locations.
Get in touch for detailed wiring and programming instructions!
ZOOZ ZEN30 NO LOAD WIRING DIAGRAM
1. POWER OFF:
Cut power to circuits for all switches in the box.
2. PREP WIRES:
Strip at 1/2"-5/8" and straighten.
3. CONNECT:
Use electrical pliers to splice wires and wire nuts to cap them.
Add electrical tape if needed. Don't leave bare wires out.
4. ARRANGE:
Carefully arrange wires in the box to make room for the
switch.
5. COMPLETE:
Screw the switch to the electrical box and install the wall
plate. Restore power and test the switch.
USE WITH SMART BULBS!
DON'T CONNECT the switch directly to your smart bulb.
Ask us for custom wiring and programming instructions
for on/off and brightness control of your smart bulb!
DON'T SEE YOUR SET-UP?
Request custom instructions:
ask@getzooz.com
WHAT IS THIS?
Advertisement

Related Manuals for ZooZ ZEN30


Summary of Contents for ZooZ ZEN30
-
Page 1: Before You Install
You can easily create a virtual 3-way or 4-way using the Double 1. CHECK THE LOAD: Lights only for dimmer (75W for LED’s, 250W for Switch and any other Zooz Z-Wave switch/dimmer. The benefits incandescent), 15 A resistive load / 1/2 HP motor for relay include the ability to dim and trigger scenes from all locations. - Page 2 Ensure the device is never close to any heat source or open flame to prevent fire. Ÿ IN NO EVENT SHALL ZOOZ OR ITS SUBSIDIARIES AND AFFILIATES BE LIABLE FOR ANY INDIRECT, INCIDENTAL, PUNITIVE, SPECIAL, OR Ensure the device is connected to an electric power source that does not exceed the Ÿ...
Need help?
Do you have a question about the ZEN30 and is the answer not in the manual?
Questions and answers