Table of Contents

Related Manuals for Artika For Living Atlantis

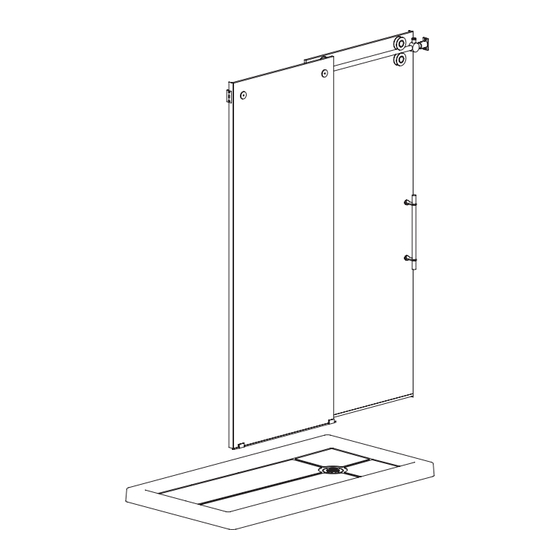
Summary of Contents for Artika For Living Atlantis
- Page 1 Installation Manual 2 people are required for the installation. This shower absolutely needs 3 walls surrounding it. The rail wall brackets screws must be installed in wall studs to support the weight of the doors. rev. 6-3-2013...
- Page 2 Installation Manual Dimensions 208 cm (81.8 in/po) 152.4 cm 81.3 cm (60 in/po) (32 in/po) IMPORTANT NOTE The glass door can be installed on the left or right side. Artika recommends installing the glass door adjacent to the shower faucet wall. This instruction manual is showing a right side installation.
-
Page 3: You Will Need
Installation Manual You will need Hardware list (included) - Screwdrivers - 3 Allen keys - 2 regular screws - Drill - 4 wall screws - Drill bits 1/4 in. & 1/8 in. - 14 Self-drilling 1 inch screws (speci c drill bit may be required for ceramic tiles) - 14 Self-drilling 1,25 inch screws - Silicone - Tape measure... - Page 4 Installation Manual Instructions The Atlantis shower enclosure is designed to replace a standard 60 by 32 inch (152.4 x 81.3 cm) tub. The shower enclosure needs to be encased by 3 surrounding walls. The shower base can be positioned with the drain on the right or left side.
- Page 5 Installation Manual 3- Install the tiling flange Determine the 60 inch (152.4 cm) side of the shower base that will installed next to the 60 inch wall. This is the side where you will install the long tiling ange. Start with the long tiling ange. The side with the groove in the middle of the ange will face down on the top of the threshold of the Top part...
-
Page 6: Install The Drain
Installation Manual 4. Install the drain Disassemble the drain. Remove the stainless cap, tightening tool, adaptor ring, rubber ring, large nut, cardboard gasket and rubber gasket. Apply a bead of silicone underneath the drain body and the drain hole on the underside of the drain body and the edge of the drain hole in the shower base. - Page 7 Installation Manual 5. Verify the fit of the base Ensure the base ts properly and the shower base drain hole is centered over the drain hole in the oor. 6. Verify that the base is level If your base is not level, there are 3 options. Use wooden shims.
-
Page 8: Check For Leaks
Installation Manual 9. Check for leaks With the drain still plugged, check for water leaks by lling the shower base with 1 gallon (3.5 liters) of water. Look for air bubbles forming near the drain. If possible, check drainage pipes below the oor for leaks. -
Page 9: Important Note
Installation Manual IMPORTANT NOTE The glass door can be installed on the left or right side. Artika recommends installing the glass door adjacent to the shower faucet wall. This instruction manual is showing a right side door installation. For a left side door installation, follow the instructions as though the sliding door was on the left. - Page 10 Installation Manual 13. Gaskets placement *NOTE: Extra gaskets are included. Only one J gasket and two K gaskets are necessary. 14. Bottom gasket installation Protect the shower base using a thick piece of cardboard. Install bottom door gasket O onto the sliding door panel.
- Page 11 Installation Manual 15. Vertical gasket installation Install one vertical gasket K on the xed glass panel. The ap goes inside the shower. Install on the side adjacent to the wall. 16. Stoppers installation Put the stoppers on the rail. Temporarily x them with the 6 mm Allen key. 17.
- Page 12 Installation Manual 18. Verify the fit of the bar Insert the bar in the shower. Adjust wall brackets so both ends touch a wall. Important: Depending on the thickness of tile used, it could be possible that the bar is too long. Artika recommends that you deal with a profes- sional to cut the bar to the right length.
-
Page 13: Rail Installation
Installation Manual 19. Rail installation Install the rail to the xed door panel using xed panel bracket M. Temporarily x it. Questions? customerservice@artikaworld.com 1-866-661-9606... - Page 14 Installation Manual 20. Bottom gaskets installation Place the bottom gaskets P on the xed panel. Slide them into the bottom brackets I and H. 1.500'' (38 mm) 1.500'' (38 mm) FLUSH WITH GLASS Questions? customerservice@artikaworld.com 1-866-661-9606...
- Page 15 Installation Manual 21. Pre installation of the fixed panel. Two people are required to perform this step. Carefully lift the xed glass panel in the shower. Verify the rail is leveled. Verify the xed glass panel is leveled vertically. Verify the xed glass panel and gasket K are at against the tiles.
- Page 16 Installation Manual 22. Continued Mark screws locations for the wall brackets. Important: Wall brackets must be aligning with wall studs. Mark where bottom brackets I and H will be installed. Questions? customerservice@artikaworld.com 1-866-661-9606...
- Page 17 Installation Manual 23. Threshold Remove the xed door assembly. Verify the BOTTOM VIEW threshold ts onto the shower base. If the threshold is too long, use cutting pliers to trim the required lenth. Apply silicone under the threshold (see below) and position into place. Fix this bottom gaskets over the threshold with the regular screws.
- Page 18 Installation Manual 24. Wall brackets installation WALL STUD Using the pencil mark from step 11, drill two holes on each side. DRY WALL Use the ceramic drill bit to drill through tiles. Install wall bracket plates. TILES PLATE Reinstall the xed panel assembly. COLLAR Slide the collar into place.
- Page 19 Installation Manual 25. Wheels installation Assemble the two top wheels on the sliding door panel. Wheels have to be installed on the outside of glass door. Note: At this step, you have to insert the blue dry-adhesive washers to the screw of the wheels before instaling on the glass door.
-
Page 20: Handle Installation
Installation Manual 25. Continued Install the bottom wheels. RAIL 26. Handle installation Install the handle onto the sliding door panel. Questions? customerservice@artikaworld.com 1-866-661-9606... -
Page 21: Front View
Installation Manual FRONT VIEW 27. Gaskets installation Install the gasket J onto the sliding door panel. The ap goes between the two panels. You may cut gasket J to make space for the support bar. Cut here FIXED PANEL DOOR INSIDE VIEW DOOR FIXED PANEL... - Page 22 Installation Manual 28. Stoppers Adjust one stopper to ensure the glass door does not hit the wall of the shower. Adjust the other stopper to prevent the handle from coming into contact with the fixed glass panel. Check stoppers are secure. Critical Step Questions? customerservice@artikaworld.com 1-866-661-9606...
- Page 23 Installation Manual 29. Silicone Apply silicone along the outside edge of the threshold. Do not shower for 24 hours Questions? customerservice@artikaworld.com 1-866-661-9606...
-
Page 24: Warranty
WARRANTY Artika For Living Inc. is proud to offer you a five (5) year Warranty. We guarantee our product to be free of manufacturing defects in material and workmanship for a period of five (5) years from the date of purchase. Should a defect arise within the warranty period, Artika For Living Inc.
Need help?
Do you have a question about the Atlantis and is the answer not in the manual?
Questions and answers