I/O Magic MagicImage 500 Manual
Hide thumbs
Also See for MagicImage 500:
- User manual (60 pages) ,
- Specifications (1 page) ,
- User manual (58 pages)
Table of Contents
Advertisement
Quick Links
Download this manual
See also:
User Manual
1
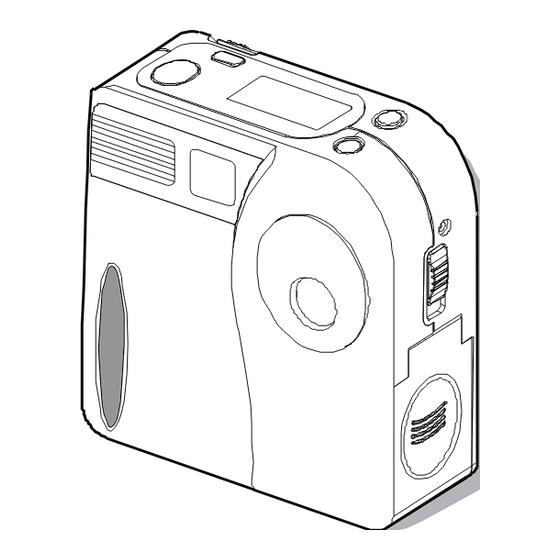
Camera Introduction
Features:
The MagicImage 500 combines all the features professional
photographers and advanced enthusiasts demand – all in
one digital imaging powerhouse. The only limit to the
MagicImage 500 is your imagination. The camera has the
following features:
.1280 X 960 and 1024 X 768 resolution.
.800K CCD Digital Camera.
.4MB of removable Smart Media Memory.
.Built in Flash.
.Automatic power saving feature.
.Compact, light weight and easy to carry.
Systems requirement:
IBM PC or PC-compatible
1. Microsoft Windows 95 /98 or Windows NT3.51/4.0
2. 24MB memory ,32MB is recommended
3. VGA color display (TRUE color mode support is
recommended)
4. CD-ROM drive and a 3.5" floppy drive
5. Available RS232 Serial port.(115200 Baud Rate transfer
required )
1
Advertisement
Table of Contents

Related Manuals for I/O Magic MagicImage 500


Summary of Contents for I/O Magic MagicImage 500
- Page 1 The MagicImage 500 combines all the features professional photographers and advanced enthusiasts demand – all in one digital imaging powerhouse. The only limit to the MagicImage 500 is your imagination. The camera has the following features: .1280 X 960 and 1024 X 768 resolution.
-
Page 2: Package Contents
Package contents: Camera PC serial cable User's manual 2 AA Alkaline Batteries Quick Start Guide 4MB memory card Pouch and Strap CD Software TWAIN Driver *3V AC Adapter (optional) Digital Camera CD Software PC serial cable Memory card Pouch Strap Batteries User's manual TWAIN Driver... -
Page 3: Camera Preparation
Camera Preparation Loading the batteries To load the batteries, open the battery compartment (figure1) and insert the batteries provided with the camera (figure 2). ¡ ´ P lease note the corre ct p ositive (+) and ne gative (-) polarity as sho w n in figure 2. Attaching the strap: Attach the strap as shown below... -
Page 4: Memory Card Installation
Memory card installation: Insert the memory card as shown on the image below. Note:The camera will not function if the memory card is not inserted into the camera’s memory compartment. Note: Any new memory card used for the first time needs to be formatted (please see P.13 for formatting procedures). - Page 5 Camera Buttons / Functions: Flash M ode b utto n L C D P a ne l P icture d ele tion b utton M od e se le ction (D EL ) butto n S hutter relea se bu tton C o m pu ter conne ctio n p ort M em o ry ca rd...
-
Page 6: Front Of Camera
High/Low resolution mode: Press the mode button for 3 seconds to switch from High to Low resolution mode. Note: ” H ” refer to 1280x960 pixels resolution ” L ” refer to 1024x768 pixels resolution The Delete button allows you to delete a single D E L image or all images stored on the camera (refer to P.10 for additional information). -
Page 7: Back Of Camera
MACRO mode operation: Macro mode is shown on the diagram below. Refer to P.12 for additional information. MACRO switch enlarged from the side view. Back of camera: ¡ ´ P o w er O n directio n enlarged diagram Viewfinder Power On/O ff B utton Shooting-R eady LED (G reen) -
Page 8: Lcd Panel Display
LCD Panel Display: E RA S E A LL Fill-in Flash mode Flash Off mode Self-timer PC linked indicator. Counter Image is in 1024x768 pixels resolution. Auto flash mode A U T O... - Page 9 a.Batteries are b.Batteries are fully charged. drained. Memory card storage condition (from zero to full marks) MACRO mode (push MACRO switch to 1. Delete all saved Delete last image data. picture 2. Format memory card (Please refer to P.12, P.15) Memory card is full.
-
Page 10: Basic Operations
Basic Operations: Taking pictures: (1) Turn the power on. (2) Set the resolution mode you need and/or the NORMAL/ MACRO switch position. (3) Frame the subject in the viewfinder. (4) Press the shutter release button halfway for focusing, until the green (shooting-ready) LED stops blinking, which indicates the camera is ready to take the picture. -
Page 11: Using Flash
Using flash: The camera has three flash shooting modes: Note:Effective distance of flash is 1m~1.5m. Auto flash: Flash will automatically fire under AUTO dim light setting Fill-in flash mode:The flash will always fire whenever you take pictures. In low-light condition or back light situation, it is recommended to use this mode. -
Page 12: Macro Mode
self-timer countdown. The red self-timer LED light will blink for about 10 seconds before the shutter is released. (5) Wait until the green LED stops blinking, which indicates the camera is ready for the next picture. Macro mode: Under "MACRO" mode, focus is set at 20 cm. Macro mode provides a function of portrait. - Page 13 How to use the memory card: One 4MB memory card (SSFDC 4MB 3.3 Volt) is provided with the camera. If you need to increase the storage capacity of your camera or simply own additional memory cards, you may purchase them separately. Please contact us for the nearest authorized dealer.
- Page 14 How to connect the camera to your personal computer (1) Find an available COM port on your computer (COM1 or COM2). Connect the serial cable to the COM port. (2) Connect the other end of the serial cable to the digital camera (Port marked “DIGITAL”).
- Page 15 Using the TWAIN Driver Interface Getting to know the TWAIN interface The digital camera is shipped with a user-friendly software (TWAIN interface) that you can use to download the pictures that you have taken with the camera. TWAIN is an industry standard interface for scanners and digital cameras.
-
Page 16: Transferring Images To Your Computer
: MGI PhotoSuite. 2. Select TWAIN Source. (File Get Photos From Select Source) 3. Choose MagicImage 500 Note : You need to select the Source just one time ( Step 2 and step 3 ) after you install the TWAIN Driver. - Page 17 4. Acquire (File Get Photos From Camera/Scanner) 4.1 Retrieving thumbnail (Connection Port Auto Detect.) 4.2 Thumbnail: After acquire, you will get the thumbnails of your pictures.
- Page 18 5. If you can not connect or retrieve the images, check the connection and push the “ Preview “ button again. 6. Getting pictures: Please select the picture you want, and click on the “get pictures“ button.
- Page 19 6.1 Open pictures If you want to view the full-size picture before saving it to disk, select the “Open Pictures” 6.2 After you pressed the “GET Picture“ button, the full-size picture will popup and the thumbnail window will be mini- mized to the bottom-left corner.
- Page 20 You can select your favor directory to save the pictures, just pushing the browse button “…”. The prefix will become the first part of the pictures’ filenames. For example, if you select pictures 0001, 0003 and 0010 to save to disk, and the prefix is “Pic”. Then the pictures’ filenames will be Pic0001.jpg, Pic0003.jpg and Pic0010.jpg.
- Page 21 7. Erasing pictures: Select the pictures you want to erase and click on the “ERASE “ button. Note: The “ERASE Picture” function may take more than one minute. Please wait for a while.
- Page 22 MagicImage 500 Specifications Image Devices 1/3”-CCD w/800k pixels Color depth 24 bits true color Resolution 1280x960 pixels,1024x768 pixels Auto Exposure Exposure/lris Rating) (Control-ISO White |Balance Auto Shutter speed 1/30 ~ 1/1000 Flash Build-in Flash light Self Timer 10 secs Lens Fix;...
- Page 23 Cautions and Troubleshooting: Cautions: Do not use a power supply that is over 3 Volts (DC in). Be aware that failing to comply with this warning can damage the internal components of the camera as well as putting you at risk of an electric shock / fire. Only use I/OMagic approved power supplies with the camera.
- Page 24 Make sure you are using a valid COM port. When you open the MGI PhotoSuite software, make sure you are selecting the MagicImage 500 as your source device. Double check all steps on this manual if nothing else works.
- Page 25 There are several reasons that can cause this problem. The main reason is using the wrong COM port setting. Make sure you select the right COM port before you start to download your pictures. Other reasons include weak batteries and camera not turn on. Will the camera work without the moemory card? No, the camera will not work without the memory card.
- Page 26 LCD Display Measures to be taken Panel messages 1.Please check if the positive and No. display in the LCD negative polarity is set correctly. 2.Please check if batteries are drained. Wrong image showed Batteries become weak, please prepare new batteries for replacement. Mark is blinking Batteries are too low to run the and power automatically...
- Page 27 I/OMAGIC Corporation ATTN: Technical Support 6 Autry Irvine, CA 92618 Register Your I/OMagic Product Please take the time to send in your registration card. The serial number of your MagicImage 500 CCD Digital Camera is located on the camera itself.
- Page 28 Alternatively, you can register your product on-line at our Web site. This is actually the fastest way to receive the latest I/OMagic product information and updates. The Web URL address to the registration page is: http://www.iomagic.com/registration_page.htm Again, we would like to thank you for buying I/OMagic products.
Need help?
Do you have a question about the MagicImage 500 and is the answer not in the manual?
Questions and answers