Advertisement
Advertisement
Table of Contents

Related Manuals for Boss DD-8


Summary of Contents for Boss DD-8
- Page 1 R eference M anu a l...
-
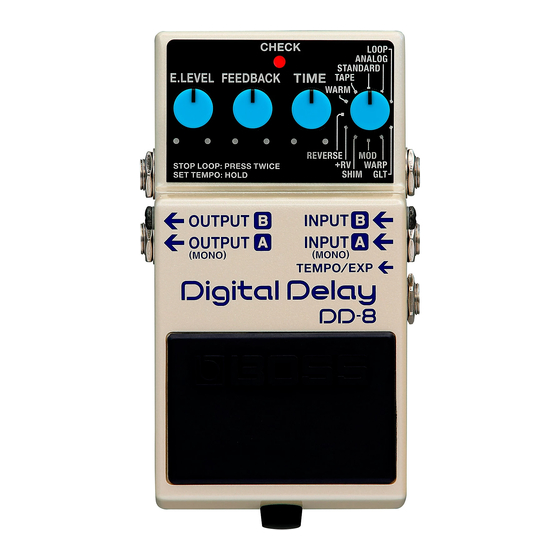
Page 2: Panel Descriptions
Panel Descriptions DC IN jack Accepts connection of an AC Adaptor (PSA series; sold separately). By using an AC Adaptor, you can play without being concerned about how much battery power you have left. * If there are batteries in the unit while an AC adaptor is being used, normal operation will continue should the line voltage be interrupted (power blackout or power cord disconnection). - Page 3 Panel Descriptions OUTPUT-A (MONO) jack, TEMPO/EXP jack OUTPUT-B jack This jack is for connecting a footswitch (FS-5U, FS-6, FS-7; sold separately) or an expression pedal (Roland EV-5, FV-500H, The output jacks are used to connect the unit to an amplifier FV-500L, EV-30;...
- Page 4 Panel Descriptions * This cannot be used in LOOP mode. * In GLT mode, this adjusts the depth of the GLT effect. * Oscillation may occur when the knob is set at certain positions. [TIME] knob This adjusts the delay time. Turning the knob clockwise lengthens the delay time.
- Page 5 Panel Descriptions Characteristics of each mode MODE knob Explanation Delay time STANDARD Clear digital delay. 20–800 ms ANALOG Mild analog delay. 20–800 ms TAPE Sound with the modulation that is distinctive of a tape echo unit. 20–800 ms WARM Mild digital delay. 20–800 ms REVERSE Delay played backward.
- Page 6 Connections AC Adaptor (PSA series; sold Keyboard separately) Electric Guitar Guitar Amplifier Footswitch (FS-6 etc.) Expression Pedal (Roland EV-5 etc.) You can obtain a variety of different delay effects by changing how the connections are made. For more information, refer to “Setting the Output Method” (p. 15).
- Page 7 Connections Footswitch connections Refer to the diagrams for details on the appropriate cables to use and the setting of the polarity switch. * When connecting a footswitch, you must turn off the power before connecting or disconnecting cables. Failure to observe this precaution will cause malfunctions.
- Page 8 Connections Caution when making connections * To prevent malfunction and equipment failure, always turn down the volume, and turn off all the units before making any connections. * Do not use connection cables that contain a built-in resistor. * Before turning the unit on/off, always be sure to turn the volume down. Even with the volume turned down, you might hear some sound when switching the unit on/off.
-
Page 9: Operating The Unit
Operating the Unit 2. Select the mode. Use the [MODE] knob to select the mode to be used. * Operation differs depending on the mode. For details, refer to “Characteristics of each mode” (p. 5). 3. Adjust the delay time. Adjust the delay time with the [TIME] knob. -
Page 10: Using The Tempo Delay
Using the Tempo Delay Tempo input allows you to set the delay time to match the tempo According to the value that you select, the actual delay time will be of a song by repeatedly pressing the pedal switch in time with the as shown in the illustration. - Page 11 Using the Tempo Delay * Never switch off the power while the CHECK indicator is flashing rapidly. For example if TAP DIVISION is set to a dotted eighth note (WARM), and you press the pedal switch at quarter-note * This setting is retained even while the power is turned off. intervals in synchronization with the tempo of the song, Setting the tempo using the Pedal switch the tempo is calculated based on that spacing, and the...
- Page 12 Using the Tempo Delay Setting the Tempo Using a Footswitch Footswitch Operation If two FS-5U units Use the TIP pedal to input the tempo. Connecting a footswitch (FS-5U, FS-6, FS-7; sold separately) to the are connected TEMPO/EXP jack lets you set the tempo delay by inputting the If an FS-6 or FS-7 Use switch B to input the tempo.
- Page 13 Using the LOOP (Overdubbing) Function 6. Adjust the volume. With the LOOP function, you can record up to 40 seconds of your performance, and then have that content played back repeatedly. Use the [E.LEVEL] knob to adjust the volume of the playback You can also layer this as you perform something else, then record sound.
- Page 14 Using the TWIST Function Using the LOOP (Overdubbing) Function Using a footswitch to control the loop function If a footswitch (sold separately: FS-5U, FS-6, FS-7) is connected to the TEMPO/EXP jack, you can use the TWIST function which creates an aggressive sense of rotation. If a footswitch (FS-5U, FS-6, FS-7;...
-
Page 15: Setting The Output Method
Setting the Output Method Long With the DD-8, you can obtain a variety of different delay effects by changing how the connections are made. This produces long delay with A input and B output. Normal This produces mono delay with A input and A output. - Page 16 Setting the Output Method Direct Mute Stereo This produces effect output with B input and A output. With A input and A/B output, this provides mono-in stereo-out delay. DD-8 RETURN SEND Guitar Amplifier DD-8 Guitar INPUT With A/B input and A/B output, this provides stereo-in stereo-out delay.
- Page 17 Setting the Output Method Effect + Direct This produces effect + direct output with B input and A/B output. (Direct sound) (Effect sound) DD-8 Guitar Guitar Amplifier * A: effect, B: direct * Switching off the effect outputs the direct sound from A.
-
Page 18: Setting The Mode For Stereo Delay
Setting the Mode for Stereo Delay When using the DD-8 as a stereo delay, you can choose among MODE knob Effect Explanation three different types of stereo delay effect. TAPE * For detailed information on how to make the connections for WARM stereo delay, refer to “Stereo”... -
Page 19: Control Using An Expression Pedal
Control Using an Expression Pedal 2. Make the settings for the parameters. Connecting an expression pedal (Roland EV-5, BOSS FV-500H, FV-500L, EV-30; sold separately) to the TEMPO/EXP jack enables you Turn the [E.LEVEL], [FEEDBACK], and [D.TIME] knobs to set the to control the respective parameters of the [E.LEVEL], [FEEDBACK],... -
Page 20: Use Of Battery
Use of Battery * If operating this unit on batteries, please use alkaline batteries. * If you handle batteries improperly, you risk explosion and fluid leakage. Make sure that you carefully observe all of the items related to batteries that are listed in “USING THE UNIT SAFELY” and “IMPORTANT NOTES” (supplied on a separate sheet). * When operating on battery power only, the unit’s indicator will become dim when battery power gets too low. -
Page 21: Changing The Battery
Changing the Battery 3. Connect the snap cord to the new battery, and place Thumbscrew Pedal the battery inside the battery housing. * Be sure to carefully observe the battery’s polarity (+ versus -). Spring Base 4. Slip the coil spring onto the spring base on the back Battery Snap of the pedal, and then close the pedal. -
Page 22: Main Specifications
Main Specifications BOSS DD-8: Digital Delay Owner’s Manual, Leaflet (“USING THE UNIT SAFELY, ” “IMPORTANT NOTES, ” Accessories Nominal Input Level -20 dBu and “Information”), Alkaline battery (9 V, 6LR61) Input Impedance 1 MΩ AC adaptor: PSA series Nominal Output Level...
Need help?
Do you have a question about the DD-8 and is the answer not in the manual?
Questions and answers