
Related Manuals for TERMA MOA 43D


Summary of Contents for TERMA MOA 43D
- Page 1 User Manual Electric Heating Element Instrukcja Obsługi — Grzałka elektryczna MOA 43D...
- Page 3 User Manual Our products have been designed and manufactured in such a way to ensure that all quality, functionality and aes- thetic requirements are met. We would like to congratu- late you on the purchase of this great product and wish you a pleasant experience with it.
- Page 4 6. If the device is used as a clothes and towel dryer, ensure that the fabrics drying on it have only been washed in water, avoiding contact with any harsh chemicals. User manual MOA 43D www.termaheat.pl...
- Page 5 7. To ensure the safety of very small children, install the electric dryer so that the lowest tube is at least 600 mm above the floor. 8. The device should only be installed by a qualified in- staller in accordance with the applicable regulations regarding safety and all other regulations.
- Page 6 13. The device is recommended for use solely as de- scribed in the manual. 14. Ensure that the heater has been installed on a wall in accordance with its installation manual. 15. Please forward this instruction manual to the end user. User manual MOA 43D www.termaheat.pl...
- Page 7 Zone 1 Zone 2...
-
Page 8: Electric Heating Element
4. Never test a heating element that is already installed. Do not turn the heating element on in an empty radiator! 5. Ensure that the power cord does not touch the hot parts of the heating element or radiator. User manual MOA 43D www.termaheat.pl... - Page 9 6. Before installing or removing the device, make sure it is disconnected from the power source. 7. Do not open the device — any interference with inter- nal components will invalidate the warranty. 8. Heating element’s electric output cannot exceed 60% heating output of the radiator for the follow- ing parameters: 75/65/20°C.
- Page 10 Please be cautious — avoid direct con- tact with the hot parts of the equipment. 7. Do not open the heating element casing. 8. In the central heating system, always make sure that one valve of the radiator remains open. User manual MOA 43D www.termaheat.pl...
- Page 11 9. Ensure that minors aged 8 and above or those with a physical or mental disability are supervised if operat- ing the device. 10. The device is not a toy. Keep it out of the reach of children. 11. The device must be disconnected from the mains dur- ing cleaning and maintenance.
-
Page 12: Technical Information
Casing protection class [IP]: IPx5 Length of heating element: 120 200 300 400 600 800 1000 1200 [W] 315 275 300 335 365 475 565 660 [mm] * Device intended to be connected permanently to the system User manual MOA 43D www.termaheat.pl... -
Page 13: Installation Or Removal
Installation or removal Detailed information demonstrating the dif- Before installation or first use: ferent ways of installing or removing a radi- ator heating element is available from the 1. Read the chapter Safety requirements manufacturer or importer (see footnotes at —Installation. - Page 14 2. Be aware. A radiator filled with liquid can tains no solvents or abrasives. be very heavy. When moving the radia- tor, ensure that you take the necessary safety precautions. User manual MOA 43D www.termaheat.pl...
-
Page 15: Timer Function
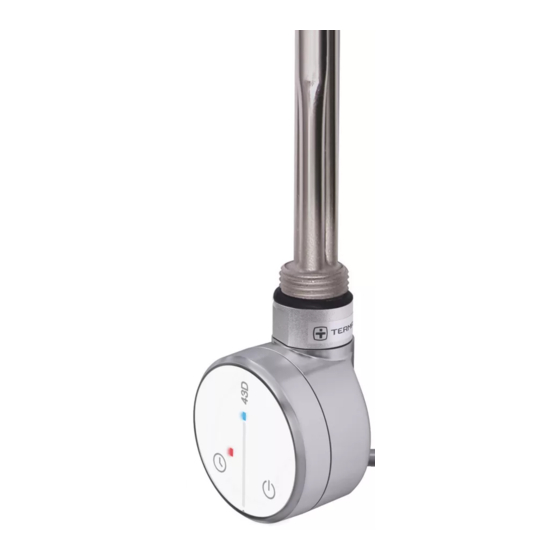
Basic Operation Device ON – heating mode diode (blue) TIMER mode diode (red) 2h TIMER switch ON/OFF switch Pressing key switches the heating element This is a normal phenomenon and it is due on and the radiator will warm up to an aver- to the design of the heating element, the age temperature of approximately 43°C. -
Page 16: Fault Indication
This does not elim- is damaged, it informs the user that the set inate a possibility of temperature sensor operating temperature has been exceeded failure. MOA 43D will display a temperature for unknown reasons. Troubleshooting Problem... -
Page 17: Warranty Terms And Conditions
Warranty terms & conditions 1. The subject of this warranty is a Terma • product being handled by unauthor- electric heating element. The product ized persons, name and characteristics are specified • fault’s or damages caused by the Client on the packaging. -
Page 18: Instrukcja Obsługi
1. Nie instaluj grzejnika bezpośrednio pod gniazdkiem elektrycznym. 2. Grzejnik elektryczny powinien być wypełniony dokład- nie odmierzoną ilością cieczy. W przypadku stwierdze- nia ubytku czynnika grzewczego oraz w każdym in- nym wymagającym jego uzupełnienia skontaktuj się ze sprzedawcą. User manual MOA 43D www.termaheat.pl... - Page 19 3. To urządzenie nie jest wyposażone w regulator tem- peratury pomieszczenia. Nie używaj go w małych pomieszczeniach, gdy znaj- dują się w nich osoby niezdolne do samodzielnego opuszczenia pomieszczenia, chyba że jest zapewniony stały nadzór. 4. Grzejnik elektryczny nie jest zabawką. Dzieci do lat 3 bez właściwego nadzoru nie powinny znajdować...
- Page 20 (R.C.D.) o czułości 30 mA. Przy podłączeniu urządzenia do sieci na stałe (wer- sje nie posiadające kabla zasilające go z wtyczką) obowiązkowy jest również wyłącznik umoż liwiający rozłączenie urządzenia na wszystkich biegunach za pomocą styków o odstępie 3 mm. User manual MOA 43D www.termaheat.pl...
- Page 21 12. Urządzenie w wersji oznaczonej PB może być zainsta- lowane w łazience w strefie 1, zdefiniowanej przez właściwe przepisy, z zachowaniem odrębnych regula- cji w zakresie wykonania instalacji elektrycznej w po- mieszczeniach mokrych. Pozostałe wersje urządzenia mogą być instalowane w strefie 2 lub poza nią. 13.
- Page 22 Strefa 1 Strefa 2 User manual MOA 43D www.termaheat.pl...
- Page 23 Grzałka elektryczna Wymagania bezpieczeństwa — instalacja 1. Montaż grzałki może wykonać wyłącznie instalator z właściwymi uprawnieniami. 2. Podłączaj urządzenie tylko do prawidłowo wykona- nej instalacji elektrycznej (patrz dane znamionowe na grzałce). 3. Dopuszcza się krótkie włączenie zimnej grzałki na wol- nym powietrzu na okres nie dłuższy niż...
- Page 24 10. Urządzenie przeznaczone jest do użytku domowego. 11. Montuj urządzenie zgodnie ze wszystkimi lokalny- mi przepisami dotyczącymi wymagań bezpieczeństwa urządzeń elektrycznych, w tym dopuszczalnej lokaliza- cji i odległości od miejsc mokrych. User manual MOA 43D www.termaheat.pl...
- Page 25 Wymagania bezpieczeństwa — użytkowanie 1. Element grzejny podczas pracy musi być w pełni zanu- rzony w cieczy. 2. Regularnie sprawdzaj, czy urządzenie nie jest uszko- dzone i czy użytkowanie jest bezpieczne. 3. Jeżeli przewód zasilający uległ uszkodzeniu, urządzenie nie nadaje się do użytku. Odłącz od zasilania i skontak- tuj się...
- Page 26 10. Urządzenie nie jest zabawką. Chroń przed dziećmi. 11. Czyszczenie można wykonywać wyłącznie po odłącze- niu urządzenia od sieci zasilającej. 12. Czyszczenie urządzenia przez dzieci w wieku poni- żej 8 lat dopuszczalne jest wyłącznie pod właściwym nadzorem. User manual MOA 43D www.termaheat.pl...
- Page 27 Przeznaczenie Grzałka jest elektrycznym urządzeniem grzew- Grzałkę należy dobrać do grzejnika tak, aby czym przeznaczonym wyłącznie do wbudo- jej moc znamionowa nie przekraczała 60% wania w grzejniki wodne (samodzielne lub mocy grzejnika dla parametrów 75/65/20° C. podłączone do instalacji c.o.) Dane techniczne Oznaczenie modelu PB (Kabel prosty bez wtyczki)* (typ kabla zasilającego)
- Page 28 5. Nie włączaj grzałki, jeżeli nie jest w peł- ni zanurzona w cieczy. 6. Zapewnij środki ochrony przed zbyt du- żym wzrostem ciśnienia w grzejniku (po- duszka powietrzna w grzejniku elektrycz- nym, otwarty jeden z zaworów grzejnika w instalacji c.o.). User manual MOA 43D www.termaheat.pl...
- Page 29 7. Nie zalewaj grzejnika cieczą o tempera- 3. Przed demontażem upewnij się, że woda turze wyższej niż 60° C. znajdująca się wewnątrz grzejnika i in- stalacji nie spowoduje szkody (zakręć 8. Przy podłączaniu urządzenia na stałe do właściwe zawory, opróżnij grzejnik, itp.). instalacji, stosuj się...
- Page 30 Obsługa grzałki MOA 43D sygnalizacja pracy urządzenia (niebieska dioda) sygnalizacja włączenia funkcji TIMER (czerwona dioda) włącznik funkcji TIMER 2h włącznik urządzenia Wciśnięcie klawisza uruchamia grzałkę, znacznie zmieniać, a także być różna w róż- przez co grzejnik rozgrzewa się do tempe- nych miejscach.
-
Page 31: Rozwiązywanie Problemów
(co 3 sek). Informacje o usterkach Grzałka ma wbudowane zabezpieczenie MOA 43D sygnalizuje przekroczenie dopusz- przed przegrzaniem przy pracy w suchym czalnej temperatury pracy za pomocą nie- grzejniku. Powyższe nie wyklucza jednak bieskiej diody migającej szybko (co 1 sek). -
Page 32: Warunki Gwarancji
Warunki gwarancji 1. Przedmiotem gwarancji jest grzałka elek- • uszkodzenia mechaniczne, w szczegól- tryczna produkcji Terma Sp. z o.o. Nazwa ności powstałe na skutek nieprawidło- modelu oraz własności wyszczególnione wego transportu lub przechowywania. zostały na opakowaniu. 6. Instalacja grzewcza powinna być wyposa- 2. - Page 34 Dual Fuel Radiator 1. Choose the option of installation that fits to you best. 2. Fit the T-fitting to the radiator (if needed) and then install the heating element. Tighten it using the correct spanner (size 22). 3. Fill the radiator with the water, then bleed it. Once bled make sure that at least one valve re- mains open.
- Page 35 Electric only Radiator 1. Correct position of the radiator and heating element. 2. Install and tighten the heating element using the correct spanner (size 22). 3. Fill the radiator with a proper heating agent. (Read the section “Before installation or first use” page 13. 4. Fit the radiator to the wall and connect the heating element to the power supply.
- Page 36 TERMA Sp z o.o. Czaple 100, 80-298 Gdańsk, Poland terma@termagroup.pl www.termagroup.pl 20180116 CiborowskiTomasz MPGKE-221...
Need help?
Do you have a question about the MOA 43D and is the answer not in the manual?
Questions and answers