
Related Manuals for WiFi CONNEkT Starter Kit

Summary of Contents for WiFi CONNEkT Starter Kit
- Page 1 Starter Kit - Install guide PRINT - 2018_Layout 1 09/01/2018 09:41 Page 5 Wall Sockets Featuring WIFI EXTEND (SSID REPEAT) POWERLINE TECHNOLOGY USB CHARGING INSTALL & SET-UP GUIDE...
- Page 2 Starter Kit - Install guide PRINT - 2018_Layout 1 09/01/2018 09:41 Page 6 THIS INSTALL GUIDE IS FOR: WiFi CONNEkT Starter Kit WiFi CONNEkT Add-On Sockets GROUP GEAR LTD Email • technical@groupgear.co.uk Skype • technical@groupgear.co.uk Website • www.groupgear.co.uk WiFi CONNEkT is a brand of Group Gear Ltd...
-
Page 3: Table Of Contents
Starter Kit - Install guide PRINT - 2018_Layout 1 09/01/2018 09:41 Page 7 CONTENTS Important Safety Warnings Socket Labels Installation Regulations Installation Instructions Safety Approvals 11-12 Product Specifications 13-15 How to Connect 16-18 Buttons & LED Functions 19-28 Set-up - SSID Repeat... -
Page 4: Important Safety Warnings
WiFi CONNEkT Wall Socket due to risk of damage to the plastic, electrocution or fire. • Do not use the WiFi CONNEkT Wall Socket with a power supply different than 220-240 volts 50 Hz AC. • To prevent fire hazard always use cable of the correct rating, size & type for the installation. -
Page 5: Socket Labels
Starter Kit - Install guide PRINT - 2018_Layout 1 09/01/2018 09:41 Page 9 MASTER SOCKET PRODUCT LABEL The product label is located on the back of the unit and contains unique details specific to your device. • Model number • Power usage details •... - Page 6 Starter Kit - Install guide PRINT - 2018_Layout 1 09/01/2018 09:41 Page 10 ADD-ON SOCKET PRODUCT LABEL The product label is located on the back of the unit and contains unique details specific to your device. • Model number • Power usage details •...
-
Page 7: Installation Regulations
Starter Kit - Install guide PRINT - 2018_Layout 1 09/01/2018 09:41 Page 11 INSTALLATION REGULATIONS UNITED KINGDOM The WiFi CONNEkT Wall Socket must be installed in accordance with the latest edition of the IEE Wiring (BS 7671) Regulations & Building Regulations. -
Page 8: Installation Instructions
Starter Kit - Install guide PRINT - 2018_Layout 1 09/01/2018 09:41 Page 12 INSTALLATION INSTRUCTIONS 1. Switch off the mains power supply in the consumer unit (fuse box). 2. If retro fit remove the existing wall socket from the wall. - Page 9 Starter Kit - Install guide PRINT - 2018_Layout 1 09/01/2018 09:41 Page 13 NOTE Please follow installation guide diagram for best practice.
-
Page 10: Safety Approvals
Starter Kit - Install guide PRINT - 2018_Layout 1 09/01/2018 09:41 Page 14 SAFETY APPROVALS • EN300328 • EN301489 • EN62311 • EN50561 • EN50412 • EN55032 • EN61000-3-2 • EN61000-3-3 • BS5733 • Complies with UK Building Regulations 2010... -
Page 11: Product Specifications
Starter Kit - Install guide PRINT - 2018_Layout 1 09/01/2018 09:41 Page 15 PRODUCT SPECIFICATIONS POWERLINE, WIRELESS, USB CHARGING & GENERAL SPECIFICATIONS... - Page 12 Starter Kit - Install guide PRINT - 2018_Layout 1 09/01/2018 09:41 Page 16 POWERLINE SPECIFICATIONS GENERAL SPECIFICATIONS • Ring main circuit distance: Up to 300m • Supports up to 8 sockets • High speed data transfer: 500Mbps (1 x Master Socket, 7 x Add-On Sockets) •...
-
Page 13: How To Connect
Starter Kit - Install guide PRINT - 2018_Layout 1 09/01/2018 09:41 Page 17 HOW TO CONNECT MASTER SOCKET, ADD-ON SOCKET & USB CHARGING PORT... - Page 14 Starter Kit - Install guide PRINT - 2018_Layout 1 09/01/2018 09:41 Page 18 HOW TO CONNECT MASTER SOCKET ADD-ON SOCKET ADD-ON SOCKET Powerline ROUTER CONNECTION HARDWIRE CONNECTION WIFI CONNECTION Router can be connected to the Add-On Socket connected to a...
- Page 15 Starter Kit - Install guide PRINT - 2018_Layout 1 09/01/2018 09:41 Page 19 USB CHARGING PORT Suitable for charging your USB devices. • Surge and spike protection • 2.1 Amp Output • USB Connector Type A USB CONNECTION Charge your USB Devices via the...
-
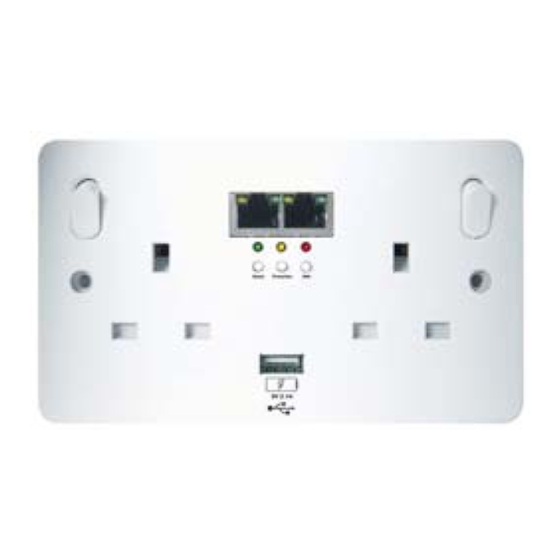
Page 16: Buttons & Led Functions
Starter Kit - Install guide PRINT - 2018_Layout 1 09/01/2018 09:41 Page 20 BUTTONS & LED FUNCTIONS RESET/POWER, POWERLINE & WIFI... - Page 17 Starter Kit - Install guide PRINT - 2018_Layout 1 09/01/2018 09:41 Page 21 BUTTONS & LED FUNCTIONS RESET GREEN LED Power is on and the wall socket is ready to use. RED LED Wall socket is in boot-up mode. NO LED...
- Page 18 Starter Kit - Install guide PRINT - 2018_Layout 1 09/01/2018 09:41 Page 22 POWERLINE WIFI GREEN LED GREEN LED Powerline detected WiFi is on. at high speed. YELLOW LED YELLOW LED Powerline detected WiFi is disabled by at medium speed.
-
Page 19: Set-Up - Ssid Repeat
Starter Kit - Install guide PRINT - 2018_Layout 1 09/01/2018 09:41 Page 23 SET-UP - SSID REPEAT ENSURE ALL THE WIFI CONNEkT WALL SOCKETS & ADD-ON SOCKETS THAT YOU WISH TO USE ARE WIRED UP TO YOUR MAINS. - Page 20 Starter Kit - Install guide PRINT - 2018_Layout 1 09/01/2018 09:41 Page 24 • Firstly connect to the WiFi CONNEkT Wall Socket. It will be displayed as “WiFi CONNEkT Master“...
- Page 21 Starter Kit - Install guide PRINT - 2018_Layout 1 09/01/2018 09:41 Page 25 • Once connected to the WiFi CONNEkT Wall Socket we then need to load up a browser and type in the address bar the IP address for...
- Page 22 Starter Kit - Install guide PRINT - 2018_Layout 1 09/01/2018 09:41 Page 26 • Now you will need to choose which configuration mode you would like to set-up. • In this instance it will be: WiFi extend/repeat (SSID). • Once you have...
- Page 23 Starter Kit - Install guide PRINT - 2018_Layout 1 09/01/2018 09:41 Page 27 • Here there will be a list of SSIDs that are available to repeat from. Select the SSID that you require.
- Page 24 Starter Kit - Install guide PRINT - 2018_Layout 1 09/01/2018 09:41 Page 28 • Once you have selected the required SSID you wish to repeat from, you will be asked to enter it’s password. • Once you have entered the...
- Page 25 Starter Kit - Install guide PRINT - 2018_Layout 1 09/01/2018 09:41 Page 29 • You will be asked if you wish to change the IP Address of the WiFi CONNEkT Wall Socket, however this is a more advanced setting and won’t be shown in this set-up guide.
- Page 26 Starter Kit - Install guide PRINT - 2018_Layout 1 09/01/2018 09:41 Page 30 • Now you will need to switch over to the SSID that you have configured in your installation.
- Page 27 Starter Kit - Install guide PRINT - 2018_Layout 1 09/01/2018 09:41 Page 31 • Once connected you will need to go back to your browser. • If the page doesn’t automatically load type in the IP address of the WiFi CONNEkT Wall Socket which is: 192.168.1.10 unless it...
- Page 28 Starter Kit - Install guide PRINT - 2018_Layout 1 09/01/2018 09:41 Page 32 • Now click the Device Control tab to check that the Add-On Sockets have connected to the Master Socket. • SSID Repeat is now set-up and active.
-
Page 29: Set-Up - Access Point (Wireless)
Starter Kit - Install guide PRINT - 2018_Layout 1 09/01/2018 09:41 Page 33 SET-UP - ACCESS POINT (WIRELESS) ENSURE ALL THE WIFI CONNEkT WALL SOCKETS & ADD-ON SOCKETS THAT YOU WISH TO USE ARE WIRED UP TO YOUR MAINS. - Page 30 Starter Kit - Install guide PRINT - 2018_Layout 1 09/01/2018 09:41 Page 34 • Firstly connect to the WiFi CONNEkT Wall Socket. It will be displayed as “WiFi CONNEkT Master“.
- Page 31 Starter Kit - Install guide PRINT - 2018_Layout 1 09/01/2018 09:41 Page 35 • Once connected to the WiFi CONNEkT Wall Socket we then need to load a browser and type in the address bar the IP address for the...
- Page 32 Starter Kit - Install guide PRINT - 2018_Layout 1 09/01/2018 09:41 Page 36 • Now you will need to choose which configuration mode you would like to set-up. • In this instance it will be: Access Point. • Once you have...
- Page 33 Starter Kit - Install guide PRINT - 2018_Layout 1 09/01/2018 09:41 Page 37 • Now you will need to choose which type of connection you wish to set the access point mode in. • In this instance it will be: Wireless.
- Page 34 Starter Kit - Install guide PRINT - 2018_Layout 1 09/01/2018 09:41 Page 38 • Here there will be a list of network connections that are available to connect to. Select the router that you require.
- Page 35 Starter Kit - Install guide PRINT - 2018_Layout 1 09/01/2018 09:41 Page 39 • Once you have selected the required router that you wish to connect to, you will be asked to enter it’s password. • Once you have entered the...
- Page 36 Starter Kit - Install guide PRINT - 2018_Layout 1 09/01/2018 09:41 Page 40 • Now you can enter a name, choose a password for the access point and advanced users can change the encryption type. • Once done click NEXT to continue.
- Page 37 Starter Kit - Install guide PRINT - 2018_Layout 1 09/01/2018 09:41 Page 41 • You will be asked if you wish to change the IP Address of the WiFi CONNEkT Wall Socket, however this is a more advanced setting and won’t be shown in this set-up guide.
- Page 38 Starter Kit - Install guide PRINT - 2018_Layout 1 09/01/2018 09:41 Page 42 • This screen shows that the set-up is complete and we must now connect to new WiFi network under the name chosen. • Connect to the newly named...
- Page 39 Starter Kit - Install guide PRINT - 2018_Layout 1 09/01/2018 09:41 Page 43 • Enter the password you also chose earlier. • Once done click OK. • You are now connected to your WiFi CONNEkT Access Point.
- Page 40 Starter Kit - Install guide PRINT - 2018_Layout 1 09/01/2018 09:41 Page 44 • Once connected you will need to go back to your browser. • If the page doesn’t automatically load type in the IP address of the WiFi CONNEkT Wall Socket which is: 192.168.1.10 unless it...
- Page 41 Starter Kit - Install guide PRINT - 2018_Layout 1 09/01/2018 09:41 Page 45 • Now click the Device Control tab to check that the Add-On Sockets have connected to the Master Socket. • Access Point Mode (Wireless) is now set-up...
-
Page 42: Set-Up - Access Point (Wired)
Starter Kit - Install guide PRINT - 2018_Layout 1 09/01/2018 09:41 Page 46 SET-UP - ACCESS POINT (WIRED) ENSURE ALL THE WIFI CONNEkT WALL SOCKETS & ADD-ON SOCKETS THAT YOU WISH TO USE ARE WIRED UP TO YOUR MAINS. - Page 43 Starter Kit - Install guide PRINT - 2018_Layout 1 09/01/2018 09:41 Page 47 • Firstly connect to the WiFi CONNEkT Wall Socket. It will be displayed as “WiFi CONNEkT Master“.
- Page 44 Starter Kit - Install guide PRINT - 2018_Layout 1 09/01/2018 09:41 Page 48 • Once connected to the WiFi CONNEkT Wall Socket we then need to load a browser and type in the address bar the IP address for the...
- Page 45 Starter Kit - Install guide PRINT - 2018_Layout 1 09/01/2018 09:41 Page 49 • Now you will need to choose which configuration mode you would like to set-up. • In this instance it will be: Access Point. • Once you have...
- Page 46 Starter Kit - Install guide PRINT - 2018_Layout 1 09/01/2018 09:41 Page 50 • Now you will need to choose which type of connection you wish to set the access point mode in. • In this instance it will be: Wired.
- Page 47 Starter Kit - Install guide PRINT - 2018_Layout 1 09/01/2018 09:41 Page 51 • Now you can enter a name, choose a password for the access point and advanced users can change the encryption type. • Once done click NEXT to continue.
- Page 48 Starter Kit - Install guide PRINT - 2018_Layout 1 09/01/2018 09:41 Page 52 • You will be asked if you wish to change the IP Address of the WiFi CONNEkT Wall Socket, however this is a more advanced setting and won’t be shown in this set-up guide.
- Page 49 Starter Kit - Install guide PRINT - 2018_Layout 1 09/01/2018 09:41 Page 53 • This screen shows that the set-up is complete and we must now connect to new WiFi network under the name chosen. • Connect to the newly named...
- Page 50 Starter Kit - Install guide PRINT - 2018_Layout 1 09/01/2018 09:41 Page 54 • Enter the password you also chose earlier. • Once done click OK.
- Page 51 Starter Kit - Install guide PRINT - 2018_Layout 1 09/01/2018 09:41 Page 55 • Once connected you will need to go back to your browser. • If the page doesn’t automatically load type in the IP address of the WiFi CONNEkT Wall Socket which is: 192.168.1.10 unless it...
- Page 52 Starter Kit - Install guide PRINT - 2018_Layout 1 09/01/2018 09:41 Page 56 • Now click the Device Control tab to check that the Add-On Sockets have connected to the Master Socket. • Access Point Mode (Wired) is now set-up...
-
Page 53: Set-Up - Add-On Socket
Starter Kit - Install guide PRINT - 2018_Layout 1 09/01/2018 09:41 Page 57 SET-UP - ADD-ON SOCKET ENSURE ALL THE WIFI CONNEkT WALL SOCKETS & ADD-ON SOCKETS THAT YOU WISH TO USE ARE WIRED UP TO YOUR MAINS. THEN LOG BACK INTO THE MASTER SOCKET (192.68.1.10) TO CONFIGURE. -
Page 54: Switching Configuration Mode
Starter Kit - Install guide PRINT - 2018_Layout 1 09/01/2018 09:41 Page 58 SWITCHING CONFIGURATION MODE SWITCH BETWEEN SSID REPEAT AND ACCESS POINT MODES. - Page 55 Starter Kit - Install guide PRINT - 2018_Layout 1 09/01/2018 09:41 Page 59 • Log into IP address: 192.168.1.10 • Click on Device Configuration. • Choose which mode you would like to swap to and click OK.
- Page 56 Starter Kit - Install guide PRINT - 2018_Layout 1 09/01/2018 09:41 Page 60 • Click OK to confirm that you would like to swap modes and reset the Master Unit to it’s factory settings. • Once factory settings have been restored...
-
Page 57: Bandwidth Throttling
Starter Kit - Install guide PRINT - 2018_Layout 1 09/01/2018 09:41 Page 61 BANDWIDTH THROTTLING LIMIT THE AMOUNT OF BANDWIDTH AVAILABLE TO EACH SOCKET. ACCESS POINT MODE ONLY. - Page 58 Starter Kit - Install guide PRINT - 2018_Layout 1 09/01/2018 09:41 Page 62 • Log into IP address: 192.168.1.10 • Click on Device Control. • Scroll down to the Bandwidth Throttling section.
- Page 59 Starter Kit - Install guide PRINT - 2018_Layout 1 09/01/2018 09:41 Page 63 • Click on the Edit Icon to the right of the sockets and type in the desired download/upload speeds. • If you are unsure of what bandwidth to set please go to: http://www.groupgear.co.uk/WiFiCalc.asp...
- Page 60 Starter Kit - Install guide PRINT - 2018_Layout 1 09/01/2018 09:41 Page 64 • Once the desired speeds have been input click the Edit Icon again and wait at least 20 seconds for the system to update the value.
-
Page 61: Time Settings
Starter Kit - Install guide PRINT - 2018_Layout 1 09/01/2018 09:41 Page 65 TIME SETTINGS SET WIFI ON/OFF TIMINGS FOR EACH SOCKET. ACCESS POINT MODE ONLY. - Page 62 Starter Kit - Install guide PRINT - 2018_Layout 1 09/01/2018 09:41 Page 66 • Log into IP address: 192.168.1.10 • Click on Device Control to view the Timer Scheduler section. • Click on the Edit Icon to the right of...
- Page 63 Starter Kit - Install guide PRINT - 2018_Layout 1 09/01/2018 09:41 Page 67 • Once the desired times have been input click the Edit Icon again and wait at least 20 seconds for the system to update the times.
-
Page 64: Global Wifi Control
Starter Kit - Install guide PRINT - 2018_Layout 1 09/01/2018 09:41 Page 68 GLOBAL WIFI CONTROL ENABLE OR DISABLE WIFI FOR ALL ADD-ON SOCKETS. - Page 65 Starter Kit - Install guide PRINT - 2018_Layout 1 09/01/2018 09:41 Page 69 • Log into IP address: 192.168.1.10 • Click on the Device Control to view the Enable or Disable WIFI section. • Select either On or Off. • PLEASE NOTE: This...
- Page 66 Starter Kit - Install guide PRINT - 2018_Layout 1 09/01/2018 09:41 Page 70 • Once the desired setting has been selected wait at least 20 seconds for the system to update.
-
Page 67: Factory Restore
Starter Kit - Install guide PRINT - 2018_Layout 1 09/01/2018 09:41 Page 71 FACTORY RESTORE RESTORE WIFI CONNEkT WALL SOCKETS TO FACTORY SETTINGS. - Page 68 Starter Kit - Install guide PRINT - 2018_Layout 1 09/01/2018 09:41 Page 72 • Log into IP address: 192.168.1.10 • Click on the Administrator tab. • Click RESTORE...
- Page 69 Starter Kit - Install guide PRINT - 2018_Layout 1 09/01/2018 09:41 Page 73 • Click YES to confirm that you would like to restore the device to it’s factory settings.
- Page 70 Starter Kit - Install guide PRINT - 2018_Layout 1 09/01/2018 09:41 Page 74 REGISTER YOUR PRODUCT To register your product please visit: http://groupgear.co.uk/WiFiConnektReg.asp...
- Page 71 Starter Kit - Install guide PRINT - 2018_Layout 1 09/01/2018 09:41 Page 75 NOTES...
- Page 72 Starter Kit - Install guide PRINT - 2018_Layout 1 09/01/2018 09:41 Page 76 Wall Sockets Featuring WIFI EXTEND (SSID REPEAT) POWERLINE TECHNOLOGY USB CHARGING WiFi CONNEkT is a brand of Group Gear Ltd GROUP GEAR LTD Email • technical@groupgear.co.uk Skype •...
Need help?
Do you have a question about the Starter Kit and is the answer not in the manual?
Questions and answers