Table of Contents
Advertisement
Advertisement
Table of Contents

Related Manuals for Bosch CH-47976


Summary of Contents for Bosch CH-47976
- Page 1 CH-47976 User Guide CH-47976-11 Rev A...
- Page 2 User Guide...
- Page 3 No part of this manual may be reproduced or transmitted in any form or by any means, electronic or mechanical, without written permission from Hickok Waekon LLC. and Bosch. Hickok Waekon LLC. and Bosch assumes no responsibility for use of this equipment by untrained or unauthorized persons.
-
Page 4: Table Of Contents
Contents Safety Information ..................1 AFIT Hardware ....................5 AFIT Unit and Accessories .......................6 The Main Control Unit (MCU) ......................8 Using the Keypad ............................8 Using the Connector Panel ........................8 The Fuel Management Unit (FMU) ....................9 Cables, Software and Adapters ....................10 Software Installation ..................11 Step 1—Verify Requirements .....................12 Operating System Requirements ......................12 Hardware Requirements .........................12... - Page 5 Contents Direct Injector Connection ........................19 Direct Injector and Fuel Pump Connection ....................20 Step 2—Connect the Tester to Power ..................21 Adjusting the Hanger ........................22 Testing ......................23 Step 1—Connect and Power-up AFIT ..................24 Step 2A—Select Vehicle ......................25 Step 2B—Clear Vehicle Selection ....................26 Step 3—Select a Test ........................27 Injector Test ............................27 Pressure Test ............................28...
-
Page 6: Safety Information
Safety Information Before using this tester, carefully read, understand and follow instructions and safety messages on equipment and in this manual. The manual cannot anticipate or provide advice and cautions for all situations encountered by technicians. With this in mind, always follow and refer to the manuals provided by the manufacturer or the vehicle or equipment being tested or used for all information and testing procedures whenever diagnosing, repairing or operating such vehicle or equipment. - Page 7 Safety Information Fuel vapors are toxic and explosive, which can cause severe injury or death • Use proper ventilation to avoid breathing fuel vapors. • Ethanol fuel and gasoline mixed with ethanol are highly poisonous and chemically active. Blindness and death are possible if exposure to these substances is extensive. •...
- Page 8 Safety Information Before beginning any tests, make sure the equipment and the test environment are safe • Test area should be well ventilated. • When working on and underneath the vehicle, make sure it is properly supported on a hoist or jack stands.
- Page 9 Safety Information Check all parts periodically, clean and replace if necessary. Make sure the equipment is in good working condition. This tester is a precision instrument— keep it clean and repair (or replace) any damaged parts. This includes: • Fuel injection parts for signs of wear. •...
-
Page 10: Afit Hardware
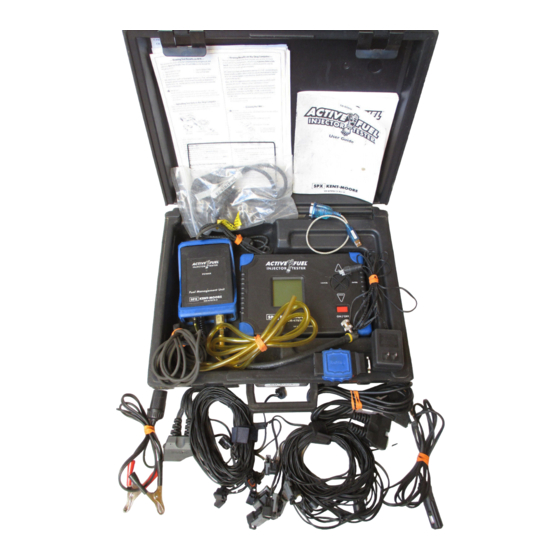
AFIT Hardware This section illustrates and describes the items included with the Active Fuel Injector Tester (AFIT). Be sure you familiarize yourself with all of the equipment and procedures before conducting any tests. For your reference, the following is a list of acronyms used throughout this guide: AFIT—Active Fuel Injector Tester DLC—Diagnostic Link Connector FAH—Fuel Access Hose... -
Page 11: Afit Unit And Accessories
AFIT Hardware AFIT Unit and Accessories Main Control Unit (MCU) Fuel Management Unit (FMU) AFIT PC Application Software CD AFIT PC Application Software Fuel Schrader DLC Adapter Connector Seal Replacement Kit (2) 6’ Serial Cables USB to Serial Port Adapter Power Adapter 12 V Power Cord 12V Power Cord... - Page 12 AFIT Hardware Component Part Number Main Control Unit CH-47976-1 Fuel Management Unit CH-47976-2 AFIT PC Application Software CD CH-47976-9 Fuel Schrader Connector Seal Replacement Kit CH-47976-13 DLC Adapter CH-47976-4a (2) 6’ Serial Cables CH-47976-10 USB to Serial Port Adapter CH-47976-3a...
-
Page 13: The Main Control Unit (Mcu)
AFIT Hardware The Main Control Unit (MCU) The Main Control Unit (MCU) is used for functions such as selecting and starting tests, monitoring the status of a test, interfacing with the vehicle, and controlling the Fuel Management Unit (FMU). Using the Keypad The main functions of the keypad are: •... -
Page 14: The Fuel Management Unit (Fmu)
AFIT Hardware The Fuel Management Unit (FMU) The FMU handles fuel and pressure measurement. The power LED indicates when it is receiving power from the MCU. • Hanger—use to hang the unit from the hood of the vehicle to allow for proper fuel flow through the FMU. -
Page 15: Cables, Software And Adapters
AFIT Hardware Cables, Software and Adapters • AFIT PC Application Software—install onto the shop computer. Use to analyze and save the test data uploaded to the computer from the MCU. Also use to download software update files to the MCU. •... -
Page 16: Software Installation
Software Installation Before you begin to use AFIT for the first time, you will need to install the AFIT PC Application Software and, depending on your computer, the USB to Serial Port software driver. This section defines the computer requirements and how to install the software on to your computer. -
Page 17: Step 1-Verify Requirements
• Available serial port or USB port or USB port (Requires using the USB to Serial Port Adapter when connecting to the computer’s USB port) • For SIDI Engines CH-47976-500 Adapter Kit (includes DMU and 2 cables) Note: Add Duramax Engine coverage with CH-47976-505 (2 cables) •... -
Page 18: Step 2-Download/Install Afit Update Utility Program
Software Installation 4. Under Security and Maintenance Click Change User Account Control Settings. 5. Make a note of your current settings and then slide the setting’s bar to Never Notify. 6. Click OK and then close the Control Panel. 7. Restart your computer. For computers running Microsoft 7 Professional: 1. -
Page 19: If You Are Installing The Update Utility From A Download
Software Installation A. Choose RUN from the Start menu. B. Choose Browse. C. In the browse box, select your computer’s CD-ROM drive. D. Double click the Setup.exe file. E. Click OK to launch the installation program. If a security warning is displayed asking if you are sure you want to run an .exe file, click OK. -
Page 20: Optional Software
Software Installation Optional Software An electronic version of this User Guide and the Quick Reference Guide are automatically installed on to your computer when installing the AFIT PC Application software. Viewing the Guides, which are in Adobe® Portable Document Format (PDF), requires Adobe® Reader® software version 6.0 or higher. - Page 21 Software Installation Active Fuel Injector Tester User Guide...
-
Page 22: Hookup
Hookup This section describes and illustrates the various hookup procedures. Several options are available to complete the basic hookup. Use this section along with the vehicle’s Service Information/Shop Manual (or equivalent) to complete the hookup for your vehicle. Active Fuel Injector Tester User Guide... -
Page 23: Step 1-Connect Afit To The Vehicle
Hookup Step 1—Connect AFIT to the Vehicle There are three ways to connect AFIT to the test vehicle: DLC Connection, Direct Injector Connection, and Direct Injector and Fuel Pump Connection. The connection you will use depends on the vehicle being tested. DLC Connection Used with most vehicles, this connection controls the injectors and the fuel pump through the DLC. -
Page 24: Direct Injector Connection
AFIT. IMPORTANT To vehicle’s battery Hang the FMU vertically from vehicle’s hood Interconnect Cable POWER CH-47976-60 Fuel Management Unit Serial When needed, use with existing Cable SPX Kent-Moore J-Cables to connect the MCU to the vehicle’s... -
Page 25: Direct Injector And Fuel Pump Connection
Hookup Direct Injector and Fuel Pump Connection Note: This connection requires the use of additional accessories not included with the kit. This connection directly controls the injectors and the fuel pump from the MCU. Use this connection for vehicles not listed in the AFIT database (older GM and other manufacturer’s vehicles without a Data Link Connector). -
Page 26: Step 2-Connect The Tester To Power
Hookup Step 2—Connect the Tester to Power After connecting the tester to the vehicle, you will need to supply power. There are two options for supplying power to AFIT: • 12V power cable • Battery hookup (alligator clip adapter) Hanger Power Interconnect Cable... -
Page 27: Adjusting The Hanger
Hookup Adjusting the Hanger 1. Unhook the bungee cord from the open end of the clip. 2. Slide the hook along the bungee cord to the desired position. 3. Reattach the bungee cord to the open end of the clip. Active Fuel Injector Tester User Guide... -
Page 28: Testing
Testing This section explains the AFIT test procedures and the screens you will use to navigate to the tests: Injector Test—tests the fuel injector flow characteristics Pressure Test—tests the fuel system pressure Leak Down Test—pressurizes the fuel system and allows a leak down test to the vehicle’s Service Information/Shop Manual specifications Active Fuel Injector Tester User Guide... -
Page 29: Step 1-Connect And Power-Up Afit
Testing Step 1—Connect and Power-up AFIT 1. Complete the hookup for the vehicle you are testing. If you are using one of the Direct Connection methods, make sure you have the required injector harness (or J-Cable Adapter and J-Cable) and, if required, FPEA cable available, but do not connect it to the vehicle until instructed to by AFIT. -
Page 30: Step 2A-Select Vehicle
Testing Main Menu Injector Test Pressure Test Leak Down Test Vehicle Selection Utility Functions Confirm Veh Selection New Veh Selection Clear Veh Selection Step 2A—Select Vehicle IMPORTANT! Only use this procedure for DLC Connections and Direct Injector Connection. Proceed to Step 2B if you are using the Direct Injector and Fuel Pump Connection hookup. Selecting a vehicle tells AFIT how to communicate with the vehicle. -
Page 31: Step 2B-Clear Vehicle Selection
Testing Main Menu Injector Test Pressure Test Leak Down Test Vehicle Selection Utility Functions Confirm Veh Selection New Veh Selection Clear Veh Selection Step 2B—Clear Vehicle Selection IMPORTANT! Only use this procedure for the Direct Injector Connection or the Direct Connection hookup. -
Page 32: Step 3-Select A Test
Testing Main Menu Injector Test Pressure Test Leak Down Test Vehicle Selection Utility Functions Step 3—Select a Test Once a vehicle is selected or cleared, AFIT returns to the Main Menu. You will start the Injector test, Pressure test, and Leak Down test from this screen. Utility Functions and Vehicle Selection are also accessed from this screen (see Utilities or Step 2—Select Vehicle for further information). -
Page 33: Pressure Test
Testing Injector Test (cont.) • View Test Results—displays the results of the last completed test. For further information, see the section Viewing Test Results. • Upload Test Results—use to upload test results to the shop computer to analyze and save the data with the AFIT PC Application Software. For further information, see the section Viewing Test Results. -
Page 34: Viewing Test Results
Viewing Test Results Viewing Test Results This section explains how to view the results of the last completed test by viewing the data on the MCU, or uploading the results to the shop computer and viewing the data with the AFIT PC Application. Note: DLC connections results are displayed as Injector 1, 2, 3 etc. -
Page 35: Viewing Results On Afit
Viewing Test Results Main Menu Injector Test Pressure Test Leak Down Test Vehicle Selection Utility Functions Run New Test View Test Results Upload Test Results Viewing Results on AFIT You can view the results of the last completed test by navigating to, and selecting, View Test Results. -
Page 36: Uploading Test Data To A Shop Computer
Viewing Test Results Main Menu Injector Test Pressure Test Leak Down Test Vehicle Selection Utility Functions Run New Test View Test Results Upload Test Results Uploading Test Data to a Shop Computer You will use the AFIT PC application software to upload the test data to the shop computer, view, print, and save the tests results. -
Page 37: Step 2-Upload The Data To The Shop Computer
Viewing Test Results Step 2—Upload the Data to the Shop Computer 1. Turn the MCU on. 2. Start the AFIT PC Application (if not already running). 3. Check the Selected COM Port Num and Connectivity Status at the bottom of the application window. -
Page 38: Step 3-Viewing The Test Results On The Afit Pc Application
Viewing Test Results Step 3—Viewing the Test Results on the AFIT PC Application You can view the results of any saved test by navigating to, and selecting, Customer/Vehicle Info Search. Select the line for the customer or vehicle you wish to view. By default, the most recent upload is displayed. - Page 39 Viewing Test Results This page intentionally left blank Active Fuel Injector Tester User Guide...
-
Page 40: Utilities
Utilities This section explains the AFIT utility functions: • Drain Tester • Update Tester • Injector Locator • View Vehicle Info Active Fuel Injector Tester User Guide... -
Page 41: Draining The Fmu
Utilities Main Menu Injector Test Pressure Test Leak Down Test Vehicle Selection Utility Functions Drain Tester Update Tester View Vehicle Info Injector Locator Draining the FMU CAUTION! It is recommended that you drain the fuel Management Unit after each use to avoid hazardous situations. •... -
Page 42: Updating The Database
Utilities Main Menu Pressure Test Leak Down Test Vehicle Selection Utility Functions Injector Test Drain Tester Update Tester View Vehicle Info Injector Locator Updating the Database Periodically, update files will be provided to you for download to AFIT. Instructions are included with the files on how to copy them to your computer. -
Page 43: Locating An Injector
Utilities Main Menu Injector Test Pressure Test Leak Down Test Vehicle Selection Utility Functions Drain Tester Update Tester View Vehicle Info Injector Locator Locating an Injector Because it is possible to connect any injector harness connector to any injector when using a direct connection hookup, this utility is used to identify the physical location of the injector shown in the results screen. -
Page 44: Maintenance
Maintenance Periodically, AFIT may require maintenance, such as changing a fuse or a filter; or you may need to uninstall the AFIT PC Application software from the shop computer. This section describes those procedures. Active Fuel Injector Tester User Guide... -
Page 45: Replacing The Fuel Filter
Maintenance Replacing the Fuel Filter With use, you will need to periodically replace AFIT’s fuel filter. Procedure Fuel management 1. Unscrew the filter end cap from the control unit (FMU) unit with a ½” open-ended wrench. Drain hose 2. Remove the glass housing. O-ring Fuel filter 3. -
Page 46: Adjusting The Contrast
Maintenance Adjusting the Contrast Normally you will not need to adjust the LCD screen’s contrast. However, over time, you may need to make a minor adjust. Procedure Adjust contrast 1. Unscrew the back panel of the control unit. 2. Locate the control screw. 3. -
Page 47: Replacing The Fuel Schrader Connector Seal
Maintenance Replacing the Fuel Schrader Connector Seal With use, you will need to periodically replace the Fuel Schrader Connector Seal. Replace the seal whenever it becomes damaged, deformed, fails to seal, or leaks. 1. Using a flat head screw driver, or similar object, gently pry the old seal out of the connector. -
Page 48: Contact Information
Contact Information For technical assistance or to order service parts, contact: 1-800-GM-TOOLS (1-800-468-6657) Important! Make sure to drain ALL fuel from the unit(s) before returning for servicing. Active Fuel Injector Tester User Guide... -
Page 49: Warranty
The sole and exclusive remedy for any Unit found to be defective is repair or replacement, at the option of Bosch. In no event shall Bosch be liable for any direct, indirect, special, incidental or consequential damages (including lost profit) whether based on warranty, contract, tort or any other legal theory. - Page 50 02491-049 Rev A 02491-049 Rev A US Patent. No. 5,020,362...
Need help?
Do you have a question about the CH-47976 and is the answer not in the manual?
Questions and answers
Said someone let the smoke out and it messed up a circuit board