
Summary of Contents for Diamond Shield Zapper IE
- Page 1 Diamond Shield Zapper IE Instruction Manual Valid for version 2.0 Diamond Shield Professional Page 1 Instruction Manual...
- Page 2 Diamond Shield Professional Page 2 Instruction Manual...
-
Page 3: Table Of Contents
Menu „Settings“ ..............18 Working with the chip cards ............. 19 Playing frequency programs from a chip card ......19 Technical Data ................. 20 Declaration of Conformity ..............21 For disposal ..................22 Diamond Shield Professional Page 3 Instruction Manual... - Page 4 Diamond Shield Professional Page 4 Instruction Manual...
-
Page 5: Introduction
Introduction The Diamond Shield Professional is a very effective Zapper: Very wide frequency range of 0.5 Hz to 2 MHz. Possibility of very small voltages (0.1 V) to high voltages (16 V) Impulse discharge Wobble functionality ... - Page 6 Diamond Shield Professional Page 6 Instruction Manual...
-
Page 7: Important Notices
Under any circumstances never insert a plug into an electrical outlet. Always insert the grounding cable to the Diamond Shield and then connect it to the power outlet. Never use this device to anyone who has a pacemaker. -
Page 8: Storage And Transportation
23 °C. A value without tolerances is a guiding value for the device. Maintenance The outside of the device should be cleaned regularly with a soft, non-linting cloth. The Diamond Shield should never be cleaned with alcohol or other solvents. Diamond Shield Professional Page 8... -
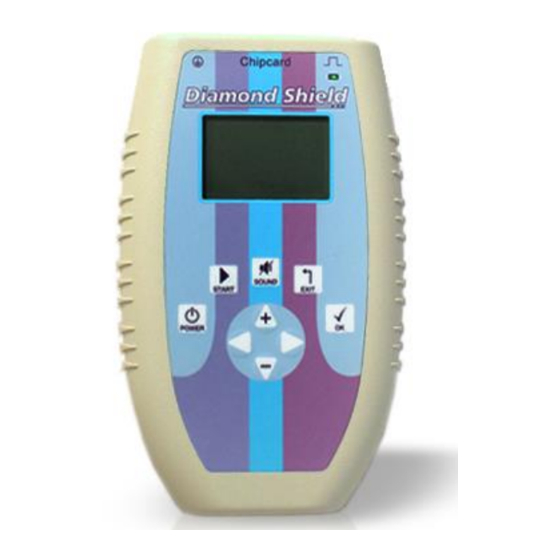
Page 9: Feature Identification
Feature Identification Front Side 1. LED 3. Mute Switch 6. EXIT-button 2. LCD-Display 4. START-button 7. OK-button 5. On-Off switch 8. Arrow keys Diamond Shield Professional Page 9 Instruction Manual... -
Page 10: Connection Side
Connection Side 1. Grounding connection 2. Chip card slot 3. Connection for hand- or bracelet-electrodes Diamond Shield Professional Page 10 Instruction Manual... -
Page 11: Back Side
Back side 1. Battery compartment Diamond Shield Professional Page 11 Instruction Manual... -
Page 12: Bringing Into Service
(above LED) 2. Connect the bracelets. 3. If you want to work with grounding: Connect the grounding cable to the left socket. Then connect the grounding wire to the plug socket. Diamond Shield Professional Page 12 Instruction Manual... -
Page 13: Operation
If the battery is empty, a message appears, and the device can no longer be used. Activate / deactivate the loudspeaker Press the SOUND button to switch the loudspeaker on or off. The current state is then displayed briefly. Diamond Shield Professional Page 13 Instruction Manual... -
Page 14: Menu Navigation
Menu Navigation Navigation through the menu structure of the Diamond Shield is simple and identical for all functional areas: The currently selected item is marked with a small black rectangle. Use the up arrow key ("+") to select the next higher element and down ("-") arrow key to select the... -
Page 15: Main Menu
Sequence: A sequence is a serial arrangement of several frequency programs. For example, there is a sequence with the name "Diamond Shield", including the frequency programs DS1, DS2 ... up to 26 DS. Diamond Shield Professional Page 15... -
Page 16: Standard" Menu
However, this is only useful for testing purposes. If the required contact is made, the unit will display for a short time the resistance in Kiloohm (kΩ) and then automatically start the execution of the frequency program. Diamond Shield Professional Page 16 Instruction Manual... -
Page 17: Display
On the right side the selected intensity is displayed in milliamps (1/1000 amps). ◦ For frequency programs without current control the actual voltage in volts is displayed. Diamond Shield Professional Page 17 Instruction Manual... -
Page 18: Menu „Settings
Speaker: the tone pitch of the internal speaker. Use the arrow keys left and right to choose 4 or 5 kHz. HW Rev.: Displays the hardware version of the device. Diamond Shield Professional Page 18 Instruction Manual... -
Page 19: Working With The Chip Cards
6. If you want to play a single frequency program, you first select the corresponding sequence. Then press the OK button to enter the submenu. Then select the desired frequency program and press the RUN button. Diamond Shield Professional Page 19 Instruction Manual... -
Page 20: Technical Data
Wobble (maximum up to twice the fundamental frequency) Voltage control to keep the output current constant (only at frequencies above 20 Hz) Internal resistance: 1 kOhm Diamond Shield Professional Page 20 Instruction Manual... -
Page 21: Declaration Of Conformity
Dermavit GmbH + Co KG herewith declares conformity of the product Bezeichnung / Productname: Funktionsgenerator / Function Generator Typ / Type: Diamond Shield Professional mit den folgenden Bestimmungen / with applicable regulations: EMV Richtlinien / EMC Directives: 2004/108/EG; Elektromagnetische Verträglichkeit / Electromagnetic compatibility: DIN EN 61326-1;... -
Page 22: For Disposal
For disposal The Diamond Shield device must – as well as other electronic devices – not be disposed with normal household waste. You can submit to the local separate collection system for electrical appliances or return it to the address below (unfree postage will not be accepted). - Page 23 DermaVit GmbH & Co. KG DermaVit GmbH & Co. KG Unterer Anger 15/Rgb. 80331 Munich Germany Tel: +49 (0) 89-18 90 84 6-0 Fax: +49 (0) 89-18 90 84 6-15 E-Mail: info@derma-vit.com Web: http://www.derma-vit.com Diamond Shield Professional Page 23 Instruction Manual...
- Page 24 Diamond Shield Professional Page 24 Instruction Manual...
Need help?
Do you have a question about the Zapper IE and is the answer not in the manual?
Questions and answers