Advertisement
Table of Contents
- 1 Table of Contents
- 2 Introduction
- 3 Intended Use
- 4 Save These Instructions
- 5 Important Safety Precautions and Warnings
- 6 How Max Power Relief Works
- 7 Know Your Unit
- 8 Assembly Steps
- 9 Get Started with Your Therapy
- 10 How to Control and Reduce Your Pain
- 11 Cleaning and Storage
- 12 Troubleshooting
- 13 Limited Warranty
- 14 Specifications
- 15 Fcc Statement
- 16 Guidance and Manufacturer's Declaration
- Download this manual
Advertisement
Table of Contents

Related Manuals for Omron Max Power Relief PM500


Summary of Contents for Omron Max Power Relief PM500
- Page 1 ® INSTRUCTION MANUAL TENS Therapy Pain Relief Max Power Relief® PM500 Pads are for Single Patient Use Only...
-
Page 2: Table Of Contents
TABLE OF CONTENTS 1. INTRODUCTION ......................3 2. INTENDED USE ......................4 3. SAVE THESE INSTRUCTIONS ................... 5 4. IMPORTANT SAFETY PRECAUTIONS AND WARNINGS ........6 5. HOW MAX POWER RELIEF WORKS ..............13 6. KNOW YOUR UNIT.....................14 7. ASSEMBLY STEPS .......................16 8. -
Page 3: Introduction
1. INTRODUCTION Thank you for purchasing the OMRON Max Power Relief. The Max Power Relief is a portable TENS (Transcutaneous Electrical Nerve Stimulation) device that provides relief of chronic, acute* and arthritic pain. It is designed to reduce and relieve muscle and joint pain, stiffness and numbness in the back, arms, legs, shoulder and foot by applying electrical nerve stimulation to the surface of the skin near the site of the pain. -
Page 4: Intended Use
2. INTENDED USE This device is intended for the relief of pain associated with sore or aching muscles of the lower back, arms, legs, shoulder, or foot due to strain from exercise or normal household and work activities. When used for the symptomatic relief and management of chronic, intractable pain and relief of pain associated with arthritis, use the Shoulder mode of stimulation. -
Page 5: Save These Instructions
3. SAVE THESE INSTRUCTIONS Symbols Glossary: For symbol information, visit: OmronHealthcare.com/symbols-glossary Contraindication Do not use this device if you have a cardiac pacemaker, implanted defibrillator or other implanted metallic or electronic device. Such use could cause electric shock, burns, electrical interference or death. -
Page 6: Important Safety Precautions And Warnings
4. IMPORTANT SAFETY PRECAUTIONS AND WARNINGS Indicates a potentially hazardous situation which, if not avoided, could WARNING result in death or serious injury. DO NOT USE THIS UNIT WITH THESE OTHER DEVICES: • Do not use this device while using another TENS device. •... - Page 7 4. IMPORTANT SAFETY PRECAUTIONS AND WARNINGS DO NOT USE ON THESE INDIVIDUALS • Pregnant women. • Do not use on children or infants because this device has not been evaluated for pediatric use. • Keep out of the reach of young children because the electrode cord could cause strangulation.
- Page 8 4. IMPORTANT SAFETY PRECAUTIONS AND WARNINGS Both sides of the chest cavity simultaneously (lateral or front and back), or across your chest because the introduction of electrical current may cause rhythm disturbances which could be lethal. On the calves of both legs at the same time because this may cause cardiac disturbance.
- Page 9 4. IMPORTANT SAFETY PRECAUTIONS AND WARNINGS DO NOT ALTER THE UNIT • Do not plug this cord into anything other than this unit. • No modification of this unit is allowed. • Use this unit only with the leads, electrodes, pads and accessories recommended by the manufacturer to avoid damage to the unit.
- Page 10 4. IMPORTANT SAFETY PRECAUTIONS AND WARNINGS • Do not bend or fold the pads because the gel may get damaged and it won’t stick or function properly. • To avoid damage to the adhesive surface of the pads, put the pads only on the skin or on the plastic pad holder provided.
- Page 11 • Ensure that this device has acclimated to room temperature before using. Using this device after an extreme temperature change could lead to an improper operation. OMRON recommends waiting for approximately 2 hours for the device to warm up or cool down when the device is used in an environment within the temperature specified as operating conditions after it is stored either at the maximum or at the minimum storage temperature.
- Page 12 4. IMPORTANT SAFETY PRECAUTIONS AND WARNINGS Possible Adverse Reactions • Do not use to treat one region for extended periods of time (more than 30 minutes a session, up to three times/day) or muscles in that region may become exhausted and sore.
-
Page 13: How Max Power Relief Works
5. HOW MAX POWER RELIEF WORKS How does it work? The OMRON Max Power Relief is a powerful TENS device that provides relief of chronic, acute* and arthritic pain. Scientific theory suggests that TENS therapy may work in several ways: 1. -
Page 14: Know Your Unit
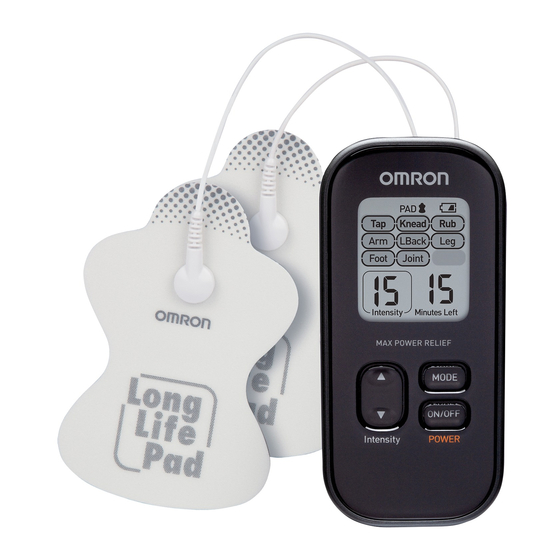
6. KNOW YOUR UNIT PACKAGE CONTENTS Main Unit Electrode Cords Pad Holder 2 LONG LIFE PADS™ (1 standard) (1 standard pair) Batteries (2 AAA size (LR03) batteries) Belt Clip Soft Pouch Instruction Manual Quick Start Guide/Pad Placement Guide... - Page 15 2. Fifteen intensity levels (1 low to 15 high). 3. Pair of pads (durable, reusable, washable, up to 150 uses). (Only use OMRON manufactured pads and cords with this unit). 4. Automatic 15-minute shut off. 5. Big screen lets you clearly control your therapy with mode, intensity level and minutes left displayed.
-
Page 16: Assembly Steps
7. ASSEMBLY STEPS Before using your unit, ensure that: 1. The cord is not broken. 2. The gel pad is not damaged. 3. The electrode cord connection is not broken. 4. The unit is intact and working. 5. There is no battery leakage. STEP 1 –... - Page 17 7. ASSEMBLY STEPS STEP 2 – ATTACH ELECTRODE CORD TO THE MAIN UNIT Attach the electrode cord plug to the bottom of the main unit. STEP 3 – SNAP EITHER ELECTRODE CORD TO EACH OF THE PADS For the first time, take the pads out of the sealed package. CAUTION •...
- Page 18 7. ASSEMBLY STEPS STEP 4 – REMOVE AND DISCARD PLASTIC FILM FROM PADS Remove the clear plastic film from the back of the pad. Discard the plastic film backing as well as the clear packaging. STORING PADS ON PAD HOLDER pad facing down Remove plastic film and put sticky side of pads on either side of the pad holder.
-
Page 19: Get Started With Your Therapy
8. GET STARTED WITH YOUR THERAPY (USE FOR A MAXIMUM OF 30 MINUTES PER SESSION) STEP 1 – PAD PLACEMENT CAUTION For optimal therapy: • Place pads on each side of the pain, not directly on the pain. • Place pads at least 1 inch (3 cm) apart for optimal results. •... - Page 20 8. GET STARTED WITH YOUR THERAPY STEP 1 – PAD PLACEMENT (continued) LOWER BACK Attach one pad below Attach pads on each and above the region side of the region in pain, both on same where you feel pain. side. JOINT (ELBOW) (HIP &...
- Page 21 8. GET STARTED WITH YOUR THERAPY STEP 1 – PAD PLACEMENT (continued) JOINT (KNEE) (CALF) Attach both pads above the Attach both pads on the calf where you feel pain. knee or above and below the joint with pain. WARNING •...
- Page 22 8. GET STARTED WITH YOUR THERAPY STEP 1 – PAD PLACEMENT (continued) SHOULDER Attach both pads on the shoulders according to your pain. SHOULDER Attach one pad on the front and on the back of your shoulder. WARNING • Do not apply the pads on both sides of the chest cavity simultaneously (lateral or front and back), or across your chest because the introduction of electrical current may cause rhythm disturbances which could be lethal.
- Page 23 8. GET STARTED WITH YOUR THERAPY STEP 2 – SELECT 1 OF 9 MODES • Push “ON/OFF”. • Choose 1 of the 9 modes. Modes cannot be combined. Choose a massage-like mode 1. Tap 2. Knead 3. Rub Or choose a pain mode: Push “MODE”...
- Page 24 8. GET STARTED WITH YOUR THERAPY STEP 2 – SELECT 1 OF 9 MODES (continued) Lower Back Foot Therapies Lower Back Foot designed for What does the Series of low Series of high rate Series of low to Series of low therapy deliver? to medium rate to low tingling...
- Page 25 8. GET STARTED WITH YOUR THERAPY STEP 3 – SELECT THE CORRECT INTENSITY LEVEL (1 LOW – 15 HIGH) Start at the lowest intensity level and slowly increase it by pushing the “▲(Up)” arrow button. You should feel a gentle pulsing sensation. How do I pick the right intensity level for my pain? Each time you push the “▲(Up)”...
-
Page 26: How To Control And Reduce Your Pain
9. HOW TO CONTROL AND REDUCE YOUR PAIN When should I start therapy? Use as soon as your pain begins. Start with one session (unit automatically turns off at 15 minutes). Get to your pain early If you get to your pain early, it may prevent the pain from becoming worse, or even chronic. - Page 27 9. HOW TO CONTROL AND REDUCE YOUR PAIN What type of pain is it best for? This therapy works best on acute pain because it is localized. Acute pain is pain in one area for less than 3 months. If you have chronic pain, you may have pain in more than one area and for longer than 6 months.
-
Page 28: Cleaning And Storage
10. CLEANING AND STORAGE The unit is designed for repeated use over time. The pads will last up to 150 uses, or 5 months (based on use one time per day). Here are important cleaning and storage instructions: Cleaning the pads 1. - Page 29 10. CLEANING AND STORAGE Storing the pads 1. Turn the unit off and remove the cord from the bottom of the unit. 2. Remove the pads from your body. 3. Leave the electrode cords connected to the pads. Place the pads on the pad holder, one pad on each side with the sticky side of each pad on the pad holder.
-
Page 30: Troubleshooting
11. TROUBLESHOOTING If any of the below problems occur, check to make sure that no other electrical device is within 12 inches (30 cm). If the problem persists, refer to the table below. If this happens... Possible causes... Try this solution... The intensity is not felt. - Page 31 11. TROUBLESHOOTING If this happens... Possible causes... Try this solution... Battery icon is empty. Are the batteries weak? Replace both batteries at the same time. Gel pad does not stick Have you removed the transparent Peel off film from the adhesive to skin.
-
Page 32: Limited Warranty
12. LIMITED WARRANTY Your OMRON Max Power Relief unit, excluding the batteries and pads, is warranted to be free from defects in materials and workmanship appearing within 1 year from the date of purchase, when used in accordance with the instructions provided with the device. The above warranty extends only to the original retail purchaser. - Page 33 12. LIMITED WARRANTY This warranty provides you with specific legal rights, and you may have other rights that vary by jurisdiction. FOR CUSTOMER SERVICE Visit our web site at: OmronHealthcare.com Call toll free: 1-800-634-4350...
-
Page 34: Specifications
Device: 5 years Pad: 150 uses NOTE: These specifications are subject to change without notice. This OMRON product is produced under the strict quality system of OMRON HEALTHCARE Co. Ltd., Japan. Designed for a minimum of 5 years life expectancy. - Page 35 13. SPECIFICATIONS Optional Accessories • PMLLPAD-L (3”x4.5” (75 mm × 114 mm)) • PMLLPAD (2.5”x4” (63 mm × 102 mm)) To order : OmronHealthcare.com...
-
Page 36: Fcc Statement
14. FCC STATEMENT FCC CAUTION Changes or modifications not expressly approved by the party responsible for compliance could void the user’s authority to operate the equipment. Note: This equipment has been tested and found to comply with the limits for a Class B digital device, pursuant to part 15 of the FCC Rules. -
Page 37: Guidance And Manufacturer's Declaration
15. GUIDANCE AND MANUFACTURER’S DECLARATION OMRON Max Power Relief Information for Accompanying Documents in the Scope of IEC60601-1-2:2014 Important information regarding Electromagnetic Compatibility (EMC) PM500 conforms to IEC60601-1-2:2014 Electromagnetic Compatibility (EMC) standard. Further documentation in accordance with this EMC standard is available at... - Page 38 OMRON HEALTHCARE Co., Ltd. 53, Kunotsubo, Terado-cho, Muko, Kyoto 617-0002 JAPAN Distributed by: OMRON HEALTHCARE, INC. 1925 West Field Court, Lake Forest, IL 60045 U.S.A. OmronHealthcare.com © 2019 OMRON HEALTHCARE, INC. Made in China...
- Page 39 Omron Healthcare helps you For questions: 1-800-634-4350 Get general pain info: make positive lifestyle changes OmronPainRelief.com/blog with innovative medical solutions that you can use safely and accurately at home. OmronHealthcare.com 3144132-8A...
Need help?
Do you have a question about the Max Power Relief PM500 and is the answer not in the manual?
Questions and answers