Advertisement
Quick Links
SwiftNet™ Installation Instructions
Safety
: Please be very certain to only put the Tensioning Boom in the Netting
when the Netting is lying flat on the ground. Never try to insert the Boom into
the Netting Top End Caps with the Netting standing up. Doing so would require
placing the Boom under tension by hand, which could result in possible injury.
Video
: Please review the installation video with Pickleball Pro Glen Peterson
first before trying to assemble the system as he shows you how to do it quickly
and easily. The video can be found at:
https://www.pickleball.com/SwiftNet-Portable-Pickleball-Net-p/pb05.htm
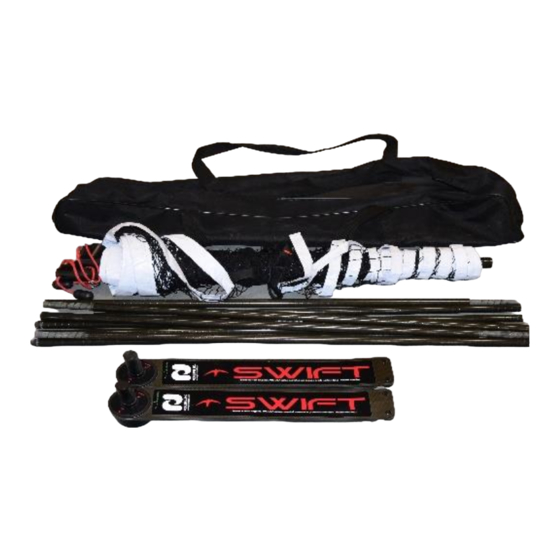
The SwiftNet™ from Aero Sports Equipment consists of six main components:
1 – Center Net Support (shaped like an "A) – "Net Support" - A
1 - Shock Corded Carbon Fiber Tensioning Boom (8 sections corded together) – "Boom" - B
2 - Carbon Fiber Base Leg Pairs (interchangeable for left or right side) with Vertical Support– "Base" – C
On each base is a Vertical Support (small black metal shaft pointing up) – C-1
1 - Netting with 2 Carbon Fiber Posts attached – "Netting" - D
1 – Center Net Strap Adjuster – "Adjuster" - E
D
B
C
C-1
E
A
Page 1 of 9
Advertisement

Summary of Contents for Pickle-ball SwiftNet
- Page 1 The video can be found at: https://www.pickleball.com/SwiftNet-Portable-Pickleball-Net-p/pb05.htm The SwiftNet™ from Aero Sports Equipment consists of six main components: 1 – Center Net Support (shaped like an “A) – “Net Support” - A 1 - Shock Corded Carbon Fiber Tensioning Boom (8 sections corded together) – “Boom” - B 2 - Carbon Fiber Base Leg Pairs (interchangeable for left or right side) with Vertical Support–...
- Page 2 Step 1: Open Carry Bag Open the carry bag and remove the contents, and set them on the court for easy access. Step 2: Open the Base Legs Take one of the Carbon Fiber Base Legs, and fan it open around the Vertical Support on the Base. Place each Base about one foot outside the sideline at the center of the court with the legs directed away from the court.
- Page 3 Note that the Net Tightening Cord that is on top of each Top End Cap, is fully loosened before inserting Boom. Step 5: Attach End Posts to Base Take the Netting with one of the End Posts with the Boom already inserted and slide it down over the Vertical Support of the Base.
- Page 4 Tighten the Netting by pulling the Tensioning Net Cord straight down through the cam mechanism in the Top End Cap on both sides of the Netting (be sure to pull the cord down through the teeth of the mechanism before tightening).
- Page 5 36”. If this measures slightly higher than 36”, you may need to adjust the Base Legs to ensure a proper 3-point contact, and that the posts are vertical. Thank you very much for using the SwiftNet™! We very much appreciate your business. Additional Questions - Please contact: Pickle-Ball Inc.
- Page 6 SwiftNet™ Disassembly Instructions Safety Never try to remove the Boom from the Netting while it is under tension. Serious injury could result. Always be certain to fully release the Tensioning Net Cord from both of the Top End Caps before attempting to take the net apart.
- Page 7 Step Four: Separate the Netting from the assembly Separate the Netting and End Posts from the Support Base by pressing in the interlock lever to release the Post from the Vertical Support of the Base. Lay the Netting and Boom on the ground with the Boom still inserted in either Top End Cap of the End Posts.
- Page 8 Base. Place each of the Base Legs in the carry bag. Be sure that the Vertical Support of the Base Legs is pointing up in the bag. Thank you very much for using the SwiftNet™! We very much appreciate your business and hope that it brings you many years of Pickleball enjoyment.
- Page 9 SwiftNet™ Limited Warranty All of the components of the SwiftNet™ system, with the exception of the items listed in the “What’s Not Covered” section of this document, are guaranteed against workmanship and/or manufacturer defects for a period of one (1) year from the date of purchase. The warranty is not transferable after registration and only applies to the original owner.
Need help?
Do you have a question about the SwiftNet and is the answer not in the manual?
Questions and answers