
Related Manuals for MB Connect Line mbNET.mini Series


Summary of Contents for MB Connect Line mbNET.mini Series
- Page 1 MDH860, MDH861, MDH862 EU, MDH 862 AT&T, MDH863, MDH 865, MDH 866 EU, MDH 866 AT&T, MDH 867 PROG. CNTLR. E482663 Quick start-up guide from firmware V 2.0.6 and HW 02 ( Nov. 26 , 2019) 8.002.702.02.00...
-
Page 2: Table Of Contents
Table of contents Safety instructions Using Open Source Software General Information Special Liability Regulations Used Open-Source Software Included in delivery Performance characteristics Getting started Initial configuration Initial configuration via mbCONNECT24 V 1.7 Login mbCONNECT24 Adding a new device Transfer configuration to the mbNET.mini Initial configuration via RSP mbCONNECT24 V 2.x... -
Page 3: Safety Instructions
This Quick Start Guide provides a quick Overview of selected operating procedures and functions of the mbNET.mini industrial router. However, the detailed manual with the important Notes and safety instructions can NOT be replaced by this document. Read the following instructions carefully and keep this document in a safe. Latest information, updates and the complete Manual, visit our website at www.mbconnectline.com. -
Page 4: Using Open Source Software
Using Open Source Software General Information Our products contain, amongst others, so-called open-source software that is provided by third parties and has been published for free public use. The open-source software is subject to special open-source software licenses and the copyright of third parties. Basically, each customer can use the open-source soft-ware freely in compliance with the licensing terms of the respective producers. -
Page 5: Special Liability Regulations
Requests must be directed to the following address, if possible under specification of the serial number: MB CONNECT LINE GMBH Tel. +49 (0) 98 51 / 58 25 29 0 Fernwartungssysteme Fax +49 (0) 98 51 / 58 25 29 99 Winnettener Str. -
Page 6: Included In Delivery
MDH 862 (EU/AT&T) Please keep the original box and the original packaging in case you need to send the device for repair at a later date. MB connect line GmbH Should any of these parts are Winnettener Str. 6 Tel.: +49 (0)9851/582529-0 missing or damaged, please 91550 Dinkelsbühl... - Page 7 MDH 863 MDH 865 MDH 866 (EU/AT&T) MDH 867 Quick start guide WiFi antenna antenna Item No.: 8.002.702.02.00 Item No.: 8.002.101.00.00 Item No.: 8.002.108.00.00...
-
Page 8: Performance Characteristics
Performance characteristics ● The router can be fully configured via the portal (my)mbCONNECT24. ● Can connect to machines and systems via LAN, WAN, WiFi or modem. ● Deployable worldwide using mobile communications plus access via LAN and Internet. ● Secure connection using an integrated firewall with IP filter, NAT, port forwarding and VPN with Blowfish encryption. -
Page 9: Initial Configuration
Initial configuration Requirements: ● You have a user account on the web portal V 1.7.x mbCONNECT24 or the Remote Service Portal RSP V 2.x mbCONNECT24 If you do not have a user account on mbCONNECT24, please contact your system administra- tor or authorized sales partner. -
Page 10: Initial Configuration Via Mbconnect24
Initial configuration via V 1.7 mbCONNECT24 Login mbCONNECT24 mbDIALUP ADVICE! Change unconditionally and without delay the default login information! Adding a new device For the initial configuration following information / settings are necessary: • Description: Device Name and Type • Network: LAN IP and LAN Netmask bzw. - Page 11 Save your settings. Click Configuration Click mbconnect24.mbn Then click in the Device Administration on the disk icon and select „Download to PC“ option. Save the configuration file on a USB stick - directly in the root directory.
-
Page 12: Transfer Configuration To The Mbnet.mini
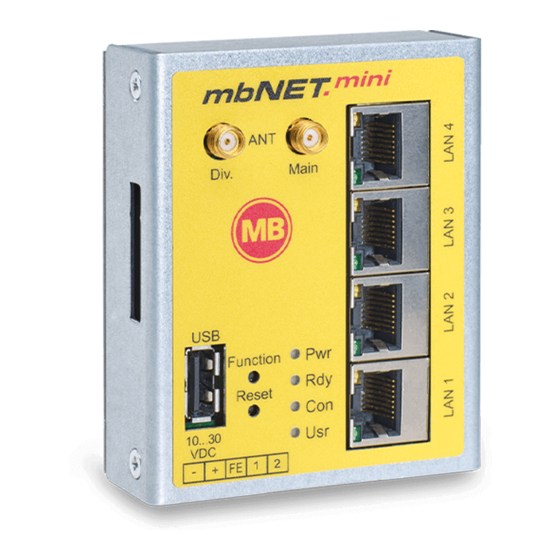
Transfer configuration to the mbNET.mini When the mbNET.mini is ready to operate, insert the USB stick into the USB port of the device. The device will recognize the configuration file and show that th- rough the slowly flashing LED Usr (flashing frequency: 1.5 Hz). As soon as the LED Usr starts to flash ... -
Page 13: Initial Configuration Via Rsp Mbconnect24 V
Initial configuration via RSP V 2.x mbCONNECT24 Login mbCONNECT24 mbDIALUP ADVICE! Change unconditionally and without delay the default login information! Navigation: Administration > User Creating a project Navigation: Administration > Projects In the project overview, click the plus and assign the next screen a project name (all other inputs / information can be made up later). -
Page 14: Create A Device
Create a device Navigation: Administration > Projects > Project Alpha (selected project) In the selected project, click the plus and select „Create new device“. For the basic configuration, you only need to select your "Device Type" and enter a unique device "Name". -
Page 15: Create The Configuration
Create the configuration Navigation: Administration > Projects > Project Alpha (selected project) > NewDecice (selec- ted device) Here the following menus are relevant for the initial configuration: ● LAN (all devices) Make sure that the LAN IP and the WAN IP are in different address ranges. -
Page 16: Transferring The Configuration To The Mbnet.mini
Transferring the configuration to the mbNET.mini Navigation: Administration > Projects > Project Alpha (selected project) > NewDecice (selec- ted device) After entering all necessary data, you must transfer the configuration to the mbNET.mini. Therefor connect an USB stick to your configuration PC (the USB stick must have the file format FAT!). -
Page 17: Transfer Configuration To The Mbnet.mini
Transfer configuration to the mbNET.mini When the mbNET.mini is ready to operate, insert the USB stick into the USB port of the device. The device will recognize the configuration file and show that th- rough the slowly flashing LED Usr (flashing frequency: 1.5 Hz). As soon as the LED Usr starts to flash ... -
Page 18: Access The Web Interface Of The Mbnet.mini
Access the web interface of the mbNET.mini On the web interface of the mbNET.mini a Status page and a Diagnostic page is available. On the Status page, five steps with additional information are displayed, which must be run through when connecting the mbNET.mini with the portal. The Diagnostic page helps you in case of a failed connection establishment in troubleshoo- ting. -
Page 19: Device State
Device State After a successful login you will see on the status page the "Device State". Among other things, the five steps are displayed that are required so that the device can connect to the portal. = everything OK = processing = Error Click on the icon to the right of each progress to get details / information about this step. -
Page 20: Tags
Tags If the mbNET.mini has established a connection to the portal (indicated by the green LED symbol next to „Portal communication“), all available Tags for the portal are listed here. In addition to the name of a Tag, its status (using the LED symbol*) and the respective Tag value are displayed. -
Page 21: Loading The Factory Settings
Loading the factory settings Before you reset the device to its factory settings, note the following: ● The device must be operational (LED Pwr + Rdy light up). ● The IP address of the router is reset to 192.168.0.100. You may have to adjust the network settings of the configuration computer accordingly. To reset the mbNET.mini to factory settings, proceed as follows: Click the button Reset once . -
Page 22: Factory Settings On Delivery
MB connect line GmbH SIMPLIFIED EU DECLARATION OF CONFORMITY Fernwartungssysteme Hereby, MB connect line GmbH declares that the radio equipment type MDH 861; -862 EU; -863; -865; -866; -867 is in compliance Winnettener Str. 6 with Directive 2014/53/EU.
Need help?
Do you have a question about the mbNET.mini Series and is the answer not in the manual?
Questions and answers