Table of Contents
Advertisement
Quick Links
- 1 Introduction to the Starline Roldeck Control Rdeb 2006
- 2 2/3 Installation Instructions / Safety Instructions
- 3 Control Panel / Kontroll Panel / Bedieningspaneel
- 4 Electrical Connections / Elektrische Anschlüsse / Electrisch Aansluiten
- 5 Programming the Roldeck Control / Programmieren der Roldecksteuerung
- Download this manual
GB
D
NL
GB
Copyright Starline Pools & Equipment the Netherlands.
All rights reserved. Nothing from this publication may be copied, stored in an automated database or made
public in any shape or form whether electronically, mechanically, through photocopying, recording or in any
other way without prior written permission from Starline Pools & Equipment.
Copyright Starline Pools & Equipment Niederlande.
D
Alle Rechte vorbehalten. Ohne vorherige schriftliche Genehmigung von Starline Pools & Equipment ist es
nicht gestattet, diese Ausgabe oder Teile daraus auf elektronische, mechanische, fototechnische oder andere
Weise zu vervielfältigen, in einem elektronischen Datenbestand zu speichern oder zu veröffentlichen.
Copyright Starline Pools & Equipment The Netherlands.
NL
Alle rechten voorbehouden. Niets uit deze opgave mag worden verveelvoudigd, opgeslagen in een
geautomatiseerd gegevensbestand of openbaar gemaakt, in enige vorm of op enige wijze, hetzij elektronisch,
mechanisch, door fotokopieën, opnamen, of op enige andere manier, zonder voorafgaande schriftelijke
toestemming van Starline Pools & Equipment.
STARLINE ROLDECK
ROLDECK CONTROL MANUAL RDEB 2006
BEDIENUNGSANLEITUNG ROLDECKSTEUERUNG RDEB 2006
HANDLEIDING ROLDECKBESTURING RDEB 2006
RDEB2006MM.03
Advertisement
Table of Contents

Related Manuals for Starline ROLDECK RDEB 2006

Summary of Contents for Starline ROLDECK RDEB 2006
- Page 1 Starline Pools & Equipment. Copyright Starline Pools & Equipment Niederlande. Alle Rechte vorbehalten. Ohne vorherige schriftliche Genehmigung von Starline Pools & Equipment ist es nicht gestattet, diese Ausgabe oder Teile daraus auf elektronische, mechanische, fototechnische oder andere Weise zu vervielfältigen, in einem elektronischen Datenbestand zu speichern oder zu veröffentlichen.
-
Page 2: Table Of Contents
CONTENTS / ÜBERSICHT / INHOUDSOPGAVE INTRODUCTION TO THE STARLINE ROLDECK CONTROL RDEB 2006 DIE STARLINE ROLDECKSTEUERUNG RD 2006 INTRODUCTIE VAN DE STARLINE ROLDECKBESTURING RD 2006 INSTALLATION INSTRUCTIONS / SAFETY INSTRUCTIONS INSTALLATIONSVORSCHRIFTEN / SICHERHEITSHINWEISE INSTALLATIE VOORSCHRIFTEN / VEILIGHEIDS INSTRUKTIES CONTROL PANEL / KONTROLL PANEL / BEDIENINGSPANEEL AUTOMATIC SAFEGUARDS AND MALFUNCTION MESSAGES AUTOMATISCHE SICHERUNG UND STŐRUNGSMELDUNGEN... -
Page 3: Introduction To The Starline Roldeck Control Rdeb 2006
Roldeck. During the opening or closing of the Roldeck, the control, in combination with the Starline pool control, offers the possibility of switching off the filter pump first and activating the Roldeck after a delay of 30 seconds. -
Page 4: Die Starline Roldecksteuerung Rd 2006
Wenn das Roldeck beim Öffnen und Schließen beispielsweise vor den Einlaufdüsen läuft, kann die Funktionsfähigkeit des Roldecks erheblich beeinträchtigt werden. Die Steuerung bietet in Kombination mit der Starline Poolcontrol die Möglichkeit, beim Öffnen und Schließen des Roldecks zuerst die Filterpumpe auszuschalten und das Roldeck nach einer Verzögerung von ca.30 Sekunden zu aktivieren. -
Page 5: Introductie Van De Starline Roldeckbesturing Rd 2006
Roldeck ernstig verstoren. De besturing biedt de mogelijkheid om in combinatie met de Starline Poolcontrol bij het openen of sluiten van het Roldeck eerst de filterpomp uit te schakelen en na een vertraging van 30 seconden het Roldeck te activeren. -
Page 6: 2/3 Installation Instructions / Safety Instructions
The connection diagram and the prevailing safety regulations must be taken into account. It is preferable for the 230 Volt connection of the RD 2006 to be connected over the Starline Pool control. If this is not possible, the RD 2006 can be connected directly to the 230V mains voltage which has an earth leakage circuit breaker with a IFN value of ≤... -
Page 7: Installationsvorschriften / Sicherheitshinweise
2. INSTALLATIONSVORSCHRIFTEN • Die Starline Roldecksteuerung RD 2006 entspricht der Schutzklasse und ist gegen Feuchtigkeit zu schützen und in einem, belüfteten (Betriebs-)Raum zu installieren. • Die RD 2006 an einer flachen Wand montieren. Dazu die betreffenden Montageöffnungen benutzen.Diese Öffnungen befinden sich links und rechts unten und oben in der Mitte. -
Page 8: Installatie Voorschriften / Veiligheids Instrukties
Het aansluitschema en de op dat moment geldende veiligheidsvoorschriften dienen in acht te worden genomen. • De 230 Volt aansluiting van de RD 2006 wordt bij voorkeur over de Starline Poolcontrol aangesloten. Indien dit niet mogelijk is wordt de RD 2006 rechtstreeks op de netspanning 230V. waarde ≤ 30mA . -
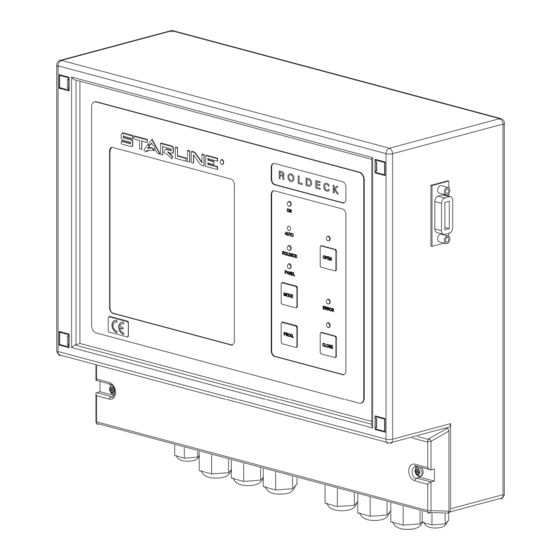
Page 9: Control Panel / Kontroll Panel / Bedieningspaneel
CONTROL PANEL / KONTROLL PANEL / BEDIENINGSPANEEL Function / Function / Functie On / off switch - Ein / Aus-Schalter – Aan/uit schakelaar Control – Kontroll –Controle LED “On” Control unit is powered on. Steuerung ist eingeschaltet. Besturing staat aan. Control –... -
Page 10: Automatic Safeguards And Malfunction Messages
AUTOMATIC SAFEGUARDS AND MALFUNCTION MESSAGES AUTOMATISCHE SICHERUNG UND STŐRUNGSMELDUNGEN AUTOMATISCHE BEVEILIGINGEN EN STORINGSMELDINGEN 1 - 9 x flashes / blinkt / knippert Error Description Beschreibung Omschrijving Motor not receiving 24V. voltage. Motor erhält keine 24-V-Spannung. Motor krijgt geen 24V. • •... -
Page 11: Electrical Connections / Elektrische Anschlüsse / Electrisch Aansluiten
ELECTRICAL CONNECTIONS / ELEKTRISCHE ANSCHLÜSSE / ELECTRISCH AANSLUITEN OVERVIEW OF CABLING IN COMBINATION WITH GLAND NUTS / ÜBERSICHT ÜBER DIE VERDRAHTUNG MIT ÜBERWURFMUTTERN / OVERZICHT VAN BEKABELING IN COMBINATIE MET WARTELS Cable specifications / Kabelspezifikationen / Kabelspecificatie. Description: Shows what the cable is used for. mm²: Is the core diameter of the connection cable. -
Page 12: Connecting 230V Supply Voltage / Anschluss 230 Volt Netzspannung / Aansluiten Van
It is preferable for the Roldeck control to Die Roldecksteuerung wird nach De Roldeckbesturing wordt bij voorkeur be connected directly to the Starline Pool Möglichkeit an die Anschlüsse „230 V direct aangesloten op de Starline control, to the connections “230V OUT”... -
Page 13: Connecting Standard Roldeck Motor (Rdem) / Anschluss Standard Roldeckmotor
CONNECTING STANDARD ROLDECK MOTOR (RDEM) / ANSCHLUSS STANDARD ROLDECKMOTOR (RDEM) / AANSLUITEN VAN STANDAARD ROLDECKMOTOR (RDEM) Connection “-, +, +, A, B, -” Anschluss „-, +, +, A, B, -“ Aansluiting “-, +, +, A, B, -” (Standard Roldeck motor) (Standard-Roldeckmotor) (Standaard Roldeckmotor) Feed the 2 connection cables (out cables),... -
Page 14: Connecting The Roldeck In-Roller Motor (Rdim) / Anschluss Des Roldeck Rohrmotors
CONNECTING THE ROLDECK IN-ROLLER MOTOR (RDIM) / ANSCHLUSS DES ROLDECK ROHRMOTORS (RDIM) / AANSLUITEN VAN DE ROLDECK BUISMOTOR (RDIM) Connection “-, +, +, A, B, -, P” Anschluss „-, +, +, A, B, -, P“ Aansluiting “-, +, +, A, B, -, P” (in-roller motor) (Rohrmotor) (buismotor) - Page 15 Note! Achtung! Let op! Connections “+, A, B, -” must not be Die Anschlüsse “+, A, B, -” dürfen beim De aansluitingen “+, A, B, -” mogen interchanged with the connections in the Anschluss an die Roldeck-Steckdose nicht onderling niet verwisseld worden met de Roldeck plug socket.
-
Page 16: Connecting The Roldeck Operating-Key Switch / Anschluss Der Roldeckbedienung
CONNECTING THE ROLDECK OPERATING-KEY SWITCH / ANSCHLUSS DER ROLDECKBEDIENUNG - DES SCHLÜSSELSCHALTERS / AANSLUITEN VAN ROLDECK BEDIENING - SLEUTELSCHAKELAAR Cable length: Maximum 75 Meters Kabellänge max. 75 Meter Kabellengte: Maximaal 75 Meter Connect the Roldeck operating/key switch according to table below. Die Roldeckbedienung / der Schlüsselschalter sind den Angaben in der nachfolgenden Tabelle entsprechend anzuschließen. - Page 17 Put the cover with the control buttons Den Deckel mit den Bedienungstasten Plaats het deksel met de back on the housing and tighten the wieder auf das Gehäuse setzen und die bedieningsknoppen terug op de screws crosswise. Schrauben kreuzweise anziehen. behuizing en draai de schroeven kruislings vast.
-
Page 18: Connecting The Childproof Safety Lock To Roldeck Control / Anschluss
CONNECTING THE CHILDPROOF SAFETY LOCK TO ROLDECK CONTROL / ANSCHLUSS DES KINDERSICHERHEITSSCHLOSS AN DIE ROLDECKSTEUERUNG / AANSLUITEN VAN KINDERVEILIGHEIDSSLOT OP ROLDECKBESTURING DIP-switch “S1” switch 1 set to “ON” DIP-Schalter “S1” Schalter 1 auf “ON” DIP-switch ”S1” schakelaar 1 op “ON” Connection “M3+, M3- ”... - Page 19 Functions DIP-switch “S1” / Funktionen des DIP-Schalters „S1“ / Functies Dip switch “S1” Switch / Schalter / Function Funktion Functie Schakelaar Activates Kindersicherung aktivieren Kinderveiligheidsslot childproof safety activeren lock 30 Second 30 Sekunden 30 Seconden engagement Einschaltverzögerung des inschakelvertraging delay Roldeck in Roldeck in Verbindung mit.
-
Page 20: Connecting The Level Controller To Roldeck Control / Anschluss Des
CONNECTING THE LEVEL CONTROLLER TO ROLDECK CONTROL / ANSCHLUSS DES NIVEAUREGLERS AN DIE ROLDECKSTEUERUNG / AANSLUITEN VAN NIVEAUREGELING OP ROLDECKBESTURING Connection level sensor Anschluss d. Pegelsensor Aansluiting niveau sensor EELS 2006 Connection “6, 7” LEVEL Anschluss „6, 7“ Niveauregler (EELS Aansluiting “6, 7”... - Page 21 Connection “6 - 7” level switch Anschluss „6 - 7“ Niveauregler Aansluiting “6 - 7” niveauschakelaar The Starline electronic level control (EELS Der elektronische Starline Niveauregler De Starline elektronische niveauregeling 2006) and the RD 2006 together ensure (EELS 2006) und die RD 2006 (EELS 2006) en de RD 2006 zorgen the optimum working of the Roldeck.
-
Page 22: Connecting Jetstream To Roldeck Control (Fluvo) / Anschluss Der
CONNECTING JETSTREAM TO ROLDECK CONTROL (FLUVO) / ANSCHLUSS DER GEGENSTROMANLAGENPUMPE AN DIE ROLDECKSEUERUNG (FLUVO) / AANSLUITEN VAN JETSTREAM OP ROLDECKBESTURING (FLUVO) DIP-switch “S1” switch 2 set to “ON” DIP-Schalter “S1” Schalter 2 auf “ON” DIP-switch ”S1” schakelaar 2 op “ON” Remove bridging wire between contact “A2 - 96”... - Page 23 Connections “21 - 23” switch contact Anschlüsse „21 -23“ Schaltkontakte Aansluitingen “21 - 23” schakelcontact jetstream pump der Gegenstromanlagenpumpe jetstreampomp If you choose to automatically switch the Wenn die Gegenstromanlagenpumpe Wanneer de keuze gemaakt wordt om de jetstream pump off while closing the beim Öffnen und Schließen des Roldecks jetstreampomp tijdens het sluiten van het Roldeck (recommended by Monoblock),...
-
Page 24: Connecting Jetstream To Roldeck Control (Fitstar) / Anschluss Der
CONNECTING JETSTREAM TO ROLDECK CONTROL (FITSTAR) / ANSCHLUSS DER GEGENSTROMANLAGENPUMPE AN DIE ROLDECKSEUERUNG (FITSTAR) / AANSLUITEN VAN JETSTREAM OP ROLDECKBESTURING (FITSTAR) DIP-switch “S1” switch 2 set to “ON” DIP-Schalter “S1” Schalter 2 auf “ON” DIP-switch ”S1” schakelaar 2 op “ON” Remove bridging wire between contact “A1 - 95”... -
Page 25: Connecting Filter Pump To Roldeck Control / Anschluss Filterpumpe An
6.10 CONNECTING FILTER PUMP TO ROLDECK CONTROL / ANSCHLUSS FILTERPUMPE AN DIE ROLDECKSTEUERUNG / AANSLUITEN VAN FILTERPOMP OP ROLDECKBESTURING Connections “11 - 13” Anschlüsse „11 - 13“ Aansluitingen “11 - switch contact Filter Schaltkontakte der 13” schakelkontact pump Filterpumpe Filterpomp If you choose to Wenn die Filterpumpe Wanneer de keuze... -
Page 26: 1- Button Operation / 1-Tasten-Bedienung / 1- Knop Bediening
6.11 1- BUTTON OPERATION / 1-TASTEN-BEDIENUNG / 1- KNOP BEDIENING Connection “4 - 5” 1 - Button operation Anschluss „4 - 5“ Ein-Tasten- Aansluiting “4 - 5” 1 - Knop bediening Bedienung This connection enables the Roldeck to be Dieser Anschluss bietet die Möglichkeit, Met deze aansluiting bestaat de operated with a pressure contact switch das Roldeck über einen so genannten... -
Page 27: Programming The Roldeck Control / Programmieren Der Roldecksteuerung
PROGRAMMING THE ROLDECK CONTROL. Without moveable bottom flap. PROGRAMMIEREN DER ROLDECKSTEUERUNG. Ohne automatischer Bodenklappe PROGRAMMEREN VAN DE ROLDECK BESTURING Zonder beweegbare bodemklep Place the programming plug in the connector. Den Programmierstecker in den Anschluss stecken. Plaats de programmeerstekker in de connector. Press buttons “prog”... - Page 28 Note: if the Roldeck motor runs in the wrong Press button “open” and bring the direction, the + and – of the Roldeck motor Roldeck to the correct open must be changed round position. The Roldeck motor will continue to Achtung: runas long as the button remains Falls der Roldeckmotor die falsche...
- Page 29 Press button “close” and bring the Roldeck to the correct closed position. The Roldeck motor will continue to run as long as the button remains pressed in. Die Taste “Close” drücken und das Roldeck so weit wie gewünscht schließen.Der Roldeckmotor läuft, solange die Taste gedrückt wird.
- Page 30 FINE-TUNING THE ROLDECK / FEINEINSTELLUNG DES ROLDECKS / FIJN AFSTELLING VAN HET ROLDECK “open” indien het Roldeck in de eind-positie “open” bijgesteld moet worden. “Open”, falls die Endposition „Open“ des Roldecks geändert werden soll. “Open” to adjust the Roldeck in the end position “open”...
-
Page 31: With Moveable Bottom Flap
PROGRAMMING THE ROLDECK CONTROL. With moveable bottom flap. PROGRAMMIEREN DER ROLDECKSTEUERUNG. Mit automatischer Bodenklappe PROGRAMMEREN VAN DE ROLDECK BESTURING Met beweegbare bodemklep Place the programming plug in the connector. Den Programmierstecker in den Anschluss stecken. Plaats de programmeerstekker in de connector. Press buttons “prog”... - Page 32 Note: if the Roldeck motor runs in the wrong Press button “open” and bring the direction, the + and – of the Roldeck motor Roldeck to the correct open must be changed round position. The Roldeck motor will continue to Achtung: runas long as the button remains Falls der Roldeckmotor die falsche...
- Page 33 Press button “close” and bring the Note: Roldeck to the correct closed position. if the Roldeck motor runs in the wrong The Roldeck motor will continue to run direction, the + and – of the Roldeck motor as long as the button remains pressed must be changed round Achtung: Die Taste “Close”...
- Page 34 Press button “open” and bring the Roldeck to the correct open position. The Roldeck motor will continue to runas long as the button remains pressed in. Die Taste “Open” drücken und das Roldeck so weit wie gewünscht öffnen. Der Roldeckmotor läuft, solange die Taste gedrückt wird.
- Page 35 Press button “close” and bring the Roldeck to the correct closed position. The Roldeck motor will continue to run as long as the button remains pressed in. Die Taste “Close” drücken und das Roldeck so weit wie gewünscht schließen.Der Roldeckmotor läuft, solange die Taste gedrückt wird.
- Page 36 FINE-TUNING THE ROLDECK AND/OR BOTTOM FLAP Note! To fine-tune the Roldeck position “open”, the bottom flap must first be opened via the control. FEINEINSTELLUNG DES ROLDECKS UND / ODER DER BODENKLAPPE Achtung! Zur Feineinstellung der Roldeckposition “Open” muss zuerst die Bodenklappe über die Steuerung geöffnet werden.
-
Page 37: Manual Roldeck Control / Manuelle Roldeck Bedienung
MANUAL ROLDECK CONTROL / MANUELLE ROLDECK BEDIENUNG / HANDMATIGE ROLDECK BEDIENING Only with type RD2006 Nur beim Type RD2006 Alleen bij type RD2006 from serial number ab Serienummer vanaf serie nummer 5124376. 5124376. 5124376. If the Roldeck motor fails Wenn sich der Als de motor van het due to a problem with Roldeckmotor auf Grund... - Page 38 Subsequently the Durch drücken der Vervolgens kan het Roldeck can be "open" bzw. "close" Roldeck handmatig controlled manually Tasten an der worden bedient door op by pushing the “open” Steuerung oder am de “open” of “close” and “close” button on Schlüsselschalter, knop op de the Key Switch until the...
-
Page 39: Programming Remote Control / Programmierung Der Funkfernbedienung
PROGRAMMING REMOTE CONTROL / PROGRAMMIERUNG DER FUNKFERNBEDIENUNG / PLAATSEN VAN MODULES IN ROLDECK BESTURINGSKAST NOTE! ACHTUNG! LET OP: To install the modules (receiver, Beim Einbau des Modules Om de modules (ontvanger, klepmodule Automatic bottom flapor the high power (Empfängers“Klappenmoduls oder of high power remmodule) te plaatsen brake module) the control must be Hochleistungs-Bremsmoduls) muss die... -
Page 40: Fitting Remote Control (Rdrc 2000) Optional / Montage Der Funkfern
FITTING REMOTE CONTROL (RDRC 2000) optional / MONTAGE DER FUNKFERNBEDIENUNG (RDRC 2000) Option / AFSTANDSBEDIENING MONTEREN (RDRC 2000) optie Receiver Empfänger Ontvanger RDRC 2000 To install the “receiver” the control Beim Einbau des „Empfängers“ muss Om de “ontvanger” te plaatsen dient de must be switched off. -
Page 41: Programming Remote Control / Programmierung Der Funkfern
PROGRAMMING REMOTE CONTROL / PROGRAMMIERUNG DER FUNKFERNBEDIENUNG AFSTANDSBEDIENING PROGRAMMEREN Remote control. (RDRC 2000) Fernbedienung (RDRD 2000) – Sender Afstandsbediening. (RDRC 2000) transmitter - receiver - Empfänger zender - ontvanger The RD-2006 can be fitted with an Die RD 2006 kann auf Wunsch mit einem De RD-2006 kan optioneel voorzien optional 2-channel transmitter/receiver. - Page 42 PROGRAMMING BUTTON PROGRAMMIERTASTE PROGRAMMEERKNOP Removing old settings Löschen alter Einstellungen. Verwijderen van oude instellingen. Press the programming button on the Die Programmiertaste am Empfänger Druk de programmeerknop op de receiver until the LED starts to burn. drücken, bis die LED-Anzeige beginnt ontvanger in totdat de LED gaat branden.
-
Page 43: Roldeck Control In Connection With Moveable Bottom Flap. Roldecksteuerung
ROLDECK CONTROL IN CONNECTION WITH MOVEABLE BOTTOM FLAP. MOVEABLE BOTTOM FLAP MODULE (RDAP 2006) IS OPTIONAL / ROLDECKSTEUERUNG IN VERBINDUNG MIT AUTOMATISCHER BODENKLAPPE DAS „AUTOMATISCHE BODENKLAPPE MODUL ” (RDAP 2006) IST EINE OPTION / ROLDECKBESTURING I. C. M. BEWEEGBARE BODEMKLEP BEWEEGBARE BODEMKLEP MODULE (RDAP 2006) IS EEN OPTIE Automatic bottom flap module RDAP 2006... - Page 44 Flap module for automatic bottom flap Klappenmodul für automatische Klepmodule ten behoeve van (RDAP 2006) Bodenklappe (RDAP 2006) automatische bodemklep (RDAP 2006) If the swimming pool is designed with an Wird das Schwimmbecken mit einer Indien het zwembad uitgevoerd wordt met automatic moveable bottom flap, the RD automatischen Bodenklappe ausgerüstet, een automatisch beweegbare bodemklep,...
- Page 45 DIP-switch S1 switch 4 on “ON” DIP-Schalter S1 v. Schalter 4 auf “ON” DIP-switch S1 schakelaar 4 op “ON” Connection “-, +, +, A, B, -” Anschluss „-, +, +, A, B, -“ Aansluiting “-, +, +, A, B, -” flap motor (0.5 revolutions per minute) Klappenmotor (0.5 U/min) klepmotor (0.5 omwentelingen / min.)
- Page 46 Connection “-, +, +, A, B, -, P” Anschluss „-, +, +, A, B, -, P“ Aansluiting “-, +, +, A, B, -, P” (in-roller motor) (Rohrmotor) (buismotor) Feed the 2 connection cables (out cables), Die beiden zwei- bzw. fünfadrigen Voer de 2 aansluitkabels (uitkabels), respectively 2- and 5-core, through gland Anschlusskabel (Ausgangskabel) durch...
- Page 47 HIGH POWER BRAKE MODULE. (RDBS 2006) optional / HOCHLEISTUNGS BREMSMODUL (RDBS 2006) OPTION / HIGH POWER REMMODULE (RDBS 2006) OPTIE To install the “high power brake Beim Einbau des „Hochleistungs- Om de “high power remmodule” te module” the control must be switched Bremsmoduls“...
- Page 48 High Power Brake module (RDBS 2006) Hochleistungs-Bremsmodul (RDBS High Power Remmodule (RDBS 2006) 2006) The standard RD 2006 has an automatic Die RD 2006 ist serienmäßig mit einer De RD 2006 is standaard voorzien van braking function which automatically automatischen Bremsfunktion een automatische remfunctie die bij het controls the rotational speed when the ausgerüstet, die beim Schließen des...
-
Page 49: Technical Specifications / Technische Daten / Technische Gegevens
TECHNICAL SPECIFICATIONS / TECHNISCHE DATEN / TECHNISCHE GEGEVENS Starline Roldeckcontrol / besteuerung / besturing RD 2006 Supply voltage Netzspannung Voedingsspanning 230-240V ~ 50-60 Hz Power consumption Stromverbrauch (primär) Opgenomen vermogen 350VA (primary) (primair) Connection cable 230V~ Anschlusskabel 230 V~ Aansluitkabel 230V~ ±... - Page 50 Fuse secondary 80V / 20 A. Sekundärsicherung 80V / 20 A. Zekering secondair 80V / 20 A. Fuse primary 230V / 3.15 A T Primärsicherung 230V / 3.15 A T Zekering primair 230V / 3.15 A T Service LED Service LED Service-LED Adjust “close”...
-
Page 51: Copyrights
All rights reserved. No part of this publication may be reproduced, stored in a retrieval system, or transmitted, in any form of by any means, electronic, mechanical, photocopying, recording or otherwise, without the prior written permission of Starline Pools & Equipment BV. Alle Rechte vorbehalten. Kein Teil dieser Publikation kann in einem Informations-Retrievalsystem reproduziert werden, gespeichert werden, oder, in irgendeine Form mit irgendwelcher Mittel übertragen...
Need help?
Do you have a question about the ROLDECK RDEB 2006 and is the answer not in the manual?
Questions and answers
roldek sluit niet meer op de kast is een error lampje dat brand hoe te handelen ?
If the error light on the Starline ROLDECK RDEB 2006 flashes once and it won't close, this means the motor is not receiving 24V. To fix this:
1. Check if the motor is correctly connected.
2. Make sure the power cable is not broken.
If the error light flashes 7 times while closing, the braking capacity is inadequate. To fix this:
1. Add the "High power brake module" (RDBS 2006) to the RD 2006 system.
This answer is automatically generated