DAMPP-CHASER Piano Life Saver System Installation Instructions Manual
Vertical 5-part system
Hide thumbs
Also See for Piano Life Saver System:
- Installation instructions (4 pages) ,
- Installation instructions manual (8 pages) ,
- Care and maintenance instructions (2 pages)
Table of Contents
Advertisement
TOOLS REQUIRED: Use either a #2 Phillips head driver or a 1/4-inch hexhead driver, as both types of screws are
included with this sysem. To install the system, you will need:
• racheting driver
• cordless drill
• small blade screwdriver
• wirecutters
The following is a list of components:
.
1
91 cm Dehumidifier
1
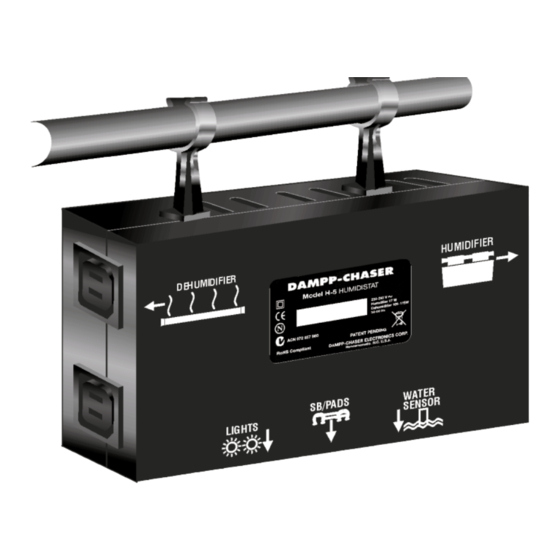
Humidistat
1
Humidifier
1
Water Sensor Probes
1
Humidifier Heater Bar
1
Two-light Panel
1
Watering tube
1
Humidifier pads
1
3 m Extension Power Cord
1
Moisture Distribution Baffle
1
Watering Can
1
Bottle of Humidifier Treatment
1
Hardware kit
1
System Care and Maintenance sheet / 5-Year Warranty Certificate
The hardware kit includes the following:
2
Y Hangers
13
13 mm #8 screws
2
19 mm #8 screws
3
5 mm clamps
2
13 mm standard clamps
2
Half clamps and serrated washers
6
6 mm clamps
2
Screw hooks
2
Wire ties and cable ties
4
Pin pegs
2
Plastic hanger C clips
1
"STOP, DO Not Unplug Label
1
Warranty Registration card
Smart Bracket package includes:
Smart Bracket Sensors
Single-Light Cube
While we make every effort to ensure all components are included, it is a good idea to check that none are missing prior to
arriving at the installation location. In the unlikely event that a part is missing, please call your supplier with information from
the end of the box and the assembler's name. The replacement part will be shipped to you without delay.
• screw starter
• small hammer
• chalk or other marker
(with attached extensions)
5-PART SYSTEM INSTALLATION INSTRUCTIONS
• scissors
• file
• measuring tape
Purpose
Removes excess moisture from the piano
Controls the Humidifier and Dehumidifier
Brings moisture into the piano
Measure water depth in Humidifier
Warms pads to aid evaporation
Shows System is energized and when to add water
Enables the delivery of water to the Humidifier
Used to vaporize moisture from the Humidifier
Connects Humidistat to electrical wall outlet
Dispenses moisture throughout the piano
For adding water to the Humidifier
Additive that prolongs the life of the pads
Described below
Used to suspend the Humidifier tank when necessary
Mounts clamps
Used to attach the light panel
Attaches wire between light panel and Humidistat
Attaches watering tube between keybed and Humidifier
Attaches the end of the watering tube to the rim
Anchors Humidistat power cord wire
Used to suspend the Humidifier when necessary. Used with Y Hangers
Used to bundle excess cords
Used to mount Dehumidifier and the Moisture Distribution Baffle
Used to mount the Humidistat on the Dehumidifier
Can be attached to power cord near wall outlet
Attaches to Humidifier heater bar and senses when pads are dry
Signals when Humidifier pads are dry
VERTICAL
Advertisement
Table of Contents

Related Manuals for DAMPP-CHASER Piano Life Saver System


Summary of Contents for DAMPP-CHASER Piano Life Saver System
- Page 1 VERTICAL 5-PART SYSTEM INSTALLATION INSTRUCTIONS TOOLS REQUIRED: Use either a #2 Phillips head driver or a 1/4-inch hexhead driver, as both types of screws are included with this sysem. To install the system, you will need: • racheting driver • screw starter •...
- Page 2 Inspect the System’s cords/wires each time you service the piano. 3) Installation of the Piano Life Saver System must be made by a professional Piano Technician or Tuner. Any warranties stated or otherwise implied are void if the installation is made by someone other than a professional Piano Technician or Tuner.
- Page 3 STEP 1. HUMIDIFIER INSTALLATION Mounting the Smart Bracket: You will mount the Smart © Bracket outside the Clean Sleeve on the Humidifier Heater Bar You should install the Humidifier first. When you unpack the (Figure 2). The Sleeve protects the Heater Bar from corrosion System box, you will find several items in the Humidifier tank: caused by excessive minerals in the water.
- Page 4 STEP 1-A. SUSPENDING THE HUMIDIFIER TANK hangers’ top legs with your wire cutters. Note that the Dehu- midifier will be installed approximately 20 cm above ABOVE TRAPWORK the Humidifier. In some pianos, the trapwork prevents placing the Humidifier STEP 2. MOISTURE DISTRIBUTION BAFFLE tank in the bottom, and you will need to suspend the tank INSTALLATION above the trapwork (Figure 4).
- Page 5 STEP 3. DEHUMIDIFIER INSTALLATION Note, that with either a tank resting on the floor or a suspended tank (Step 1-A, page 4), the Dehumidifier should be located First, hold the Dehumidifier inside the piano approximately approximately 20 cm above the Humidifier tank. (See the where you think it might need to go, to be sure it clears rods Humidistat installation instructions below.) If you need to and the plate without touching them.
- Page 6 Ideally, the lower corner of the Humidistat should be positioned You may prefer another method of running the power cord out 5 cm above the top of the Humidifier tank and 5 cm away from of the piano. If you feel comfortable drilling a hole in the the side of the Humidifier tank (Figure 14).
- Page 7 Humidistat replacement of the bottom panel. outlet marked LIGHTS. After the Piano Life Saver System is completely installed, Be sure none of the cords/wires touch the Dehumidifier plug the Humidistat into a non-switchable wall outlet where rods, as exposure to heat can damage the cords/wires.
- Page 8 The use of other water treatment preparations will Smart Bracket Maintenance: If the System includes the void the warranty of the Piano Life Saver System and may optional Smart Bracket, the sensor wires operate more effec- void the warranty of the piano manufacturer.
Need help?
Do you have a question about the Piano Life Saver System and is the answer not in the manual?
Questions and answers