Table of Contents
Advertisement
Available languages
Available languages
Advertisement
Table of Contents

Related Manuals for Melchioni MK680

Summary of Contents for Melchioni MK680
- Page 1 MK680 Termostato Settimanale Programmabile Weekly Programmable Thermostat / Termostato semanal programable / Thermostat hebdomadaire programmable Cod. 493933763 Manuale / User manual / Manual de usuario / Mode d'emploi...
- Page 3 NON IMMERGERE IL TEMPORIZZATORE IN LIQUIDI DI NESSUN TIPO. Tenere fuori dalla portata di bambini In caso di surriscaldamento anomalo disconnettere dalla rete elettrica Conforme alle direttive 2014/30/CE e 2014/35/CE TERMOSTATO SETTIMANALE PROGRAMMABILE MK680 MANUALE DI ISTRUZIONI MK680 1. Tasti e display LCD...
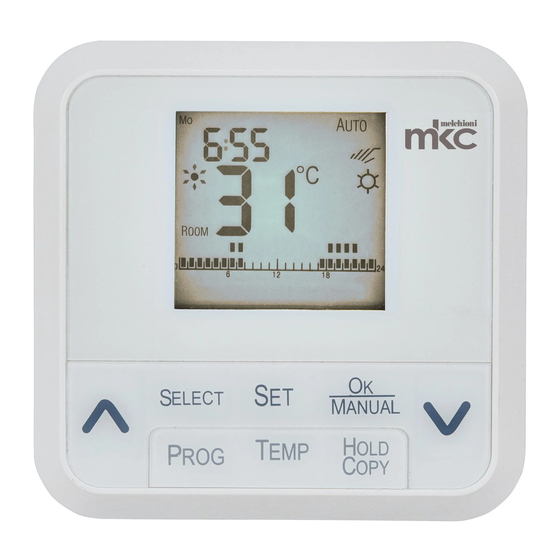
- Page 4 1) Orologio 2) Giorno della settimana 3) Programma giornaliero 24 ore 4) Temperatura impostata 5) Simbolo antigelo 6) Simbolo impostazione TIME (orario) 7) Simbolo PROGrammazione 8) SET simbolo impostazione delle funzioni 9) Simbolo riscaldamento 10) Simbolo condizionamento 11) Simbolo vacanze 12) Simbolo di HOLD (mantieni) temporaneo 13) Simbolo di manuale temporaneo 14) Simbolo programma AUTOmatico...
- Page 5 Premere SELECT per passare all’ impostazione successiva, Ora, sempre con i tasti freccia. Premere SELECT per passare all’ impostazione successiva, Minuto, sempre con i tasti freccia. Premere SELECT per tornare all’Anno. Premere OK per salvare ed uscire. B. Impostazione funzioni Utilizzare il tasto SELECT per scegliere tra Holiday (vacanze) e Heat/Cool (caldo/freddo): “Ho”...
- Page 6 a. Vacanze, questa caratteristica permette di impostare la temperatura in funzione ECO per un periodo da 1 a 199 giorni. Premere i tasti freccia per aumentare o diminuire i giorni. Premere OK per salvare e uscire. OSSERVAZIONE: durante il periodo Holiday, l’unità funziona con la temperatura FISSA impostata nella funzione vacanze.
- Page 7 Controllo raffreddamento Per il controllo Riscaldamento o Raffreddamento, questa unità dispone di queste uscite: Temperatura ambiente Uscita terminale NO Uscita terminale NC Riscaldamento 1°C>temp. Impostata Aperto Chiuso 1°C<temp.Impostata Chiuso Aperto Raffreddamento 1°C>temp. Impostata Chiuso Aperto 1°C<temp. Impostata Aperto Chiuso Questa unità offre un ritardo opzionale all’avvio per la protezione della pompa di riscaldamento o raffreddamento.
- Page 8 4. Impostazione dei programmi Premere PROG per entrare nella procedura di impostazione del programma. A. La prima è l’impostazione del programma. Premere il tasto SELECT per selezionare la modalità di programmazione come sotto descritto. a. I programmi giornalieri della settimana sono differenti. Sulla parte bassa del display appare “7dY”.
- Page 9 4) Premere PROG per l’impostazione per questo giorno e tornare indietro per selezionare il giorno successivo. 5) Per impostare il programma per un nuovo giorno, si può utilizzare la funzione Copy (copia) per copiare il medesimo programma su un altro giorno. All’inizio dell’impostazione del nuovo giorno, premere il tasto Copy.
- Page 10 Premere PROG per rivedere il programma giornaliero. Utilizzare i tasti UP/DOWN per verificare il programma di ciascuna ora. Dopo la revisione, premere PROG per tornare indietro alla selezione del programma. Premere OK per tonare al modo normale. 5. Funzionamento manuale A.
- Page 11 D. Impostazione manuale AUTO/OFF/Antigelo, premere e tenere premuto il tasto MANUAL per 3 secondi. Premere SELECT per selezionare: a. AU-Auto, modalità di controllo programmata b. AF-Antigelo, la temperatura è prefissata a 5°C c. oF-OFF, il sistema è spento d. oN, il sistema acceso sempre. Premere OK per salvare ed uscire.
- Page 12 MANUALE DI INSTALLAZIONE MK680 MK680 è formato da due parti: pannello di controllo e base di commutazione Pannello di controllo Base di commutazione INSTALLAZIONE BASE DI COMMUTAZIONE A MURO 1. Praticare due fori sul muro di installazione come sotto indicato...
- Page 13 2. Svitare le due viti sul coperchio della base di commutazione. Rimuovere il coperchio. 3. Estrarre i fili. Seguire lo schema per la connessione dei fili. 4. Riavvitare il coperchio. 5. Utilizzare le viti fornite per avvitare la base di commutazione su una scatola 503. Oppure utilizzare gli ancoraggi forniti con i fori praticati nel muro.
- Page 14 INSTALLARE LE BATTERIE E IL PANNELLO DI CONTROLLO 1. Installare due batterie AAA nel pannello di controllo, come indicato in figura. 2. Afferrare i lati sinistro e destro del pannello di controllo e premerli sulla base di commutazione. Ricordare di prendere i lati sinistro e destro, NON utilizzare i lati Alto e Basso.
- Page 15 RESET In caso il sistema debba essere resettato, afferrare i lati sinistro e destro del pannello di controllo ed estrarlo. Togliere una o due batterie ed attendere un minuto circa. Reinserire quindi le batterie. CONNESSIONI NC= uscita fase, contatto Normalmente Chiuso COM=ingresso fase NO=uscita fase, contatto Normalmente Aperto Osservazione: i fili per l’installazione devono avere sezione minima 1.0 mm²...
- Page 16 DO NOT IMMERSE TIMER IN WATER OR ANY OTHER LIQUID. Heaters and similar appliances should never be left unattended during operation. The manufacturer recommends such appliances not be connected to timers. Conform to directive 2014/30/CE e 2014/35/CE MK680 WEEKLY PROGRAMMABLE THERMOSTAT INSTRUCTIONS MANUAL MK680 Buttons and LCD Display...
- Page 17 1) Time 2) Week day 3) 24 hours daily program 4) Setting Temperature 5) Anti-Frozen symbol 6) TIME setting symbol 7) PROGram setting symbol 8) Feature SETting symbol 9) Heating Control symbol 10) Cooling Control symbol 11) HOLIDAY symbol 12) Temporary HOLD symbol 13) Manual Override symbol 14) Program AUTO Contrl symbol 15) Battery Low symbol...
- Page 18 Press SELECT button to the next step, Day setting. Use the setting dial to set. Press SELECT button to the next step, Hour setting. Use the setting dial to set. Press SELECT button to the next step, Minute setting. Use the setting dial to set. Press SELECT back to Year setting.
- Page 19 a. Holiday, this feature allows the current temperature setting been kept for 1 to 199 days of holiday period. Turn the setting dial to increase or decrease the days for setting. Press OK button to save quit this setting. REMARK, During the Holiday setting days, this unit will work on the FIXED setting temperature when at Holiday set.
- Page 20 Heating Control Cooling Control For the Heating or Cooling control, this unit outputs details as below: Room Temperature Terminal NO outputs Terminal NC outputs Heating 1'C>Set Temperature OPEN CLOSE 1'C<Set Temperature CLOSE OPEN Coolting 1'C>Set Temperature CLOSE OPEN 1'C<Set Temperature OPEN CLOSE For the starting delay, this unit offers an optional outputs starting delay for cooling or...
- Page 21 Temperature Setting This Unit allow 4 preset temperatures: Comfort, Semi-Comfort, Economic and Anti-Frozen. Please refer the figures shown as below: Press and hold TEMP button for 3 seconds to enter. Use TEMP Button to select preset temperature for setting. Turn the setting dial to adjust temperature setting. Press TEMP button to save this setting and enter next temperature setting.
- Page 22 B. Then select day for Program Setting. Press SELECT button to select. For example, select Monday for the first day program of 7 days program mode. Press PROG to the next step. Then set the day program selected. The program setting is from 0:00 of the day. Use TEMP button to select any one of below 5 status for each hour program.
- Page 23 Repeat procedure B and C to finish all the day program setting. Press OK button to save quit this setting. D Program Review Press PROG button to enter the program setting procedure. Press SELECT button 4times to The “7dY” appears at the left upper side of the display. Press PROG to next step to select the day program for reviewing.
- Page 24 Manual Operations Manual Overriding the current Program Temperature Status. Press TEMP button to override different temperature status. This overriding will be continued to the next hour. The Temporary Manual Control symbol appears on the display. Manual Temperature Setting Override, Turn the setting dial to adjust the current temperature setting.
- Page 25 Manual AUTO/OFF/Anti-Frozen setting, press and hold the MANUAL button for 3 seconds to enter. Press SELECT button to select: AU-Auto, program control mode. AF-Anti-Frozen. oF-OFF, system turn OFF oN, system will be ON continuously. Press OK button to save and quit this setting. 6.
- Page 26 INSTALLATION MANUAL MK680 MK680 contents TWO parts: Control Penal and Switching Base Control Panel Switching Base INSTALL SWITCHING BASE TO WALL 1. You maybe need to drill 2 screw holes on the installation surface as the below diagram.
- Page 27 2. Screw out the 2 screws on the terminal cover of switching base. The remove the terminal cover. 3. Take out the wires. Following the wiring label on terminal to screw the wires to it. 4. Screw back the terminal cover.
- Page 28 5. Use the screws supplied to screw the switching base onto the 503 Box. Or use the anchors supplied to insert to the holes drilled. Then use the screws supplied to screw the switching base onto. INSTALL BATTERY AND CONTROL PANEL 1.
- Page 29 RESET When reset needed, take the right and left side of control panel and pull it out. Take 1 or 2 batteries of it and Wait about 1 minute. Then press the batteries back. WIRING Remark: The installation wire request 1.0mm2 MINIMUM and 2.5mm2 MAXIMUM SPECIFICATIONS Power Rate: 230V 50Hz 8A Resistive Load...
- Page 30 Made in China MELCHIONI S.p.A. Via P. Colletta 37, Milano – Italia | Tel: 02/57941 | www.melchioni.it | www.b2b.melchioni.it...
Need help?
Do you have a question about the MK680 and is the answer not in the manual?
Questions and answers