Advertisement
Advertisement
Table of Contents

Related Manuals for Paula Deen PDAO10


Summary of Contents for Paula Deen PDAO10
- Page 1 Air Fryer Oven INSTRUCTIONS & RECIPES MODEL PDAO10...
- Page 2 Meet Paula Deen Culinary icon Paula Deen is a self- made entrepreneur who learned her savory secrets from her grandmother. She started her career in the food industry with a small catering company called The Bag Lady, but business quickly outgrew her home kitchen.
-
Page 3: Important Safeguards
IMPORTANT SAFEGUARDS When using electrical appliances, basic safety precautions should be followed as follows: • Read all instructions before first use. • This appliance is designed for household use only. • Do not place the appliance against a wall or against another appliance. - Page 4 • Do not use the appliance if there is any damage to the plug, cord or other parts. • Check that the voltage indicated on the appliance fits the voltage for your outlet. • Do not connect appliance to an external timer switch. • Immediately unplug the appliance if you see dark smoke coming out of the appliance.
-
Page 5: Parts Description
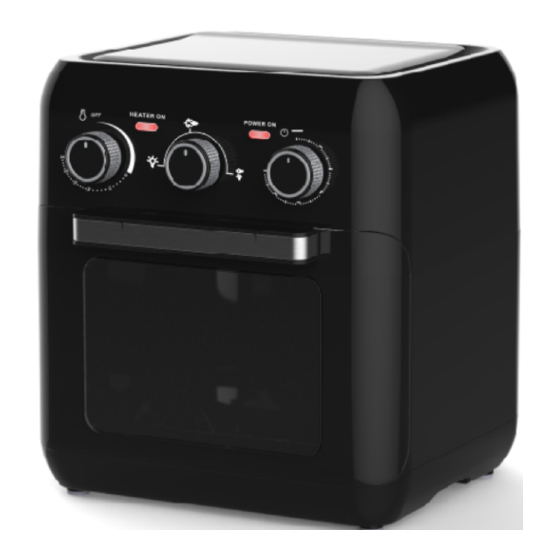
PARTS DESCRIPTION 1. Control Panel 6. Handle 2. Door Handle 7. Racks(2) 3. Basket 8. Rotisserie 4. Metal Lug 9. Rotisserie Removal 5. Drip Tray Handle... -
Page 6: Control Panel
CONTROL PANEL 1. Temperature Knob: Turn to desired temperature between 140°F and 400°F. 2. Heating Light: The light will illuminate when the unit is heating. 3. Light/Rotisserie Knob: Turn the knob to illuminate the inside light or use the rotisserie function. The first option (A) is for the light, second option (B) is to use the rotisserie and the third option (C) is for the light and rotisserie. -
Page 7: Before First Use
BEFORE FIRST USE 1. Remove all packaging materials, stickers and labels. 2. Clean the basket and all other accessories with hot water, dishwashing liquid, and a non-abrasive sponge. 3. Wipe the inside and outside of the appliance with a cloth. USING THE APPLIANCE Handle: The handle should always be used when taking the basket in and out of the unit. - Page 8 Drip Tray: The drip tray should be placed inside the unit during use. When using the basket, the drip tray should be placed above the heating elements. For the rotisserie the drip tray should be placed below the heating elements. When using the racks, the drip tray should be placed above the heating element.
-
Page 9: Using The Appliance
USING THE APPLIANCE: 1. Place the appliance on a stable, horizontal and even surface. When air frying place the drip tray above the heating element. See page 8 for more information on the drip tray. Plug the unit into a grounded wall socket. 4. - Page 10 How to Prepare Your Rotisserie for Proteins The protein needs to be placed on a spit so that it is centered and evenly balanced. It must also be held in place so it does not move around as it is cooking. Detach the fork on one side by unscrewing.
- Page 11 CLEANING • Remove the plug from the wall outlet and let the appliance cool down for at least 30 minutes. • Clean the appliance after every use. Do not clean the basket or accessories and the inside of the appliance with any metal kitchen utensils or abrasive cleaning materials, as this may damage the coating on them.
-
Page 12: Cooking Chart
COOKING CHART This table will help you select the basic settings for your ingredients and what to do during the cooking time. NOTE: Settings are indications only. Since ingredients differ in origin, size, shape and brand, we cannot guarantee the best setting for your ingredients. SUGGESTED TEMP (°F) TIME... - Page 13 AIR FRYER RECIPES Fried Green Tomatoes with Vidalia Onion Relish Serves 2-4 Fried Green Tomato Ingredients 1 large firm green tomato, cut into ¼-inch slices 1 cup buttermilk 1 cup all-purpose flour Parchment Paper Vidalia Relish Ingredients 2 white onions diced ½...
- Page 14 Naked Hot Chicken Wings Serves 4 Ingredients 2-pounds chicken wings, cut at the joint to yield a wingette and a drumette from each wing 1 teaspoon Kosher Salt 1/8 teaspoon Cayenne pepper 2 tablespoons peanut oil 1 stick butter 5oz. Hot Sauce Preparation 1.
-
Page 15: Southern Fried Chicken
Southern Fried Chicken Serves 2-4 Ingredients Seasoning 2 ½ lbs. chicken, cut into pieces 2 cups self-rising flour 1 cup hot sauce 3 large eggs Preparation 1. In a medium sized bowl, beat the eggs together with the hot sauce. 2. - Page 16 Fried Pork Chops with Tomato Gravy Serves 2 Ingredients 2 bone-in center cut pork chops, 1-inch thick, ½ pound each ¼ teaspoon garlic powder Oil for spraying 4 tablespoons olive oil 4 tablespoons unsalted butter 2 tablespoons finely chopped onion ¼...
- Page 17 Bacon Wrapped Shrimp Serves 2-4 Ingredients 16 jumbo shrimp, butterflied 16 chunks Monterey Jack cheese 1 serrano pepper, thinly sliced 16 bacon strips, cooked Toothpicks Barbecue sauce Preparation 1. Place shrimp, seam-side down, on a cutting board. 2. Stuff 1 shrimp with a piece of cheese and pepper; close shrimp, wrap it with a piece of bacon and secure with a toothpick.
-
Page 18: Fried Catfish
Fried Catfish Serves 2-4 Ingredients 4 catfish filets Salt 1 cup buttermilk 2 tablespoons hot sauce Oil for spraying 1 cup flour 1 cup yellow corn meal 1 teaspoon crab boil seasoning 1 teaspoon garlic powder Preparation 1. Season the catfish fillets on both sides with salt and pepper. 2. - Page 19 French Fries Serves 2-4 Ingredients 2 Russet Potatoes, peeled and cut into fries Oil for frying Sea salt Preparation 1. Soak cut potatoes in a bowl of ice water for at least 15 minutes. 2. Pat the potatoes dry with paper towels. 3.
-
Page 20: Limited One-Year Warranty
Also include a brief description of the problem you are experiencing and a copy of your sales receipt or other proof of purchase in order to validate warranty status. MODEL PDAO10...
Need help?
Do you have a question about the PDAO10 and is the answer not in the manual?
Questions and answers