Table of Contents
Advertisement
Quick Links
Moog Music Inc.
554C Riverside Drive
Asheville, NC 28801
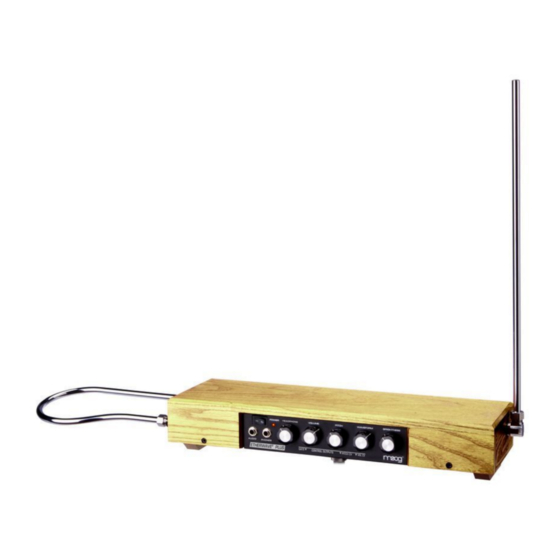
SETTING UP AND PLAYING THE MOOG ETHERWAVE THEREMIN
INTRODUCTION
The theremin is an electronic musical instru-
ment played by the free movement of the
performer's hands in the space surrounding it.
This method of playing gives the theremin tone
its unique ethereal and dramatic quality, while
at the same time allowing the performer a
measure of artistic freedom that other musical
instruments do not offer. The techniques of
Playing the theremin can be mastered by
anyone who has a good musical ear, and who
is willing to invest a modest amount of
practicing time. Two motions are involved.
Movement of the right hand toward the pitch
antenna controls pitch, while movement of the
left hand toward the volume antenna controls
loudness or volume.
The Moog ETHERWAVE theremin is powered by
a special adapter which plugs into a standard
110-125 volt grounding power outlet. It is
designed to operate with a wide range of
amplifier-speaker combinations.
PREPARING THE ETHERWAVE THEREMIN FOR
PLAYING
Your
ETHERWAVE
assembled. Only the following preparations for
playing
are
necessary:
instrument on a stand, b) attaching the two
antennas, c) connecting the power adapter,
d) connecting the amplifier-speaker with an
audio
cord,
and
adjustments. Each of these steps will now be
described in detail. Note that the steps of
theremin
is
completely
a)
Placing
e)
setting
the
preparation are listed in the order in which they
are to be executed.
a) Placing the instrument on a stand:
ETHERWAVE theremin requires either a standard
microphone stand (preferred) or a small table
36" to 42" high. If a table is used, no objects on
the table should be within a foot or two of the
theremin, and the theremin itself should be
positioned so that the the volume antenna will
overhang the edge of the table. Whichever
type of stand is used, the ETHERWAVE should be
securely mounted, and away from walls and
other large stationary objects.
b) Attaching the two antennas:
antenna, which is the long straight tube, is
placed in the elbow (right angle) fitting on the
right end of the instrument, with the brass
compression ring down. The mounting nut is
slipped over the antenna and screwed onto
the fitting. The nut need be only finger-tight, but
should be tight enough so that the antenna is
firmly in place.
The volume antenna, which is the tubular loop,
is placed in the straight fittings on the left end
of the instrument, with the bulge in the loop
facing forward and down. The mounting nuts
already on the antenna are screwed onto the
fittings. The nuts need be only finger-tight, but
the
should be tight enough so that the antenna is
firmly in place.
c)
Connecting
panel
ETHERWAVE is powered by a special adaptor
which is grounded to the power ground and
which supplies 14 volts AC to the ETHER-WAVE
The pitch
the
power
adaptor:
The
The
Advertisement
Table of Contents

Summary of Contents for Moog Etherwave
- Page 1 Moog Music Inc. 554C Riverside Drive Asheville, NC 28801 SETTING UP AND PLAYING THE MOOG ETHERWAVE THEREMIN INTRODUCTION preparation are listed in the order in which they are to be executed. The theremin is an electronic musical instru- ment played by the free movement of the a) Placing the instrument on a stand: performer's hands in the space surrounding it.
- Page 2 C, step back from the instrument. You d) Connecting the amplifier-speaker: The should hear the pitch decrease further until the ETHERWAVE may be used with a wide variety of tone stops completely ('zero beat'). Adjust the musical instrument, stereo, or public address PITCH tuning knob carefully so that, when your amplifier systems.
- Page 3 Note that ETHERWAVE's VOLUME knob tuning The above exercises will give you basic skills of adjustment. Its purpose is to adjust how the theremin playing: finding notes,...
- Page 4 THEREMIN, starring theremin virtuoso Lydia Kavina, shows you how to perform these and other exercises. Study this video closely to learn proper theremin-playing technique. The ETHERWAVE theremin is designed to meet the needs of musicians who wish to explore the artistic resources space control.
- Page 5 This User’s Guide only describes the added functions of the Etherwave Plus. For information regarding the operation of the Etherwave Plus’ basic theremin functions, please refer to the Sections “Setting Up and Playing the Moog Music Etherwave Theremin” in the Etherwave Theremin User’s Manual.
- Page 6 Using the Etherwave Plus CV Outputs. The Etherwave Plus CV outputs are located on the bottom of the unit as indicated by the front panel, requiring the placement of the Etherwave Plus on a mic stand to provide access. CAUTION: Be sure you understand the operating levels of the equipment involved before making connections.
- Page 7 • There are many ways to use gestural control of electronic musical instruments. Hook it up and try it. Experiment! These are just a couple quick examples to get you started with using the Etherwave Plus as a CV controller. As the variety of modern analog CV-compatible equipment increases, so to does the wealth of opportunities for the use of your Etherwave Plus as an expressive gestural controller for your sonic explorations.
- Page 8 • Looking at the vertically mounted PCB (p/n 11-213) located between the panel and the standard Etherwave theremin PCB (p/n 11-211), find where the Audio Output jack is plugged into the PCB - this connector is labeled J8. Unplug this connection.


Need help?
Do you have a question about the Etherwave and is the answer not in the manual?
Questions and answers