Table of Contents
Advertisement
Advertisement
Table of Contents

Related Manuals for SCULPTO Sculpto 2

Summary of Contents for SCULPTO Sculpto 2
- Page 1 START GUIDE Print. Create. Design.
- Page 2 WELCOME!
- Page 3 TABLE OF CONTENT...
- Page 4 THE SCULPTO2 For homes 3D PRINTER and schools. For users from all ages. * Works via Wi-Fi. Must be used indoors. Simon B. Fisker Functions with hot CEO Sculpto ApS surfaces. * Children under 14 years must be under adult supervision.
-
Page 5: Product Overview
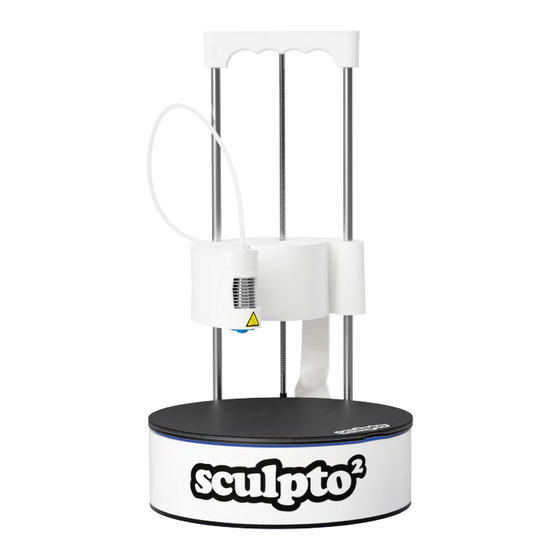
Controls the height of the printed objects. BUILDPLATE Rotable platform where the 3D object will be printed. FILAMENT GEAR COVER Can be removed for maintaining the Filament gear. POWER INPUT Insert power supply here. ON/OFF SWITCH Turns the Sculpto 3D printer on and off. -
Page 6: Getting Started
3. GETTING STARTED Plug t he power adaptor i n to t he power outlet and plug it into the 3D printer. CLICK! Turn on the printer using the black on/off switch on the back of the printer. 60”-90” For a full video setup guide please click here... - Page 7 Please note that the web app does not support the 3D printer set-up. If you have more than one Sculpto 3D printer, please note that you need to create a unique account for each of your Sculpto 3D printers.
-
Page 8: Connect Your Printer
5. CONNECT YOUR PRINTER Click on the printer button in the menu below (3rd icon from the left). Click on Connect Printer. Follow the instructions in the app to enable the connection between the printer and the app. Select your home network from the drop down menu and enter your Wi-Fi network password. - Page 9 6. CALIBRATION Press the Tools icon in the upper left corner in the printer menu. Press Calibrate z-axis. Follow the instructions in the App carefully in order to complete the calibration. The calibration is key to get great results. For more information about Calibration and instructions on how to do it please follow this link.
- Page 10 7. INSERT FILAMENT Assemple the filament holder t hat c omes w ith t he S culpto a nd p lace t he filament on the filament holder near the printer but in a position that allows the filament spool to run freely. Press t he Tools icon i n the upper l eft corner i n the printer m enu and p ress Change Filament.
-
Page 11: Start Printing
In the Home menu, login or create an account on Thingiverse and authorise the Sculpto App by following the steps on the Thingiverse webpage in the App. Browse b etween f eatured projects f rom the Home s creen or s earch between +100.000 projects by searching for your favorite theme directly on the search bar. - Page 12 Upload your fi le to t he app from Dropbox or s imilar. Only STL fi les can b e 3D printed on Sculpto 3D p rinter. Uploading STL fi les directly from the web app www.app.sculpto.dk is extremely easy and STL files can be uploaded directly from the desktop.
- Page 13 10. ENJOY YOUR PROJECT Remove the Buildplate P ro from the 3D Flex t he t op metal s heet t o release t he printed project from the sheet. printer and remove t he t op metal s heet from the buildplate Remove any suppor-structure and r aft added t o the model and enjoy y our 3 D printed project.
-
Page 14: Warranty & Assistance
Please read operating instructions carefully before use and keep it for further reference. We also recommend to read the safety warnings and cautions in our user manual to ensure your personal safety and prevent property damage. Support Center Contact us sculpto sculpto.global For more information visit our website. - Page 15 12. NICE TO KNOW & GLOSSARY WHITE Constant: The printer is connected to the internet and is ready for use. YELLOW Flashing: The printer isn’t connected to a network. BLUE Pulsating: The printer is trying to connect to the router. Constant: The printer is working.
- Page 16 Sculpto ApS Helsingforsgade 27, 8200 Aarhus N Denmark www.sculpto.eu SCULPTO © COPYRIGHT 2015. ALL RIGHTS RESERVED.
Need help?
Do you have a question about the Sculpto 2 and is the answer not in the manual?
Questions and answers