Table of Contents
Advertisement
Advertisement
Table of Contents

Summary of Contents for High Street TV Invictus X7
- Page 1 ® 13 Piece Kit Instruction Manual...
-
Page 2: Table Of Contents
Instructions for use Content 1 Safety and warning notices ........................2 1.1 Approved use ............................3 1.2 Safety notice ............................3 2 Before first use ............................6 3 Product components ..........................7 4 Main unit ..............................8 5 Use of attachments ...........................9 6 Starting up ...............................11 6.1 Assembly ............................11 6.2 Charging the battery .........................12 7 Use ................................13... -
Page 3: Approved Use
Instructions for use 1.1 Approved use The appliance is intended for home use only. It is not suitable for „ commercial or industrial use. Only use the appliance for the clea- ning of dry surfaces. This appliance is not suitable for the following applications: „... - Page 4 Instructions for use If the appliance’s power cable is damaged it has to be replaced „ with a special cable which can be obtained from the manufacturer or its customer service department. When you unplug the adaptor, hold the adaptor and not the cable. „...
- Page 5 Instructions for use SAFETY DURING USE Ensure an adequate distance between the appliance and heat „ sources (e.g. hotplates or ovens) and open flames to prevent damage. The appliance is not suitable for outdoor use. Store it in a dry „...
-
Page 6: Before First Use
Instructions for use RISK OF INJURY FROM RECHARGEABLE BATTERIES If a battery should leak, avoid contact between the battery acid „ and the skin, eyes and nose. If contact does occur, wash the affected areas immediately with plenty of clean water and seek medical attention without delay. -
Page 7: Product Components
Instructions for use Main X7 unit Li-ion battery 2 in 1 Crevice combi brush nozzle Tube Wall mount Charging cable Motorised power brush with universal brush roll Some accessories available separately. -
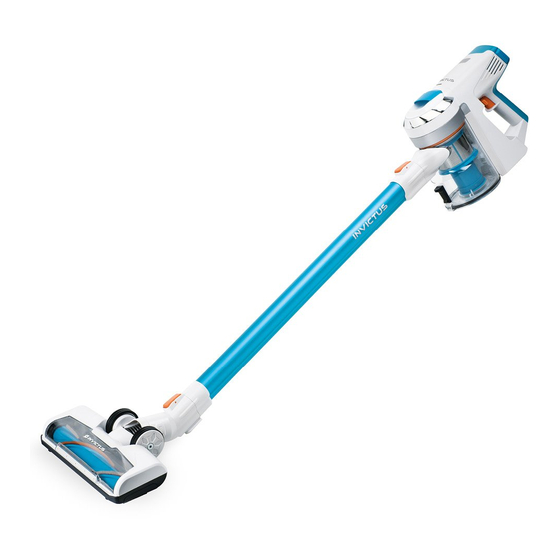
Page 8: Main Unit
Instructions for use 4 Main unit Transparent 0.5L dust container Charging indicator light Premotor filter Boost button Suction opening on the dust container HEPA filter cover On/Off button Dust container release with locking lever button (quick clean) Handle View of device from below: Dust container release button Li-ion battery Hook for wall mount... -
Page 9: Use Of Attachments
Instructions for use 5 Use of attachments Accessories Picture Motorised - Has an integrated electric motor which power brush rotates the brush at up to 10,000 r.p.m. - Use optionally with the universal brush roll or the ultra soft brush roll - For cleaning large areas such as hard flooring and carpets Universal brush... - Page 10 Instructions for use Accessories Picture Crevice nozzle - For narrow and difficult to access corners or niches Wall mount - For simple and practical storage Charging cable - Plug into the mains socket to charge battery...
-
Page 11: Starting Up
Instructions for use 6 Starting up 6.1 Assembly Insert tube Remove tube Insert motorised power brush Remove motorised power brush The motorised power brush and the motorised mini power brush are driven by a separate integrated „ motor and have to be directly connected to the main unit or the tube to ensure a power supply. All other accessories can be directly connected to the main unit or, to increase the appliance‘s reach, to „... -
Page 12: Charging The Battery
Instructions for use 6.2 Charging the battery NOTE! Charge the battery with the supplied charging cable only. Always use original batteries Disconnect the cable from the mains when it isn‘t being used. When the vacuum cleaner is in use the indicator light is blue. It changes to red when the battery power becomes depleted. -
Page 13: Use
Instructions for use 7 Use CAUTION! Never use the appliance on wet surfaces or to vacuum liquid. Keep body parts and items of clothing away from the moving parts and apertures of the appliance when it is in operation. Do not use the appliance when connected to the charging cable. Switching the appliance on and off –... - Page 14 Instructions for use Wall Mount Affix the wall mount to the wall using the supplied screws. Ensure that there are no pipes or electric cables behind the screw insertion points in the wall. The recesses on the mount can be used for cable storage to prevent the charging cable from hanging on the floor when not in use.
-
Page 15: Cleaning And User Maintenance
Instructions for use 8 Cleaning and user maintenance WARNING! Risk of electric shock! Always switch off and unplug the appliance before cleaning it or performing maintenance. Never hold the main unit and battery under water or immerse the appliance in water or other liquids. - Page 16 Instructions for use Cleaning the premotor filter Pull the premotor filter up and out of the main unit. Both compo- nents (the outer fabric ring and the inner foam rink) can be tapped against a hard surface or held under running water to clean them. Cleaning/replacing the HEPA filter To ensure full functionality, the HEPA filter should be cleaned regularly and replaced around every 6 months, depending on usage.
- Page 17 Instructions for use NOTE! If the appliance is not used for a long time, store the semi-charged battery in a cool, dry place. Cleaning – replacing the motorised power brush Remove the screw and take off the side cover. Take out the brush in the direction indicated by the arrow and remove the dirt.
-
Page 18: Trouble Shooting
Instructions for use 9 Trouble shooting WARNING! Always switch off and unplug the appliance before attempting to resolve a problem, otherwise you risk injury and electrocution! PROBLEM POSSIBLE CAUSE/SOLUTION The appliance doesn’t work Check whether the battery is charged and charge it if necessary. -
Page 19: Disposal
Instructions for use 10 Disposal Packaging The packaging material can be recycled. Dispose of the packaging in an environmentally friendly way for recycling. Electrical appliances The symbol with the crossed out dustbin means that this product cannot be disposed of in the household waste. -
Page 20: Technical Details
Instructions for use 11 Technical details Model Dimensions 123 x 22,5 x 26 cm Tube length Approx. 71 cm Power (with power brush) 380 W Battery 25.2 V li-ion battery Battery capacity 2,000 mAh Battery charging time 3 – 4 h Operating time Max. - Page 22 Distributed by: High Street TV, PO Box 724, Altrincham, WA15 5BJ Version 2 08/18...
Need help?
Do you have a question about the Invictus X7 and is the answer not in the manual?
Questions and answers