Table of Contents
Advertisement
Quick Links
D
GB
CZ
SK
NL
NOR
Güde GmbH & Co. KG
Birkichstraße 6
D-74549 Wolpertshausen
www.guede.com
F
DK
I
S
Güde Scandinavia A/S
Güde Czech, s.r.o.
Engelsholmvej 33
Poþernická 120
DK-8900 Randers
CZ-36005 Karlovy Vary
www.guede.com
www.guede.com
Profi 2500
94131
#
GÜDE Slovakia s.r.o
Podtúre -Rove 208
SK-033 01 Liptovský Hrádok
www.guede.com
Güde Hungary Kft.
Kossuth L. út 72
H-8420 Zirc
www.guede.com
Advertisement
Table of Contents

Related Manuals for Gude Profi 2500


Summary of Contents for Gude Profi 2500
- Page 1 Profi 2500 94131 Güde GmbH & Co. KG Güde Scandinavia A/S Güde Czech, s.r.o. Güde Hungary Kft. GÜDE Slovakia s.r.o Birkichstraße 6 Engelsholmvej 33 Poþernická 120 Podtúre -Rove 208 Kossuth L. út 72 D-74549 Wolpertshausen DK-8900 Randers CZ-36005 Karlovy Vary H-8420 Zirc SK-033 01 Liptovský...
-
Page 2: Table Of Contents
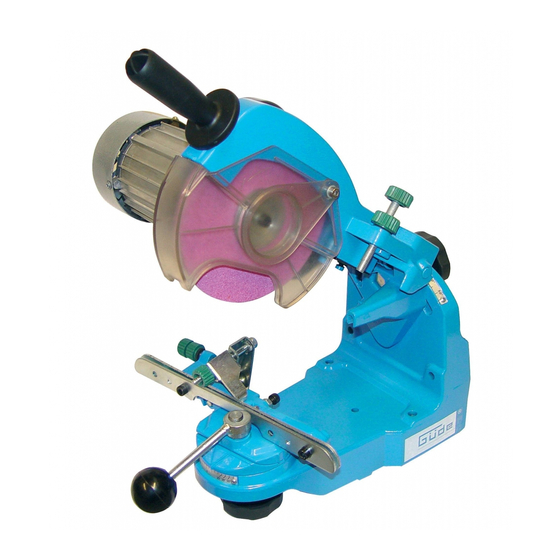
11. guide flap valve 12. screw clamp 13. guide position set screw 14. setting screw 15. grinding disk 16. grinding disk protective enclosure 2. Technical Data Profi 2500 Supply voltage: 230 Volt/50 Hz Motor input power: P1 230 Watt Maximum speed: 3400 rpm Noise level: <... -
Page 3: General Safety Precautions
3. General Safety Precautions Read the instruction manual carefully before the first use of the machine. If any doubt regarding the connection and operation of the machine arises, seek the manufacturer’s assistance (servicing department) Protect the machine from moisture, rain and dust. FOR US TO SECURE THE HIGHEST DEGREE OF SAFETY, CONFORM TO THE FOLLOWING INSTRUCTIONS: Use the machine only for the scope of work it has been designed for ! - Page 4 Wear proper working clothing! Do not wear any wide garments and jewellery that might be caught by the moving machine parts. For working outdoors, rubber gloves and non-skid shoes are recommended. If your hair id long, wear a hairnet. Use protective goggles. Wear a breathing mask when engaged in a dust-producing job.
-
Page 5: Assembly
3. Assembly The saw-chain grinding machine is delivered pre-assembled. One part consists of the base, on which the chain guide is located. The other part is a bearing arm with the motor and handgrip. The assembly shall be performed with the machine unplugged! The machine design provides either for a desk installation or wall mounting. -
Page 6: Grinding Disk Check
4. Grinding Disk Check To avoid injuries and accidents only fitting grinding disks free of any defects should be used. Check the disk you are about to fit in for damages prior to the assembly. It may be done by a simple sound test: Hold the disk so that a pencil may be put in the hole and the disk may swing freely. -
Page 7: Clamping Screw Set Up
6. Clamping Screw Set Up Before the start of grinding, the chain should be conducted between both the attachment guides Now, the tooth to be sharpened first should be taken against the stop. Watch out for the sharpening angle to correspond to the guides position. -
Page 8: Grinding Depth Delimiter
Some types of saw-chains require that the clamping screw be tilted by 5° - 10° (cf. Table: space Tilt angle). Note the notches (Fig.9). Now, the machine may be switched on and the saw-chain grinding may be started by a careful thrust on the grinding disk. -
Page 9: Dimensions
10. Dimensions... -
Page 10: Assembly Drawing
9. Assembly Drawing... -
Page 11: List Of Spare Parts
List of Spare Parts Spare Part No. Spare Part No. Description Description Produc Versi Produc Versi Positi Position t No. t No. 94131 Swing arm 94131 screw 94131 Grinding disk enclosure body 94131 screw 94131 Lateral guard 94131 bolt 94131 Switch enclosure 94131 screw... - Page 12 Bei einer nicht mit uns abgestimmten Änderung der Geräte verliert diese Erklärung ihre Gültigkeit. In a case of alternation of the machine, not agreed upon by us, this declaration will loose its validity. Bezeichnung der Geräte: - Profi 2500 Machine desciption: Artikel-Nr.: - 94131 Article-No.: Einschlägige EG-Richtlinien:...
Need help?
Do you have a question about the Profi 2500 and is the answer not in the manual?
Questions and answers