Advertisement
Quick Links
ASSEMBLY AND OPERATING INSTRUCTIONS
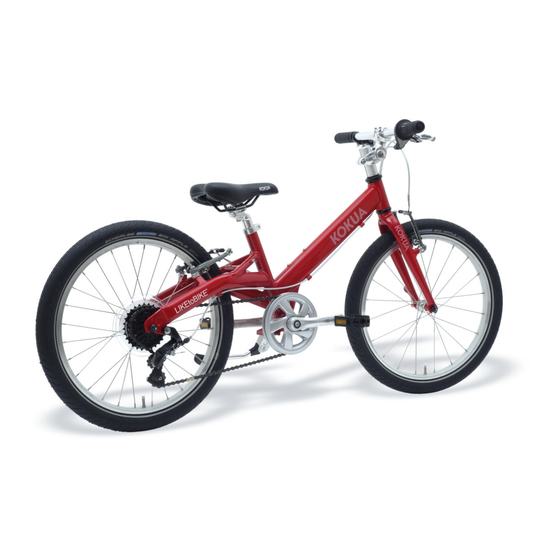
LIKEtoBIKE 20
Please read this manual carefully before using the LIKEtoBIKE for the first time!
The assembly must be done by an adult!
1. Remove all packaging materials. Contents of the enclosed acces-
sory box are: Pedals, hexagon tool (Allen key) (4mm,5mm,6mm),
Front and Rear Reflectors, Touch-up paint, Instructions.
Seat post
clamping screw
2. After loosening the seat post clamp screw, slide the seat post
into the seat tube.
Important: Please note the minimum insertion depth of
the seat post! This is indicated by a line marked on the
seat post! The seat post must not be pulled out beyond
this mark, otherwise a secure connection to the down
tube is not guaranteed! The saddle can be adjusted in the lon-
gitudinal direction and inclination after loosening the saddle
fastening screw. Then tighten this screw again!
Adjusting the correct saddle height: Place a pedal in the lowest
position. If the child is sitting on the saddle, the child must be able
to touch this pedal with his heel (outstretched leg). Make sure that
the childs hips stay level and do not tip over to the side!
Saddle fastening
screw
Angle adjustment
screw
Steering tube
3. 3. Insert the stem with the already mounted handlebar onto the
steering tube.
Now align the handlebar in the direction of travel at the desired
height and tighten the height adjustment screw with a 5 mm Allen
key (torque 10 Nm).
Under no circumstances may the stem be mounted over the
upper edge of the steering tube!
After loosening the angle adjustment screw, you can fine
tune the handlebar position by changing the stem angle. Then re-
tighten the angle adjustment screw (torque 10 Nm).
Use the headset adjustment screw to adjust the headset.
Very important: With this screw you adjust only the
headset clearance! This screw is not used to attach the
stem!
4. Now mount the pedals. Turn the pedal axles by hand until snug!
Then tighten with a 15 mm wrench.
Important: The right pedal is mounted clockwise, the
left pedal counterclockwise! The pedals are marked on
the pedal axle with an „R" for the right pedal and an „L"
for the left. It is important to remember this if you need to
loosen the pedal axle someday. So that the pedals can easily be
loosened again later, grease them lightly before mounting.
After the first long ride please check that the pedals are
seated firmly! Loose pedals could damage the thread of the
cranks or cause a fall!
Adjustment for
headset clearance
(NOT TO FIX THE
STEM!)
Height
adjustment screw
Right Pedal
Left Pedal
Advertisement

Related Manuals for KOKUA LIKEtoBIKE 20


Summary of Contents for KOKUA LIKEtoBIKE 20
- Page 1 ASSEMBLY AND OPERATING INSTRUCTIONS LIKEtoBIKE 20 Please read this manual carefully before using the LIKEtoBIKE for the first time! The assembly must be done by an adult! Adjustment for headset clearance (NOT TO FIX THE STEM!) Angle adjustment screw Height...
- Page 2 Brake cable guide tubes Brake Arm 5. To install the front wheel, the front brake must be released. By Center the rim and close the quick release lever so that it is parallel squeezing the two brake arms and pulling gently on the brake to the left fork.
-
Page 3: Inspection Instructions
The brake and external trains should also be bent or otherwise damaged. be examined. KOKUA Bikes GmbH The brake pads should be checked before each ride, in case of heavy wear they must be replaced by a trained bike mechanic! The rim is also part of the braking system Schwerzfelder Str. - Page 4 The Suntour NEOS rear derailleur The Neos rear derailleur is an extremely compact derailleur with very minimal reach. The ground clearance is much larger than in a conventional circuit. This significantly reduces the risk of damage! It was specially developed for small wheels. This is an inverse rear derailleur - when pulling on the shift cable, High set screw the chain is moved to the smaller sprocket, unlike the normal rear...
- Page 5 Now retighten the angle adjustment screw. (Picture 2) Steering tube Bild 2 Bild 1 KOKUA Bikes GmbH Schwerzfelder Str. 3 D-52159 Roetgen Tel.: +49 2471 134 160 Fax: +49 2471 134 161 Email: kokua@kokua.de Manual LIKEtoBIKE 20, 12-2017...
Need help?
Do you have a question about the LIKEtoBIKE 20 and is the answer not in the manual?
Questions and answers