Table of Contents
Advertisement
TABLE OF CONTENTS / TABLE DES MATIÈRES / ÍNDICE
DISHWASHER MAINTENANCE ...... 3
DISHWASHER LOADING TIPS ........ 4
DISHWASHER CARE ....................... 5
SETTINGS ......................................... 6
ERROR CODES ................................ 7
Error codes / blinking lights ..................7
Tools and parts .....................................8
Location requirements ........................10
dimensions: .........................................11
Drain requirements .............................12
Water supply requirements .................12
Electrical requirements .......................12
INSTALLATION INSTRUCTIONS ... 13
new utilities .........................................13
Electrical connection ..........................14
Prepare dishwasher ............................15
Remove access panel .........................15
assembly .............................................15
Connect water line to fill valve ............16
Connect fill hose to fill valve ...............17
Drain hose connection ........................18
Power cord connection .......................18
(on some models) ...............................20
Place dishwasher in cabinet ...............20
(custom panel models only) ................21
Final installation check........................22
opening ...............................................23
shut-off valve ......................................24
Connect drain hose ............................24
Complete installation ..........................26
Install access panel ............................26
Check operation .................................27
If dishwasher does not operate ..........27
W11323304A
OWNER'S MANUAL
MANUEL DE L'UTILISATEUR
MANUAL DEL PROPIETARIO
ENTRETIEN DU LAVE-VAISSELLE ..29
CONSEILS DE CHARGEMENT
DU LAVE-VAISSELLE .................... 30
ENTRETIEN DU
LAVE-VAISSELLE ........................... 31
RÉGLAGES PAR LE CLIENT DE
L'INTERFACE UTILISATEUR ......... 32
CODES D'ANOMALIES .................. 33
Codes d'anomalies/témoins
qui clignotent ......................................33
EXIGENCES D'INSTALLATION ..... 34
Outils et pièces ...................................34
Exigences d'emplacement .................36
Dimensions d'ouverture du produit
et de l'armoire : ...................................37
Exigences d'évacuation ......................38
Spécifications de l'alimentation
en eau .................................................38
Spécifications électriques ...................38
INSTRUCTIONS
D'INSTALLATION ........................... 39
Préparation de l'ouverture
d'encastrement de l'armoire - nouveaux
raccordements de service ..................39
Installer la barrière anti-humidité
en option - recommandée pour les
comptoirs en bois ...............................39
Raccordement électrique....................40
Préparation du lave-vaisselle ..............41
Retrait du panneau d'accès ................41
Débrancher et enlever le plateau
d'écoulement ......................................41
Branchement de l'arrivée d'eau à la
valve de distribution ............................42
Branchement du tuyau de remplissage
à la valve de distribution .....................43
Raccord du tuyau de vidange .............44
Branchement du câble électrique .......44
Installer la poigne de porte
(sur certains modèles) .........................46
Placer le lave-vaisselle dans l'armoire ... 46
Installation du panneau personnalisé
(modèles avec panneau personnalisé
seulement) ..........................................47
Choix de l'option de fixation ...............47
Vérification finale de l'installation ........48
Fixation du lave-vaisselle dans
l'ouverture d'encastrement de
l'armoire ..............................................49
Branchement de l'arrivée d'eau au
robinet d'arrêt de la maison ................50
Raccordement du tuyau de vidange ...50
Terminer l'installation ..........................52
Installation du panneau d'accès .........52
Contrôle du fonctionnement ...............53
Si le lave-vaisselle ne fonctionne
pas ......................................................53
MANTENIMIENTO DE LA
LAVAVAJILLAS ............................... 55
CONSEJOS PARA CARGAR LA
LAVAVAJILLAS ............................... 56
CUIDADO DE LA LAVAVAJILLAS ... 57
AJUSTES DEL CLIENTE DE LA
INTERFAZ DE USUARIO ............... 58
CÓDIGOS DE ERROR .................... 59
Códigos de error / luces
parpadeantes ......................................59
REQUISITOS DE INSTALACIÓN ... 60
Herramientas y piezas ........................60
Requisitos de ubicación .....................62
Dimensiones del producto
y de la abertura del gabinete: .............63
Requisitos de desagüe .......................64
Requisitos de suministro de agua ......64
Requisitos eléctricos...........................64
INSTRUCCIONES DE
INSTALACIÓN ................................ 65
Preparación de la abertura del
gabinete: instalaciones nuevas ...........65
Instalación opcional de la barrera contra
la humedad (recomendado para los
mostradores de madera) ....................65
Conexión eléctrica ..............................66
Prepare la lavavajillas ..........................67
Quite el panel de acceso ....................67
Desconecte y retire el ensamblaje
de la bandeja de goteo .......................67
Conecte la tubería de agua
a la válvula de llenado.........................68
Conecte la manguera de llenado
a la válvula de llenado.........................69
Conexiones de la manguera
de desagüe .........................................70
Conexión del cable de alimentación ...70
Instale la manija de la puerta
(en algunos modelos) ..........................72
Coloque la lavavajillas en el gabinete .... 72
Instalación del panel a la medida
(en modelos con paneles a la medida
solamente) ..........................................73
Selección del método de sujeción
de anclaje ............................................73
Verificación final de la instalación .......74
Asegure la lavavajillas en la abertura
del gabinete ........................................75
Conexión de tubería de agua a
manguera de válvula de cierre del
hogar ...................................................76
Conecte la manguera de desagüe ......76
Complete la instalación ......................78
Instale el panel de acceso ..................78
Verifique el funcionamiento .................79
Si la lavavajillas no funciona ...............79
Advertisement
Table of Contents

Related Manuals for Maytag MDB9959SKZ


Summary of Contents for Maytag MDB9959SKZ
-
Page 1: Table Of Contents
OWNER’S MANUAL MANUEL DE L’UTILISATEUR MANUAL DEL PROPIETARIO TABLE OF CONTENTS / TABLE DES MATIÈRES / ÍNDICE DISHWASHER MAINTENANCE ..3 ENTRETIEN DU LAVE-VAISSELLE ..29 MANTENIMIENTO DE LA LAVAVAJILLAS ....... 55 DISHWASHER LOADING TIPS ..4 CONSEILS DE CHARGEMENT DU LAVE-VAISSELLE ....30 CONSEJOS PARA CARGAR LA DISHWASHER CARE ....... -
Page 2: Important Safety Instructions
IMPORTANT SAFETY INSTRUCTIONS WARNING: When using the dishwasher, follow basic precautions, including the following: Do not tamper with controls. Read all instructions before using the dishwasher. Do not abuse, sit on, or stand on the door, lid, or dish racks of Use the dishwasher only for its intended function. -
Page 3: Dishwasher Maintenance
WARNING Tip Over Hazard Do not use dishwasher until completely installed. Do not push down on open door. Doing so can result in serious injury or cuts. DISHWASHER MAINTENANCE Detergents Cycle Selection and Energy High-quality premeasured tablets and packs are recommended Efficient dishwashers run longer to save water and energy, for improved performance. -
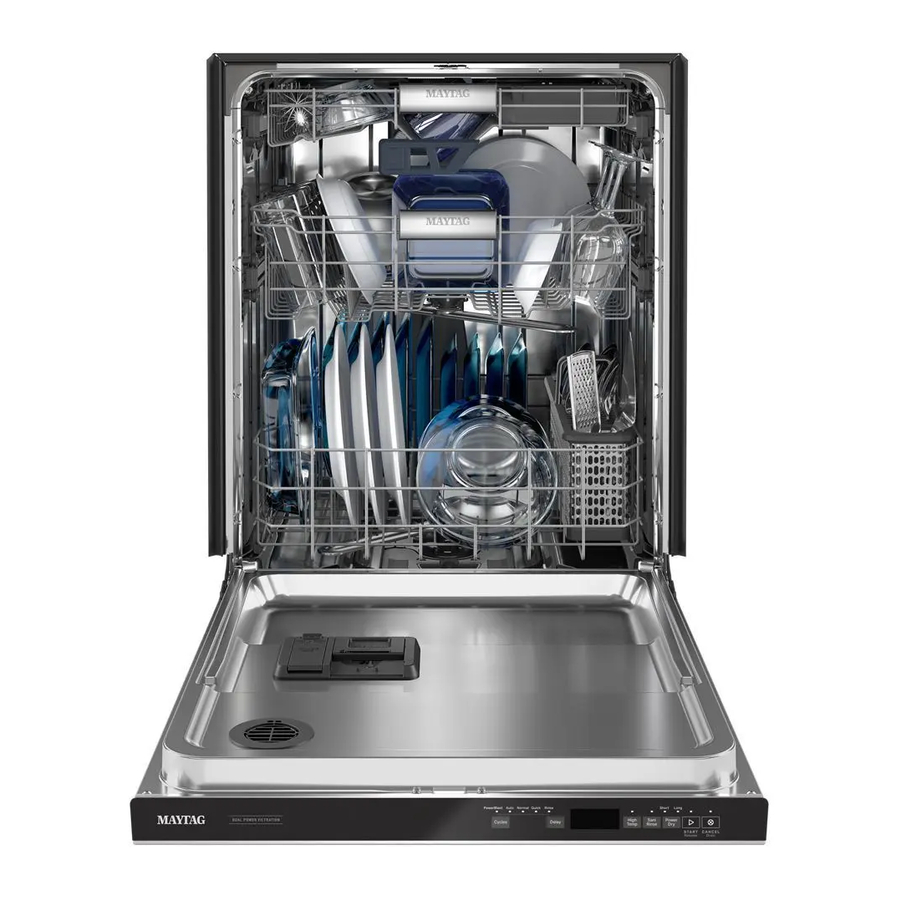
Page 4: Dishwasher Loading Tips
DISHWASHER LOADING TIPS Silverware Baskets Sliding Bowl Tines Style 1 The sliding bowl tines allow you to easily load bowls of multiple sizes. Grab the moveable tine row in the lower rack and slide into the desired position. Style 2 Fold Down Tines Use silverware basket lids to provide optimal spacing and best cleaning performance. -
Page 5: Dishwasher Care
DISHWASHER CARE Interior Cleaning Extended Time Without Use Many detergents may leave white spots or a white residue on To Reduce Risk of Property Damage During Vacation or Extended Time Without Use dishware and on the interior of the dishwasher. Over time this residue can become unsightly and could affect dishwasher When you will not be using the dishwasher during the summer ■... -
Page 6: User Interface Customer Settings
USER INTERFACE CUSTOMER SETTINGS Customer Settings To enter the Customer Settings Menu, press and Hold the HI TEMP key (or “Options” key if there is no HI TEMP key) for 5 seconds, then release. Press the START key within 2 seconds. The HI TEMP light will come on to indicate you are in the Customer Settings Menu mode. -
Page 7: Error Codes
ERROR CODES ERROR CODES / BLINKING LIGHTS Code Shown on Code Shown Front Panel LED * (7 Seg Display) Issue What will happen? What to do? (# blinks, Pause, # (if present) blinks) Turn off water to unit (if possible).Turn Drain sequence off power to unit. -
Page 8: Installation Requirements
INSTALLATION REQUIREMENTS TOOLS AND PARTS Other Useful Items You May Need: Gather the recommended tools and parts before starting installation. Read and follow the instructions provided with the tools listed here. All Installations Tools Needed: Flashlight Shallow pan Bath towel Masking, or duct tape Pliers Flat-blade screwdriver Parts Supplied:... - Page 9 Other Parts Needed (not provided): First-Time Installations 3/8" (9.5 mm) Compression x 3/4" (19 mm) Hose Fitting Check local codes. Check existing electrical supply. See the with rubber seal and 90° “Electrical Requirements” section. It is recommended that elbow (required to properly electrical connections be made by a licensed electrical installer.
-
Page 10: Location Requirements
LOCATION REQUIREMENTS For Direct Wire For Power Cord Dishwasher must be fully enclosed (top, sides, back, and floor) upon installation. A side panel kit is available from your dealer for installing your dishwasher at the end of your cabinetry. An optional moisture barrier accessory is also available for installing underneath a wooden countertop. -
Page 11: Product And Cabinet Opening Dimensions
PRODUCT AND CABINET OPENING DIMENSIONS: 24½" " (62.6 cm) 3/4" (60.4 cm) (1.9 cm) 30" 33½" 30" (76.2 cm) (85.1 cm) (76.2 cm) min. with legs removed 3¾" (9.7 cm) " - 4 " 21" (8.4 cm - 10.6 cm) (52.9 cm) A. -
Page 12: Drain Requirements
DRAIN REQUIREMENTS ELECTRICAL REQUIREMENTS A new drain hose is supplied with your dishwasher. If drain Be sure that the electrical connection and wire size are adequate ■ hose is not long enough, use a new drain hose with a and in conformance with the National Electrical Code, maximum length of 12 ft (3.7 m) that meets all current AHAM/ ANSI/NFPA 70 - latest edition, and all local codes and IAPMO test standards, is resistant to heat and detergent, and... -
Page 13: Installation Instructions
INSTALLATION INSTRUCTIONS WARNING Sand holes smooth Metal Cabinet Wood Cabinet Electrical Shock Hazard Disconnect electrical power at the fuse box or circuit breaker box before installing dishwasher. Failure to do so can result in death or electrical shock. Disconnect power Wood cabinet: Sand the hole until smooth. -
Page 14: Electrical Connection
ELECTRICAL CONNECTION Built-up floors – add shims as needed – For Direct Wire, begin with Step 7 – For Power Cord, wait until Step 18 Direct wire – route cable Built-up floors: If the kitchen floor is higher than the cabinet opening’s floor - for example, the kitchen floor tile does not extend into the cabinet opening - add shims, as needed, in the area shown to bring the dishwasher up to 34"... -
Page 15: Prepare Dishwasher
PREPARE DISHWASHER REMOVE ACCESS PANEL WARNING Remove access panel Tip Over Hazard Do not use dishwasher until completely installed. Do not push down on open door. Doing so can result in serious injury or cuts. Using a 5/16" (7.9 mm) nut driver or Phillips screwdriver, remove WARNING the two screws attaching access panel to dishwasher. -
Page 16: Connect Water Line To Fill Valve
CONNECT WATER LINE TO FILL VALVE Measure cabinet opening – For Copper line, begin with Step 12 – For Flexible line, begin with Step 14 Copper Water Line Measure the height of cabinet opening from the underside of the countertop to the floor where the dishwasher will be installed. Be sure to measure the lowest point on the underside of the countertop and the highest point on the floor. -
Page 17: Connect Fill Hose To Fill Valve
CONNECT FILL HOSE TO FILL VALVE Flexible line Tighten 90° elbow fitting to valve Elbow fitting Be sure rubber washer is properly seated in fitting. Slide the 3/4" (19 mm) fitting of the 90° elbow up to the valve and hand tighten it to avoid cross-threading. -
Page 18: Drain Hose Connection
DRAIN HOSE CONNECTION Connect drain hose Remove terminal box Terminal To remove the terminal box, depress the plastic latch, slide the box toward the left of the unit along the metal tube and rotate the left side of the box forward. Make sure that the product wiring will still be attached within the terminal box. - Page 19 Connect ground wire Secure cord or wire on strain relief Ground connector screw Ground Washer wire Ground screw Tighten strain relief screws to secure cord. Route power cord through strain relief in the back of the terminal box. Remove the ground connector screw on the raised floor Reinstall terminal box cover and wires inside the box and place it through the ring terminal of the green ground wire of power cord.
-
Page 20: Install Door Handle
INSTALL DOOR HANDLE NOTE: Route water supply, drain hose, and power cord out the rear of the dishwasher. If your product has insulation around the (ON SOME MODELS) bottom, route these lines through the slits in that insulation in the rear of the product. -
Page 21: Custom Panel Installation (Custom Panel Models Only)
Countertop Attachment: Move dishwasher all but 6" (15.2 cm) into cabinet opening Insert bracket 6" (15.2 cm) Tabs must point to the right. NOTE: Leave unit about 6" (15.2 cm) out from cabinet in order to install anchor brackets and adjust door tension if needed. Remove the brackets from the package, and insert into the open slots on the left- and right-hand top of the dishwasher collar as Pull slack from utilities... -
Page 22: Final Installation Check
Install bracket Check for plumb and adjust legs if needed Bend tabs Push bracket into slot on the side of dishwasher, and bend tab in toward the side of the dishwasher so that it keeps the bracket in Check that leveling legs are firmly against the floor. Close and place. -
Page 23: Secure Dishwasher In Cabinet Opening
SECURE DISHWASHER IN CABINET OPENING Check door clearance Double-check dishwasher alignment in cabinet opening IMPORTANT: Check that top of door does not contact screws, brackets, or countertop. If it does, adjust leveling legs or use the side attachment option. Check that dishwasher is still level front to back and side-to-side in the cabinet opening. -
Page 24: Connect Water Line To House Shut-Off Valve
CONNECT WATER LINE TO HOUSE SHUT-OFF VALVE Option A: Waste disposer—no air gap NOTE: If using a flexible braided hose, replace inlet hose after 5 Large drain years to reduce the risk of hose failure. Record hose installation Disposer inlet hose clamp or replacement dates on the hose for future reference. - Page 25 4. Attach drain hose to air gap with large Option B: No Waste disposer—no air gap drain hose clamp (provided). Use pliers to squeeze clamp open and move into position. If the drain hose was cut, use a 1½" to 2" (3.8 cm to 5.0 cm) screw-type Large drain Waste tee clamp (not provided).
-
Page 26: Complete Installation
COMPLETE INSTALLATION Power supply cord—Plug into a grounded 3 prong outlet Reconnect float switch Plug into a grounded 3 prong outlet. Reconnect power Reconnect electrical power at the fuse box or circuit breaker box. Check that the power supply wire or cord does not touch dishwasher motor or the lower part of the dishwasher tub. -
Page 27: Check Operation
IF DISHWASHER DOES NOT OPERATE Check access panel edge First try the solutions suggested here to possibly avoid the cost of a service call. Has the circuit breaker tripped or the house fuse blown? ■ Is the door closed tightly and latched? ■...
Need help?
Do you have a question about the MDB9959SKZ and is the answer not in the manual?
Questions and answers