Table of Contents
Advertisement
Advertisement
Table of Contents

Related Manuals for Ardwolf A10


Summary of Contents for Ardwolf A10
- Page 1 Ardwolf A10 Fingerprint Touchscreen Door Lock User Manual...
-
Page 2: Table Of Contents
Content 1. Features ------------------------------------------------------------------ 2. Specifications ------------------------------------------------------------ 3. How to scan your fingerprint ----------------------------------------- 4. Flow chart of menu ----------------------------------------------------- 5 5. Rule of operation--------------------------------------------------------- 6. Enroll fingerprint--------------------------------------------------------- 5 7. Delete Fingerprint-------------------------------------------------------- 6 8. Delete all fingerprint ---------------------------------------------------- 6 9. Add User Code ----------------------------------------------------------- 6 10. - Page 3 Ardwolf A10 Fingerprint Touchscreen Door Lock User Manual...
-
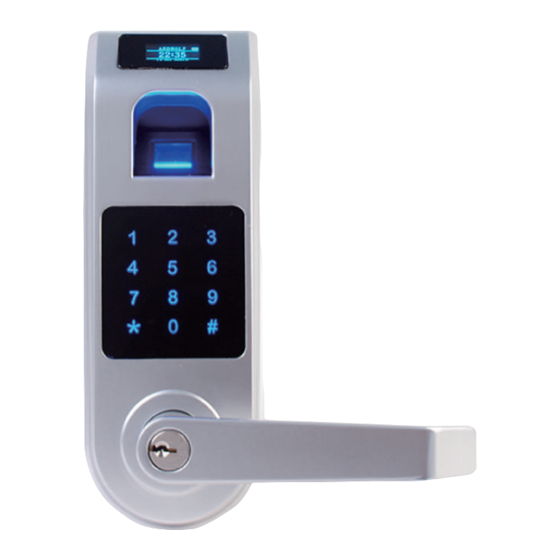
Page 4: Features
Fingerprint sensor Touchscreen Thank you for choosing Ardwolf A10 fingerprint touchscreen door lock. No more worries about losing your keys, one touch to unlock. The fingerprint sensor in the lock is combined with the touch active sensor. This feature allows an easy and fast fingerprint entry--one touch on the fingerprint sensor unlocks. -
Page 5: Specifications
• Double verification mode: unlock by User code + fingerprint or fingerprint + different fingerprint, when you enable this mode. • Support passage mode: stay at “unlock” state during the passage mode. • Memory function: “power run-out” or “system reset” will not cause the loss of enrolled fingerprint(s) and user code(s). -
Page 6: How To Scan Your Fingerprint
3. How to scan your fingerprint When placing your finger on the fingerprint sensor to scan, make sure that the location of the fingerprint “core” is making direct contact with fingerprint sensor. Apply medium pressure, or just enough to flatten the skin on your finger. The fingerprint sensor won’t get your fingerprint image if you take the following way. -
Page 7: Flow Chart Of Menu
4. Flow chart of menu Fingerprint User Code System AT logs Fingerprint AT logs User Code System Add Code Enroll Date & Time Delete Code Fingerpr. Verify mode Delete All Delete Beep Fingerpr. About Delete All FP Admin Code Reset... -
Page 8: Rule Of Operation
5. Rule of operation Active lock by touching screen then touch #. Login page will show up. Login system by Admin Code or Admin Fingerprint. After login system, following Menu to program fingerprint, user code or set up lock.Default administrator code(1234). Note: “2↑”... -
Page 9: Delete Fingerprint
7. Delete Fingerprint Login system, enter menu page (refer page 5 “5. Rule of operation”). Menu User ID Enroll Fingerpr. Fingerprint Pop up ID Delete Fingerpr. User Code Desired ID Delete All FP 2↑,8↓, # Enter 2↑,8↓, # Enter 2↑,8↓, # Enter Delete User User ID: 001 001_? -
Page 10: Delete User Code
Enter Code again Enter Code ID: 001 (4-12 digit) (4-12 digit) ******* ******* 2↑,8↓, # Enter * Exit # Enter * Exit # Enter User could input a desired ID Enter Code Code ID (4-12 digit) Enter user ID Pop up ID ******* (1 to 300): 1_ Desired ID... -
Page 11: Delete All User Code
11. Delete All User Code Login system, enter menu page (refter page 5 “5. Rule of operation”). Add Code Menu Delete All? Delete Code Fingerprint Delete All User Code 2↑,8↓, # Enter 12. Set up date and time Login system, enter menu page (refer page 5 “5. Rule of operation”). Input number, the default number will be replaced. -
Page 12: Check User Information
15. Check user information Login system, enter menu page (refer page 5 “5. Rule of operation”). You may check user information in the system. Menu System Admin Finger User Code Beep Capacity: 5 System About Admin: 1 2↑,8↓, # Enter 2↑,8↓, # Enter 2↑, 8↓, * Exit 16. -
Page 13: Audit Trail Log
18. Audit Trail log Login system, enter menu page (refer page 5 “5. Rule of operation”). You may check audit trail logs on lock directly. Touch “2” or “8” to page up or down Menu FP ID:001 System Date: 06/20/2016 Audit Logs Time: 21:23:16 ↑(2) 00012 (8)↓... -
Page 14: Troubleshooting
the lock onto a door, you will need to take the lock off the door in order to locate the reset button. After resetting the system, Programming Code will revert back to the default programming code (1234). All user fingerprints and user codes will remain in the system. You may login system to use command to delete all fingerprint or user code when you need it. - Page 15 Ardwolf A10 FINGERPRINT KEYPAD LOCK INSTALLATION INSTRUCTIONS Tools needed for new installation: Pencil, Chisel, Tape Measure, Hammer, Phillips Screwdriver, 1” (25 mm) & ⅛” (3 mm) Drill Bits, 2 ⅛” (54 mm) Hole Boring Bit, Power Drill. 1. Mark door.
- Page 17 4. Prepare doorjamb (see fig. 8). 4.1 Mark centerlines on jamb exactly opposite center of latch hole. 4.2 Make rectangle holes as shown. 4.3 Use strike as a pattern for mortise and pilot holes. Strike should fit flush. Part II. Fingerprint Keypad Lock Installation Instructions...
- Page 18 (A) Key (F) Latch (A) Mounting Screws (B) Outside Lever (G) Latch/Strike Screws (B) Inside Lever (C) Cylinder (H) Strike (M) Cover (D) Outside chassis (I) Inside chassis (N) Cover Screw (E) Lever Catch (J) Allen Screw (O) Allen Wrench The lock comes with two (K) Mounting Screws M5x60 2⅜”...
- Page 19 fig. 3 fig. 2 2. Set up inside Lever: Put Lever on Lever Spindle then use Allen Wrench to put Allen Screw (see fig. 5). Use Allen Wrench to take Allen Screw off then pull out Lever when you want to remove Lever.
- Page 20 3.4 Insert Cylinder in Lever Spindle. The Cylinder’s tail toward left if you want to set lock as left-handed (see fig. 7b), otherwise the Cylinder’s tail toward right (see fig. 8b). 3.5 Put lever on Lever Spindle (see fig. 7c, 8c). The lever will stop at half way when you push Lever in.
- Page 21 fig. 9 fig. 10 4. Install 4 brand new AA Alkaline batteries (NOT included, do not use rechargeable batteries). Alkaline Batteries Warning: Do not install backwards, charge, put in fire, or mix with other battery types, may explode or leak causing injury. Replace all batteries at the same time.
-
Page 22: Installation
fig. 12 fig. 13 nstallation Optio The lock will stay on vertical position on the door as long as the two mounting screws were tied up in most case. You may put a tapping screw on inside chassis to increase lock stability. 1. - Page 24 Important Notes: Please read all the instructions before contacting customer support. Please contact customer support before returning the product,we will reply the first time. Customer Support: Email: service@ardwolf.com Web site: www.ardwolf.com...
Need help?
Do you have a question about the A10 and is the answer not in the manual?
Questions and answers