Advertisement
Quick Links
thank you for purchasing a Sealey product. manufactured to a high standard, this product will, if used according to these instructions,
and properly maintained, give you years of trouble free performance.
IMPORTANT: PLEASE READ THESE INSTRUCTIONS CAREFULLY. NOTE THE SAFE OPERATIONAL REQUIREMENTS, WARNINGS & CAUTIONS. USE
THE PRODUCT CORRECTLY AND WITH CARE FOR THE PURPOSE FOR WHICH IT IS INTENDED. FAILURE TO DO SO MAY CAUSE DAMAGE AND/OR
PERSONAL INJURY AND WILL INVALIDATE THE WARRANTY. KEEP THESE INSTRUCTIONS SAFE FOR FUTURE USE.
refer to
electrical
instruction
shock Hazard
manual
1. SAfety
GenerAl SAfety
1.1.
the warnings, cautions and instructions referred to in this manual cannot cover all possible conditions and situations that may occur. it
must be understood that common sense and caution are factors which cannot be built into this product, but must be applied by the
operator.
WArnInG! to avoid physical injury never take measurements on bare conductors, bare or frayed cable.
‰
WArnInG! uSe eXtreme cAutIOn when working with high voltages.
‰
WArnInG! engines produce carbon monoxide which is odourless and causes slower reaction time which could lead to serious injury.
‰
An engine which is operating should be in a well ventilated area, or the vehicle's exhaust should be connected to an adequate fume
removal system.
dO nOt use leads of current clamp or multimeter if damaged or if the wire is bared in any way.
8
dO nOt use the current clamp adaptor if it has been damaged.
8
dO nOt clamp to conductors with voltages equal to or exceeding 300V dc or 240V rms Ac
8
▲
exceeding the electrical limits of this current clamp meter is dangerous and will expose you to serious or possibly fatal injury.
carefully read and understand the specification limits and cautions in this safety section.
familiarise yourself with the application and limitations of the current clamp and multimeter (see multimeter manual) as well as the
9
potential hazards.
IF IN ANY DOUBT CONSULT A QUALIFIED ELECTRICIAN.
When working on a vehicle which is being tested or repaired ensure that the handbrake is on and the front wheels are chocked to avoid
9
the vehicle moving and causing injury.
Wear suitable eye protection when testing or repairing a vehicle.
9
Avoid measurement errors from outside interference. Keep the meter away from spark plug and coil wires.
9
When using a current clamp please observe all normal safety rules concerning protection against the dangers of electrical current
9
and protect the current clamp against misuse.
Before commencing testing, follow instructions below and select the correct input sockets, function and range on the multimeter.
9
Always take care when working with voltages above 35V dc or 25V Ac rms. these voltages are considered a shock hazard.
9
Always keep fingers behind the probe barriers whilst measuring and dO nOt use when hands are wet.
9
if any abnormal readings are observed, the multimeter must be checked out by an authorised technician.
9
When not in use, store the current clamp carefully in a safe, dry, childproof location out of direct sunlight. if storing for a long period
9
of time, remove the battery. storage temperature range: -15°c to 50°c.
1.2.
replAcInG tHe BAttery (See fig.1)
1.2.1.
When the battery becomes exhausted or drops below the operating voltage, the red led battery symbol will be illuminated.
1.2.2.
open the battery cover by loosening the screw using a small cross head screwdriver.
remove the old battery and insert the new one, observing the correct polarity clearly shown inside the compartment.
1.2.3.
replace the battery cover and secure with the screw.
1.2.4.
dispose of batteries according to local authority guidelines.
remove to replace battery
fig.1
2.
IntrOductIOn
i
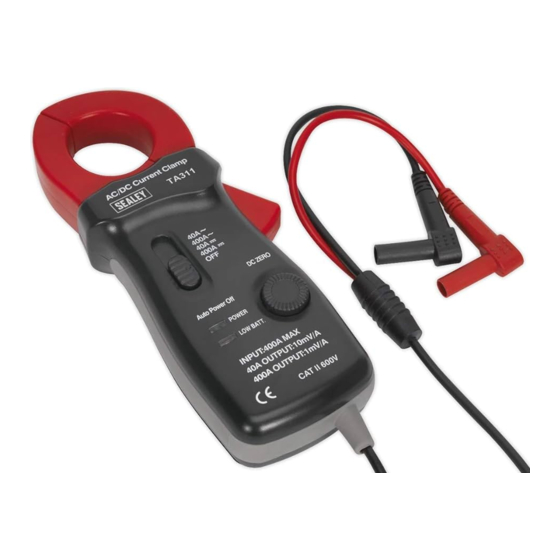
designed for use with a standard multimeter and measures current draw from vehicle components, in situ, without the need to break into the circuit.
suitable for measuring both Ac and dc current. fitted with 4mm banana elbow connectors and supplied in a storage pouch. Powered by a 9V
battery (supplied). the current clamp adaptor can also be used with an oscilloscope, using a suitable Bnc conversion adaptor.
© Jack sealey limited
instructions for
20A/80A Ac/dc current clAmp - 12mm
40A/400A Ac/dc current clAmp - 28mm
tA310 & tA311
model no:
Original Language Version
underside battery compartment. Read the warning
on the battery compartment cover before opening.
tA310, tA311 issue 2 (H, 1, 4, f) 05/12/17
Advertisement

Related Manuals for Sealey TA311


Summary of Contents for Sealey TA311
- Page 1 & tA311 model no: thank you for purchasing a Sealey product. manufactured to a high standard, this product will, if used according to these instructions, and properly maintained, give you years of trouble free performance. IMPORTANT: PLEASE READ THESE INSTRUCTIONS CAREFULLY. NOTE THE SAFE OPERATIONAL REQUIREMENTS, WARNINGS & CAUTIONS. USE THE PRODUCT CORRECTLY AND WITH CARE FOR THE PURPOSE FOR WHICH IT IS INTENDED.
- Page 2 Power and range switch dc measuring depress trigger to open zero button spring return jaws Black (-) red (+) tA310, tA311 issue 2 (H, 1, 4, f) 05/12/17 Original Language Version © Jack sealey limited...
-
Page 3: Safety Information
BAttery remOVAl - refer tO SectIOn 1.2 under the Waste Batteries and Accumulators regulations 2009, Jack sealey ltd are required to inform potential purchasers of products containing batteries (as defined within these regulations), that they are registered with Valpak’s registered compliance scheme. Jack sealey ltd Batteries Producer registration number (BPrn) is BPrn00705.