Table of Contents
Advertisement
Advertisement
Table of Contents

Subscribe to Our Youtube Channel
Related Manuals for Zte Cymbal 2


Summary of Contents for Zte Cymbal 2
- Page 1 User Guide...
- Page 2 LEGAL INFORMATION Thank you for choosing this ZTE mobile device. In order to keep your device in its best condition, please read this manual and keep it for future reference. Copyright Copyright © 2019 ZTE CORPORATION All rights reserved. No part of this publication may be quoted, reproduced, translated or...
- Page 3 ® The Bluetooth word mark and logos are registered trademarks owned by the Bluetooth SIG, Inc. and any use of such marks by ZTE Corporation is under license. microSDHC Logo is a trademark of SD-3C, LLC. Other trademarks and trade names are those of their respective...
- Page 4 Instructional Icons Additional information, supplementary NOTE instruction or tips for the operation of the product. Safety information that, if ignored, may CAUTION cause minor damage to the equipment or service interruption. Safety information that, if ignored, may WARNING cause serious damage to the equipment or danger to personal safety.
-
Page 5: Table Of Contents
Contents Getting Started............. 11 Overview ....................... 11 Knowing the Keys ..................13 Installing the nano-SIM Card and microSDHC™ Card....15 Removing the nano-SIM Card and microSDHC Card ....17 Charging the Battery ................. 18 Extending the Battery Life ..............20 Getting to Know the Home Screen ............ - Page 6 Checking External Screen Icons ............30 Entering Text ....................31 Opening an App ..................33 Connecting to Networks and Devices ......34 Connecting to Mobile Networks ............34 Connecting Wi-Fi ..................36 Connecting to Bluetooth Devices ............38 Connecting to Your Computer via USB ..........40 Sharing Your Mobile Data Connection ..........
- Page 7 Editing Contacts ..................59 Email................60 Setting Up the First Email Account ............60 Checking Your Emails ................60 Responding to an Email ................61 Writing and Sending an Email ............... 62 Adding and Editing Email Accounts ............ 63 Messaging ..............65 Opening the Messaging Screen ............
- Page 8 Camera ................72 Capturing a Photo ..................72 Recording a Video ..................74 Gallery ................75 Managing Picture/Video Files ..............75 Working With Pictures ................76 Playing Videos ..................... 77 Music ................78 Viewing Your Music Library ..............78 Playing Music ....................78 Managing Playlists ..................
- Page 9 More Features .............. 87 Setting a New Alarm ................. 87 Checking World Time ................87 Using Stopwatch and Countdown ............87 Calculator ...................... 88 Downloads ....................88 File Manager ....................88 Notifications ....................89 Settings ................. 90 Wireless & Networks .................. 90 Accessibility ....................
- Page 10 Distractions ....................106 Product Handling ..................107 Electrical Safety ..................112 Radio Frequency Interference ............. 113 Explosive Environments ................. 114...
-
Page 11: Getting Started
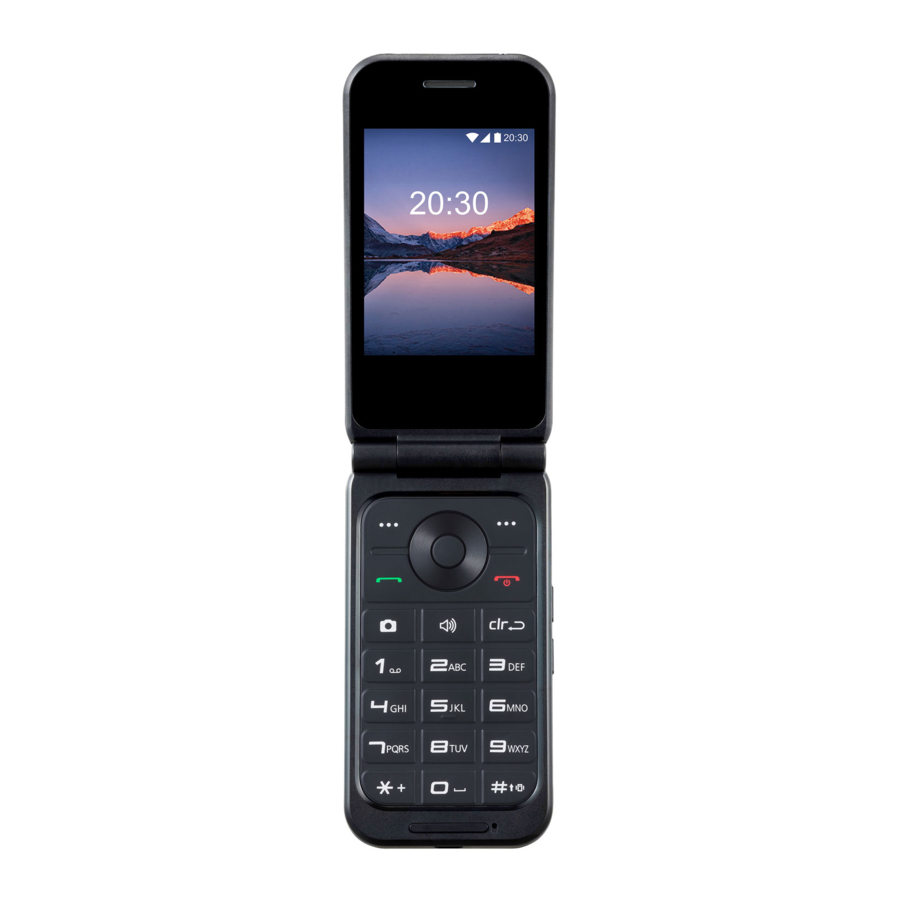
Getting Started Overview Auxiliary microphone Earpiece Internal screen 4-way OK key navigation key Left soft key Right soft key Power/End key Send key Camera key Clear/Back key Speaker key Main microphone Charging/ micro-USB jack... - Page 12 Camera Volume up key External screen Volume down key 3.5 mm Speaker headset jack Back cover...
-
Page 13: Knowing The Keys
Knowing the Keys Function • Press to end or reject a call. Power/End key • Press and hold to power on or power off. • Press to go to the home screen. Press to select the option at the bottom left corner Left soft key of the display. - Page 14 Function • Press to launch the Camera app from the home Camera key screen. • Press to take a picture when using the Camera app. Press to turn on/off speakerphone during a call. Speaker key • Press to delete text or numbers before the Clear/Back key cursor.
-
Page 15: Installing The Nano-Sim Card And Microsdhc™ Card
Installing the nano-SIM Card and microSDHC™ Card You can use one nano-SIM card and one microSDHC card (optional, not included). Power off your phone before installing or replacing the nano-SIM card or the microSDHC card. WARNING! To avoid damage to the phone, do not use any other kind of SIM cards, or any non-standard nano-SIM card cut from a SIM card. - Page 16 3. Insert the microSDHC card (sold separately), with the gold- colored contacts facing down, into its slot.
-
Page 17: Removing The Nano-Sim Card And Microsdhc Card
4. Insert the battery, making sure the connectors align. Gently push down on the battery until it clicks into place. 5. Replace the back cover. Removing the nano-SIM Card and microSDHC Card 1. With the phone powered off, open the back cover and remove the battery. -
Page 18: Charging The Battery
You should fully charge the battery as soon as possible. WARNING! Use only ZTE-approved chargers and USB cables. The use of unapproved accessories could damage your phone or cause the battery to explode. - Page 19 2. Connect the charger to a standard AC wall outlet. If the phone is on, you’ll see a charging icon, such as , appear in the status bar of the internal screen. 3. Disconnect the charger when the battery is fully charged. NOTE: If the battery is extremely low, you may be unable to power on the phone even when it is being charged.
-
Page 20: Extending The Battery Life
Extending the Battery Life Active applications, screen brightness levels, Bluetooth usage, and GPS functionality can drain your battery. You can follow these helpful tips to conserve your battery power: Reduce the screen backlight time. Lower the screen brightness. ... -
Page 21: Getting To Know The Home Screen
Getting to Know the Home Screen The home screen is the starting point for your phone’s applications, functions, and menus. Status bar Wallpaper Main menu... -
Page 22: Personalizing
Personalizing Changing the System Language 1. From the home screen, select Menu > Settings > Phone settings > Languages & input. 2. Select the language you need and press the OK key. Setting the Date and Time 1. From the home screen, select Menu > Settings > Phone settings >... -
Page 23: Changing The Phone, Notification, Or Alarm Ringtone
Changing the Phone, Notification, or Alarm Ringtone You can customize the default ringtone for incoming calls, the default notification sound, and the default alarm sound. 1. From the home screen, select Menu > Settings > Sound & notifications. 2. Select Phone ringtone, Default notification ringtone, or Default alarm ringtone. -
Page 24: Adjusting Volumes
Adjusting Volumes 1. From the home screen, select Menu > Settings > Sound & notifications > Volume. 2. Highlight the Media volume, Alarm volume, Ring volume, or Notification volume slider. 3. Press left or right on the 4-way navigation key to adjust the volume. -
Page 25: Applying New Wallpapers
NOTES: Silent and vibration modes will not silence your alarms. To instantly turn off an incoming call ringtone, press the Volume up/down key. Applying New Wallpapers You can set the wallpaper for the home screen and lock screen. 1. -
Page 26: Protecting Your Phone With A Screen Lock
Protecting Your Phone With a Screen Lock You can protect your phone by creating a screen lock. When enabled, you can enter a numeric PIN to unlock the phone. 1. From the home screen, select Menu > Settings > Phone settings >... - Page 27 Schedule an hour or more for the encryption process: you must not interrupt it or you will lose some or all of your data. When you're ready to turn on encryption: 1. From the home screen, select Menu > Settings > Phone settings >...
-
Page 28: Knowing The Basics
Knowing the Basics Monitoring the Phone Status The status bar at the top of the internal screen provides phone and service status icons on the right side. Below are some of the icons you may see. Indicator What it means 4G LTE connected HSPA+ connected Silent mode... -
Page 29: Checking Notifications
Indicator What it means Airplane mode Bluetooth on Mobile data in use Wi-Fi connected Speakerphone on Phone microphone off Checking Notifications The status bar at the top of the home screen provides notification icons on the left side. Below are some of the icons you may see. Indicator What it means New email... -
Page 30: Checking External Screen Icons
Indicator What it means Upcoming event Song playing Open Wi-Fi network detected Data downloaded Checking External Screen Icons You can also check the phone status and notification alerts with different icons on the external screen. Below are some of the icons you may see. -
Page 31: Entering Text
Indicator What it means Alarm set No signal Signal strength 4G LTE connected HSPA+ connected Airplane mode Entering Text Changing the Input Mode or Language You can enter text using the following input modes: abc, Abc, ABC, T12 abc, T12 Abc, T12 ABC, and 123 (number input). When entering text, you will see the input mode indicator on the right side of the status bar. - Page 32 Entering Letters (abc, Abc, and ABC Modes) Press a number key (2 key through 9 key) multiple times until the correct letter is shown on the screen. Press once to enter the first letter on the keypad, twice quickly to enter the second letter, and so on.
-
Page 33: Opening An App
Using Predictive Text Predictive text mode (T12 abc, T12 Abc, and T12 ABC) is based on a built-in dictionary and generates words from the combination of letters pressed. Press once on each key that corresponds to the letter you want to enter. -
Page 34: Connecting To Networks And Devices
Connecting to Networks and Devices Connecting to Mobile Networks Controlling Mobile Data Use To enable or disable data access: 1. From the home screen, select Menu > Settings > Wireless & networks > Mobile network > Mobile Data. 2. Select On or Off to enable or disable data access. To get data services when roaming: 1. - Page 35 Selecting Preferred Network 1. From the home screen, select Menu > Settings > Wireless & networks > Mobile network > Network operators > Search networks > OK and wait for the phone to search for available networks. 2. Press up or down on the 4-way navigation key to highlight a network and press the OK key.
-
Page 36: Connecting Wi-Fi
Connecting Wi-Fi Turning On and Connecting to a Wi-Fi Network 1. From the home screen, select Menu > Settings > Wireless & networks > Wi-Fi. 2. If Wi-Fi is off, select Turn on. 3. Select a network name to connect to it. 4. - Page 37 Adding a Wi-Fi Network You can add a Wi-Fi network if the network does not broadcast its name (SSID). To add a secured network, you first need to get the security details from the network’s administrator. 1. From the home screen, select Menu > Settings > Wireless & networks >...
-
Page 38: Connecting To Bluetooth Devices
Connecting to Bluetooth Devices Bluetooth is a short-range wireless communication technology. Phones or other devices with Bluetooth capabilities can exchange information wirelessly within a distance of about 30 feet (10 meters). The Bluetooth devices must be paired before the communication is performed. Turning Bluetooth On/Off 1. - Page 39 Your phone automatically scans for and displays the IDs of all available Bluetooth devices in range. 3. Highlight the device you want to pair with, and press the OK key. 4. If necessary, confirm that the Bluetooth passkeys are the same between the two devices and press the OK key.
-
Page 40: Connecting To Your Computer Via Usb
Connecting to Your Computer via USB You can connect your phone to a computer with a USB cable and transfer music, pictures, and other files in both directions. Your phone stores these files in the phone storage or on a removable microSDHC card (if one is installed). -
Page 41: Sharing Your Mobile Data Connection
Disconnecting Your Phone From the Computer To disconnect the phone from the computer, simply unplug the USB cable when you’re finished. Sharing Your Mobile Data Connection You can use tethering to share your phone’s Internet connection with a computer that connects to your phone via USB cable or by Bluetooth. -
Page 42: Phone Calls
Phone Calls You can place calls from the Call history, the Contacts app, or other apps that display contact information. Placing and Ending Calls Placing a Call by Dialing 1. From the home screen, use the keypad to enter the phone number or contact name. -
Page 43: Answering Or Rejecting Calls
Ending a Call During a call, press the Power/End key. Answering or Rejecting Calls When you receive a phone call, you can answer or reject the call, or reject it with a text message. Answering a Call To answer an incoming call, press the Send key or the OK key. NOTES: ... -
Page 44: Working With The Call History
Working With the Call History The call history is a list of all the calls you’ve placed, received, or missed. It provides a convenient way to redial a number, return a call, or add a number to your Contacts. To open the call history, from the home screen, press the Send key or select Menu >... -
Page 45: Calling Your Contacts
Taking Other Actions on a Call History Entry 1. Open the call history. 2. Select a phone number to view call details. 3. Select Options, and then choose from the following: Delete: Delete the call history entry. Block/Unblock number: Block or unblock calls from the number. -
Page 46: Using Options During A Call
3. Follow the voice prompts to listen to and manage your voicemail messages. NOTE: Setting Voicemail for how to set your voicemail service. For detailed information, please contact your service provider. Using Options During a Call You can use the following options during a call: ... -
Page 47: Managing Multi-Party Calls
Managing Multi-party Calls When the call waiting and conference call features are available, you can switch between two calls or set up a conference call. NOTE: The call waiting and conference call features need network support and may result in additional charges. Please contact your service provider for more information. -
Page 48: Adjusting Your Call Settings
Setting Up a Conference Call With this feature, you can talk to two or more people at the same time. 1. Place the first call. 2. Once you have established the connection, select Options > Add call and dial the second number. This puts the first caller on hold. 3. - Page 49 Setting Phone Flip Action You can answer a call simply by opening the flip phone. 1. From the home screen, select Menu > Settings > Call settings > Flip open to answer. 2. Select On or Off to enable or disable the function. Editing Quick Response to Rejected Callers 1.
- Page 50 Forwarding Incoming Calls The call forwarding feature allows you to forward your incoming calls to another phone number. 1. From the home screen, select Menu > Settings > Call settings > Calls > Call forwarding. 2. Select an available option to enable, update, or disable it. Barring Calls The call barring feature allows you to restrict certain outgoing and incoming calls.
- Page 51 NOTE: The PIN2 code is provided by your carrier. Entering an incorrect PIN2 code more times than allowed can cause your nano-SIM card to be locked. Contact the service provider for assistance. Setting Call Waiting This option allows you to be notified of incoming calls during a call. 1.
- Page 52 Setting Voicemail 1. From the home screen, select Menu > Settings > Call settings > Voicemail. 2. Select from the following voicemail settings: Service: Select the voicemail service provider. Your carrier is the default. Voicemail number: View the voicemail number; if needed, select to edit it.
- Page 53 TTY full: Users who cannot talk or hear may use this mode to send and receive text messages through a TTY device. TTY HCO: Users who can hear, but cannot talk, may use this mode to listen to the other party and respond via text messages.
-
Page 54: Contacts
Contacts To see your contacts, from the home screen, press the Left soft key or select Menu > Contacts. Adding a New Contact 1. From the home screen, select Contacts. 2. Select Options > New contact to add a new contact. 3. -
Page 55: Setting Up Your Own Profile
Setting Up Your Own Profile You can create your own name card in your phone. 1. From the home screen, select Contacts. 2. Select Options > Settings > My info. 3. Select the contact icon at the top to add the contact image. You can take a photo or choose from the Gallery. - Page 56 Importing Contacts From the Phone Storage or microSDHC Card 1. From the home screen, select Contacts. 2. Select Options > Import/Export > Import from storage. 3. If prompted, choose to import one, multiple, or all vCard files. 4. If prompted, select the vCard file(s) to import. Exporting Contacts to the Phone Storage or microSDHC Card 1.
-
Page 57: Working With Groups
6. The phone will export the selected contacts into a vCard file. Follow the prompts to send the vCard file. Working With Groups Viewing Your Contact Groups 1. From the home screen, select Contacts > Labels. 2. Scroll through the list to view the groups. 3. -
Page 58: Searching For A Contact
Deleting a Group 1. From the home screen, select Contacts > Labels. 2. Select the group you want to delete. 3. Select Options > Delete label. 4. Select OK to disband the group. The contacts in the group will not be deleted. Editing a Group 1. -
Page 59: Editing Contacts
Editing Contacts Editing Contact Details 1. From the home screen, select Contacts. 2. Select the contact you want to edit. 3. Select Edit. 4. Edit the contact information, and then select Save. Deleting Contacts 1. From the home screen, select Contacts. 2. -
Page 60: Email
Email From the home screen, select Menu > Email to read and send emails from your Microsoft Exchange ActiveSync, POP3, or IMAP accounts. Setting Up the First Email Account 1. When setting up the first email account on the phone, select an email server and then enter your email address and password. -
Page 61: Responding To An Email
NOTE: To adjust how often your phone checks for new emails, from the inbox select Options > Settings > Account settings > name of the account > Data usage > Sync settings > Sync frequency. Responding to an Email You can reply to or forward an email that you receive. You can also delete emails and manage them in other ways. -
Page 62: Writing And Sending An Email
Marking an Email as Unread You can return a read email to the unread state or mark a batch of emails as unread. While reading an email, select Options > Mark unread. While in an email box (for instance, the Inbox), select Options > Multi-select, select all the emails you need and select Options >... -
Page 63: Adding And Editing Email Accounts
3. Press down on the 4-way navigation key to switch to the Subject field and the Compose email field. Enter the email subject and email text. NOTE: If necessary, select Options > Insert quick response to add text template to the email text. 4. - Page 64 Editing or Removing an Email Account You can change a number of settings for an email account or remove the account from your phone. The options available depend on the type of the account. 1. Open the email Inbox and select Options > Settings > Account settings.
-
Page 65: Messaging
Messaging You can use Messaging to exchange text messages (SMS) and multimedia messages (MMS). Opening the Messaging Screen From the home screen, select Message or Menu > Messaging. The Messaging screen opens, where you can create a new message or open an ongoing message thread. ... -
Page 66: Replying To A Message
4. Select Options > Add attachments. You can add audio, video, picture, or vCard contact files to the message. These attachments will convert your message to a multimedia message. NOTE: If you do not want to send a multimedia message for contacts information. -
Page 67: Forwarding A Message
Forwarding a Message 1. On the Messaging screen, select the thread that has the message you want to forward. 2. Press up or down on the 4-way navigation key to highlight the message. 3. Press the OK key and select Forward. 4. -
Page 68: Calendar
Calendar To open Calendar, from the home screen, select Menu > Tools > Calendar. Viewing Your Calendars and Events Changing Calendar Views You can view your calendar by month, week, day, or agenda. To change the view, select Options > Monthly view / Weekly view / Daily view / Agenda view. -
Page 69: Creating An Event
Creating an Event 1. In any Calendar view, select Add. NOTE: In Weekly and Daily views, you can select a time block to add an event. 2. Enter the event details, including event name, location, time, repetition, reminder, time zone, and description. NOTE: If you have added an EAS email account that support calendar synchronization, you can assign the new event to the EAS... -
Page 70: Browser
Browser Use the Browser app to view web pages and search for information. Opening the Browser 1. From the home screen, select Menu > Browser. 2. Select Options > Type URL or move the cursor to the address box with the 4-way navigation key to enter a web address (URL) or search terms. -
Page 71: Adding A Bookmark
Adding a Bookmark 1. Open the Browser app. 2. Open the web page you want to add to bookmarks. 3. Select Options > Add to bookmarks. 4. Edit the title and URL, if necessary, and then press the OK key. Viewing Browser History 1. -
Page 72: Camera
Camera You can take photos and record videos. Photos and videos are stored to the phone’s internal storage or to a microSDHC card (if one is installed). You can copy them to your computer or access them in the Gallery app. Capturing a Photo 1. - Page 73 Photo auto review: Turn auto review on or off. When this feature is on, the phone automatically displays each photo after it is taken. 3. Press the OK key or the Camera key to take a picture. Number Function Press the Left soft key to view photos and videos you have taken.
-
Page 74: Recording A Video
Recording a Video 1. From the home screen, press the Camera key or select Menu > Camera to launch the camera. 2. Press right on the 4-way navigation key to switch to the video recorder. 3. Press up or down on the 4-way navigation key to zoom in or out. -
Page 75: Gallery
Gallery From the home screen, select Menu > Gallery to access your pictures and videos. You can then press the Left soft key to launch the camera, the OK key to view pictures and videos, or the Right soft key to get more options such as share, rename, delete and more. Managing Picture/Video Files When you open Gallery, all pictures and videos on your phone are displayed. -
Page 76: Working With Pictures
Working With Pictures Select a picture to view it. Number Function Press the Left soft key to view the picture in full screen. Press the OK key to share the picture. Press the Right soft key for options for the current picture: zoom, delete, edit, set as wallpaper or contact photo, slideshow view, rename, or view details. -
Page 77: Playing Videos
NOTE: Press left or right on the 4-way navigation key to see other pictures or video thumbnails. Playing Videos 1. Select a video thumbnail. 2. Press the OK key to play the video. 3. During the playback, you can press the OK key to pause or resume or press up/down on the 4-way navigation key to adjust brightness. -
Page 78: Music
Music From the home screen, select Menu > Media center > Music to play audio files stored on your phone or microSDHC card (if one is installed). Viewing Your Music Library Open Music, and your music library is displayed. Press left/right on the 4-way navigation key to switch among lists of songs, playlists, artists, albums, genres, folders, and favorites. - Page 79 Number Function Song, album, and artist information. Press the Left soft key to return to the music library. Press the OK key to pause or resume. Press the Right soft key for more options: shuffle, repeat, view the current playlist, add the song to other playlists or as a favourite, set the song as the default ringtone, share or delete the song, or check file details.
-
Page 80: Managing Playlists
To rewind the current song, press and hold left on the 4-way navigation key. To fast-forward the current song, press and hold right on the 4- way navigation key. Managing Playlists Create playlists to organize your music files into sets of songs, so that you can play the songs you like in the order you prefer. -
Page 81: Video
Video From the home screen, select Menu > Media center > Video to manage your video library and watch videos. Playing and Controlling Videos Open the Video app, and select a video to play it. From the video playback screen, you can control playback or manage the video. -
Page 82: Managing Video Files
Managing Video Files Deleting Videos 1. In the video library, select Options > Multi-Select. 2. Highlight each video you want to delete and press the OK key to select it. 3. Select Options > Delete > OK. Sharing Videos 1. In the video library, select Options > Multi-Select. 2. -
Page 83: Fm Radio
FM Radio With FM Radio, you can search for radio channels, listen to them, and save them on your phone. The quality of the radio broadcast depends on the radio station’s coverage in your area. The wired headset works as an antenna, so it must be connected to the phone while using the radio. -
Page 84: Other Options And Settings
Use the 4-way navigation key to tune the radio. Press up or down to adjust the channel frequency. Press left or right to switch to another channel. Select Favorites and choose a channel you have added to Favorites. Other Options and Settings Deleting a Saved Channel 1. - Page 85 To remove a channel from Favorites 1. From the main FM Radio screen, select Favorites. 2. Highlight a channel and select Options > Remove. If the channel is not found through scanning, it will also be removed from the All channels list. Turning off FM Radio From the FM Radio main screen, select Options >...
-
Page 86: Sound Recorder
Sound Recorder The Sound Recorder app enables you to record and listen to voice memos. Recording a Voice Memo 1. From the home screen, select Menu > Media center > Sound recorder. 2. Press the OK key to start recording. NOTE: During recording, you can press the Right soft key to pause and resume recording. -
Page 87: More Features
More Features Setting a New Alarm 1. From the home screen, select Menu > Tools > Alarm. 2. Highlight an existing alarm and select Edit to configure it, or select Options > Add to create a new one. 3. Set the alarm options: time, repeat, ringtone, vibration, and label. 4. -
Page 88: Calculator
Calculator 1. From the home screen, select Menu > Tools > Calculator. 2. Use the keypad to enter numbers, and use the 4-way navigation key to choose the operator for your equation. 3. The answer will be displayed automatically. You can press the OK key to use the answer to start a new equation. -
Page 89: Notifications
From the home screen, select Menu > File manager. Press left/right on the 4-way navigation key to switch between contents on the phone and on the microSDHC card (if one is installed). Highlight a folder or file and press the OK key to open it. ... -
Page 90: Settings
Settings From the home screen, select Menu > Settings. Settings contains most of the tools for customizing and configuring your device. Wireless & Networks Airplane Mode Select Wireless & networks > Airplane mode to turn airplane mode on or off. When airplane mode is on, all of the phone’s radios (mobile network, Wi-Fi, Bluetooth, and GPS) are turned off. - Page 91 Data Usage Select Wireless & networks > Data usage to check and manage mobile data use. You can view Wi-Fi usage as well. Mobile data: Turn on or off mobile data. Alert me: Turn on or off alert when data use exceed warning level.
-
Page 92: Accessibility
Accessibility Select Accessibility to configure accessibility plug-ins and services on your phone. Sound & Notifications Select Sound & notifications to manage sound and vibration settings. You can adjust different types of volume (see Adjusting Volumes); set phone ringtone, notification sound and alarm sound (see Changing the Phone, Notification, or Alarm Ringtone);... -
Page 93: Phone Settings
Phone Settings Languages & Input Select Phone settings > Languages & input to set the system language. Date & Time Select Phone settings > Date & time to set date, time, time zone, and time format, or use network-provided data (see Setting the Date Time). - Page 94 Connect to PC Select Phone settings > Connect to PC when your phone is connected to a computer to select the USB connection mode (see Connecting to Your Computer via USB). Location Select Phone settings > Location to manage location services, which help your phone and apps determine your location.
-
Page 95: Call Settings
Clear credentials: Erase the credential storage. Set up SIM card lock: Activate, deactivate, or change the PIN for your nano-SIM card. Once activated, you need to enter the PIN to use the phone and network. NOTE: Put all your confidential passwords in a safe place for future use. If you enter the wrong SIM PIN more times than allowed, your nano-SIM card will be locked and will not be able to access the mobile phone network. -
Page 96: System Update
System Update Select System update to update the phone software. You can check the current software version, or select Options to set auto-download or check update history. Assistance Select Assistance to configure emergency call and message options. When the feature is turned on and the phone flip is closed, you can press the Volume up key or the Volume down key three times within one second to activate emergency state, where the phone can sent messages to emergency contacts and call them one by one until... -
Page 97: Troubleshooting
Troubleshooting If you encounter problems while using the phone, or if it performs abnormally, you can refer to the chart below. If your particular problem cannot be resolved using the information in the chart, contact the dealer where you purchased the phone. Problem Possible causes Possible solution... - Page 98 Problem Possible causes Possible solution End the call and dial again. Poor network link quality You may be switched to a on the part of your service better-quality network link provider. or phone line. Echo or noise End the call and dial again. Poor local telephone line You may be switched to a quality.
- Page 99 Problem Possible causes Possible solution The standby time is related to your service provider system configuration. The If you are located in an area same phone used with where signaling is weak, different service providers’ temporarily power off the systems will not provide phone.
- Page 100 Problem Possible causes Possible solution The nano-SIM card is Insert the nano-SIM card inserted improperly. properly. Use a soft, dry cloth to There is debris on the nano- clean the nano-SIM card SIM card contacts. contacts. The nano-SIM card is Contact your service invalid.
-
Page 101: For Your Safety
For Your Safety General Safety Don’t make or receive handheld calls while driving. Never text while driving. Keep your phone at least 10 mm (0.4 in.) away from your body while making calls. Small parts may cause choking. Your phone can produce a loud sound. Avoid contact with anything magnetic. - Page 102 Don’t use at gas stations. Your phone may produce a bright or flashing light. Don’t dispose of your phone in a fire. To prevent possible hearing damage, do not listen at high volume levels for long periods. Exercise caution when holding your phone near your ear while the loudspeaker is in use.
-
Page 103: Fcc Rf Exposure Information (Sar)
FCC RF Exposure Information (SAR) This phone is designed and manufactured not to exceed the emission limits for exposure to radio frequency (RF) energy set by the Federal Communications Commission of the United States and Industry Canada of Canada. During SAR testing, this device is set to transmit at its highest certified power level in all tested frequency bands, and placed in positions that simulate RF exposure in usage against the head with no separation, and near the body with the separation of 0.4 inches... -
Page 104: Fcc Regulations
the FCC RF exposure guidelines. SAR information on this model phone is on file with the FCC and can be found under the Display Grant section of www.fcc.gov/oet/ea/fccid after searching on FCC ID: SRQ-Z2335CA. For this device, the highest reported SAR value for usage against the head is 0.58 W/kg, and for usage near the body is 1.28 W/kg. - Page 105 This equipment has been tested and found to comply with the limits for a Class B digital device, pursuant to part 15 of the FCC Rules. These limits are designed to provide reasonable protection against harmful interference in a residential installation. This equipment generates, uses and can radiate radio frequency energy and, if not installed and used in accordance with the instructions, may cause harmful interference to radio communications.
-
Page 106: Ised Notice
ISED Notice This device complies with Industry Canada license-exempt RSS standard(s). Operation is subject to the following two conditions: (1) this device may not cause interference, and (2) this device must accept any interference, including interference that may cause undesired operation of the device. CAN ICES-3 (B)/NMB-3(B) This Class B digital apparatus complies with Canadian ICES-003. -
Page 107: Product Handling
must comply with local laws and regulations restricting the use of wireless devices while driving. Operating Machinery Full attention must be given to operating the machinery in order to reduce the risk of an accident. Product Handling General Statement on Handling and Use You alone are responsible for how you use your phone and any consequences of its use. - Page 108 Do not carry your phone in your back pocket as it could break when you sit down. Battery Safety Using ZTE-unapproved or incompatible battery, charger or power adapter may damage your device, shorten its lifespan or cause a fire, explosion or other hazards. ...
- Page 109 If the battery damages or shows signs of swelling or leakage, please stop use immediately and contact ZTE or a ZTE-authorized service provider for replacement. Return the worn-out battery to the provider or put it in the designated recycle place.
- Page 110 Small Children Do not leave your phone and its accessories within the reach of small children or allow them to play with it. They could hurt themselves or others, or could accidentally damage the phone. Your phone contains small parts with sharp edges that may cause an injury or may become detached and create a choking hazard.
- Page 111 Seizures/Blackouts The phone can produce a bright or flashing light. A small percentage of people may be susceptible to blackouts or seizures (even if they have never had one before) when exposed to flashing lights or light patterns such as when playing games or watching video. If you have experienced seizures or blackouts or have a family history of such occurrences, please consult a physician.
-
Page 112: Electrical Safety
Loud Noise This phone is capable of producing loud noises, which may damage your hearing. Turn down the volume before using headphones, Bluetooth headsets or other audio devices. Phone Heating Your phone may become warm during charging and during normal use. -
Page 113: Radio Frequency Interference
Radio Frequency Interference General Statement on Interference Care must be taken when using your phone in close proximity to personal medical devices, such as pacemakers and hearing aids. Please consult your doctor and the device manufacturers to determine if the operation of your phone may interfere with the operation of your medical devices. -
Page 114: Explosive Environments
Medical Equipment Turn off your wireless device when you are requested to do so in hospitals, clinics or healthcare facilities. These requests are designed to prevent possible interference with sensitive medical equipment. Aircraft Turn off your wireless device whenever you are instructed to do so by airport or airline staff. - Page 115 Blasting Caps and Areas Power off your mobile phone or wireless device when in a blasting area or in areas where signs are posted to power off “two-way radios” or “electronic devices” to avoid interfering with blasting operations.
Need help?
Do you have a question about the Cymbal 2 and is the answer not in the manual?
Questions and answers
have nubia cymbal' 2 - have no idea how to use it. **** 86, and given this phone for a gift. do you have some easy instructions 'how to understand?"
To use the ZTE Cymbal 2 phone:
1. Powering On and Setup
- Insert a nano-SIM card and microSDHC card (if needed) by removing the back cover and battery, then placing the cards in their respective slots.
- Reinsert the battery and back cover.
- Charge the phone using a ZTE-approved charger before first use.
2. Accessing Installed Apps
- Press the "clr" (back) button 8 times from the home screen to see a list of most installed apps.
3. Using Apps with Keypad
- The phone runs Android 10, but many apps require touch gestures.
- The MATVT virtual mouse can be used, though it is difficult due to the phone's key mapping. Scroll mode can help trigger button clicks.
4. General Navigation
- The phone has a keypad-based interface, meaning apps without good keypad support may be hard to use.
- Some apps, like Waze, may work with effort despite limited keypad support.
Let me know if you need specific instructions.
This answer is automatically generated
what does status pending mean under view report?
cant get my hotmail account to work, rejects name and or password
To fix Hotmail account login issues on the ZTE Cymbal 2, follow these steps:
1. Open the email Inbox on the phone.
2. Go to Options > Settings > Account settings.
3. Select the Hotmail account from the list.
4. Review and update the account settings as needed (e.g., username, password, server settings).
5. If problems continue, remove the account by selecting Remove account > OK.
6. Re-add the Hotmail account with the correct login details.
Make sure the phone has a working data connection and correct date/time settings.
This answer is automatically generated
Emergency alert sounds etc happening for many hours. How do I disable this?
To disable emergency alert sounds on the ZTE Cymbal 2:
1. From the home screen, press the right soft key to choose Messages.
2. Press the right soft key again to choose Options, then select Settings.
3. Scroll down to Wireless Emergency Alerts.
4. Choose Receive emergency alerts.
5. You will see a list of alert types (e.g., Extreme Imminent Threat, Severe Imminent Threat, AMBER Alerts).
6. Select any alert type to turn it on or off (a checkmark means it is on).
Note: Presidential Alerts cannot be turned off.
This answer is automatically generated
I tried taking out the emergency message and it will not come off. I tried resetting the phone too
To remove the emergency message from a ZTE Cymbal 2, go to the Messages app, open the Emergency Alerts section, select the alert, and then either view and delete it or directly delete it.
This answer is automatically generated
how do you delete a voicemail
To delete a voicemail on the ZTE Cymbal 2, you must first listen to the voicemail. After listening, follow the prompts to delete it. If the voicemail cannot be deleted through normal options, it may be due to a system limitation or spam behavior. In that case, block the number to prevent future messages.
This answer is automatically generated
Where do i find the capital letters and numbers while texting?
To access capital letters while texting on the ZTE Cymbal 2, press and hold the # key to change the input mode to Abc or ABC. To enter numbers, change the input mode to 123 by also pressing and holding the # key and selecting 123.
This answer is automatically generated
how do I turn ON my nubia Cymbal 2
To turn on your ZTE Cymbal 2, press and hold the Power/End key until the screen lights up.
This answer is automatically generated
how to put a capital letter on a second word
On the ZTE Cymbal 2, when using Abc mode, only the first letter is capitalized. After entering the first capital letter, the mode automatically switches to abc (lowercase). To capitalize the second word, you must manually switch back to Abc mode before typing the second word.
This answer is automatically generated
Cannot turn phone on although battery indicates it is 100% charged (with a green check mark).
If the ZTE Cymbal 2 won't turn on even though the battery shows 100% charged, a possible cause could be a malfunctioning or damaged nano-SIM card. The phone may not start properly if the SIM card has issues. Try removing and reinserting the nano-SIM card, or take it to your service provider for testing.
This answer is automatically generated
where is the menu key
The menu key on the ZTE Cymbal 2 is the center OK button (OK key). Pressing it brings up the menu.
This answer is automatically generated