Triton TDJ600 Manual
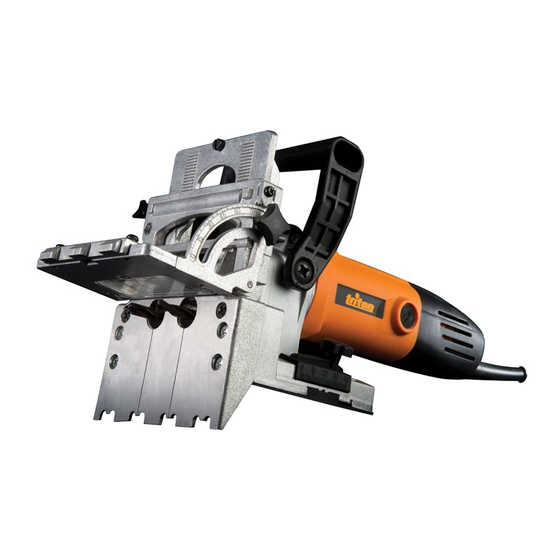
Duo dowel jointer 600w
Hide thumbs
Also See for TDJ600:
- Operating/safety instructions manual (100 pages) ,
- Operating and safety instructions manual (83 pages) ,
- Operating/safety instructions manual (83 pages)
Table of Contents
Advertisement
Quick Links
Advertisement
Table of Contents

Related Manuals for Triton TDJ600


Summary of Contents for Triton TDJ600
- Page 1 904196_Z1MANPRO1_AUS.indd 2 22/12/2014 11:19...
- Page 2 Duo Dowel Jointer 600W tritontools.com 904196_Z1MANPRO1_AUS.indd 2 22/12/2014 11:19...
- Page 3 904196_Z1MANPRO1_AUS.indd 3 22/12/2014 11:20...
- Page 4 904196_Z1MANPRO1_AUS.indd 4 22/12/2014 11:22...
-
Page 5: Description Of Symbols
Thank you for purchasing this Triton tool. This manual contains information necessary for safe and effective operation of this product. This product has unique features and, even if you are familiar with similar products, it is necessary to read this manual carefully to ensure you fully understand the instructions. -
Page 6: General Safety
General Safety b) Do not use the power tool if the switch does not turn it on and off. Any power tool that cannot be controlled with the switch is dangerous and must be repaired. WARNING Read all safety warnings and all instructions. Failure to follow the warnings and instructions may result in electric shock, fire and/or serious c) Disconnect the plug from the power source and/or the battery pack injury. -
Page 7: Intended Use
(Image G) Fitting a drill bit NOTE: The Triton Double Dowelling Jointer produces holes spaced at exactly 32mm, making the tool compatible with ‘System 32’ cabinet making – ideal for WARNING: The Drill Bits are very sharp; always wear gloves and handle with creating neatly spaced rows of holes in cabinet walls. -
Page 8: Operation
Operation 7. While keeping the tool powered, allow the body of the tool to return to its original position, removing the drill bits from the workpiece. Hold the tool securely with both hands while doing so Handling when drilling 8. Once the drill bits have exited the holes, release the On/Off Switch (12) by Always use two hands when drilling: applying light pressure to the rear of the on/off switch •... -
Page 9: Service And Maintenance
• Excessively worn brushes may cause loss of power, intermittent failure, or visible sparking • To replace the brushes acquire new brushes from your Triton stockist, remove the brush access plugs from both sides of the machine. Remove the worn brushes and replace with new. Replace brush access plugs. -
Page 10: Purchase Record
3 YEARS from the date of original purchase, www.tritontools.com* and enter your details. Triton will repair, or at its discretion replace, the faulty part free of Your details will be included on our mailing list (unless indicated other- wise) for information on future releases. - Page 11 Notes 904196_Z1MANPRO1_AUS.indd 6 22/12/2014 11:22...
- Page 12 Notes 904196_Z1MANPRO1_AUS.indd 7 22/12/2014 11:22...
Need help?
Do you have a question about the TDJ600 and is the answer not in the manual?
Questions and answers