Advertisement
Quick Links
Advertisement

Related Manuals for Italforni TSA


Summary of Contents for Italforni TSA
- Page 1 USE AND MAINTENANCE MANUAL TSA, TSB, TSC- Electric...
- Page 2 Use and maintenance manual INTRODUCTION present manual provides safety directions and instructions for the oven use and maintenance. This manual must be consigned to the people working on the oven or doing the maintenance. INDEX...
- Page 3 Use and maintenance manual CHAP .1 - PRESENTATION 1.1 Checks on consignment 1.2 Packaging disposal 1.3 Appliance shifting 1.4 Demolition 1.5 Safety norms and residual hazards CHAP .2 - TECHNICAL SPECIFICATIONS CHAP .3 - INSTALLATION 3.1 Choice of installation site 3.2 Electrical connection CHAP .4 - OVEN CONTROLS 4.1 Switching on the oven...
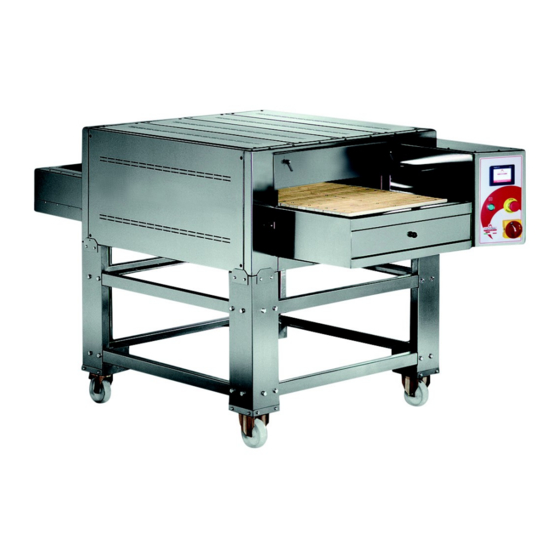
- Page 4 Two versions are available: the “Stone” version (with belt in refractory stone) and the “Classic” one (with stainless steel mesh belt). The “Stone” family is formed by three models different in capacity and power: TSA, TSB and TSC. The same is for the “Classic” family, with TCA, TCB and TCC models.
- Page 5 Use and maintenance manual 1.2 – Packaging disposal All the parts that constitute the packaging must be disposed in a specific collection site. The disposal of the aforementioned material in non appropriate sites is prohibited. 1.3 – Shifting To shift the system or to temporarily place it out of order the following needs to be done: Disconnect the power supply ...
- Page 6 Use and maintenance manual CHAP .2 – TECHNICAL SPECIFICATIONS...
-
Page 7: Chap .3 - Installation
Use and maintenance manual CHAP .3 – INSTALLATION IMPORTANT: The present installation instructions are intended for the exclusive use of qualified personnel Installation by non-qualified personnel may cause damage to the oven, persons, animal or things. Furthermore, should it be necessary to make any modifications or additions to the wiring systems of the building in which the oven is to be installed, those undertaking the work must be able to certify that it is carried out to the “state of the art”. - Page 8 PLEASE NOTE: 1. Only a licensed electrician should make the electrical connections. 2. Make sure electrical supply corresponds with that specified on the rating plate. 3. Only use copper conductors rated at 90°C suitably sized for the electric current drawn. 4.
- Page 9 Use and maintenance manual LOCKING WHEELS: PUSH 1) UNLOCKED 2) LOCKED UNLOCKING WHEELS: PUSH 1) LOCKED 2) UNLOCKED NOTE: The oven shall be installed using a flexible conduit...
- Page 10 Use and maintenance manual CHAP .4 – OVEN CONTROLS 4.1 – Switching on the oven IMPOR TANT: before the initial switching on of the oven all the protective nylon film used for stainless steel panels must be removed. In the event of any problems or anomaly press the emergency button (E) which will immediately cut off the power supply to the appliance.
- Page 11 Use and maintenance manual 4.3 – Extended periods of inactivity Should the oven not be used for longer periods and you need to switch the oven off, it is advisable to wait for the oven to return to a temperature of about 80°...
- Page 12 Use and maintenance manual 5.1.1 – Description of the touch-bar Every button on the touch-bar has a specific function. The functions of every single touch button are described below. N.B. - When a button is pressed, it lights up in orange to show the function is active. HOME button: Allows access to the main oven function management pages (cooking time, top and floor temperature).
- Page 13 Use and maintenance manual 5.2 – Cooking cycle control Pressing the HOME button accesses the cooking cycle management pages (see figure 4). From this page, you can establish cooking times, top and floor tem- peratures, as well as switch on the heating elements and the food conveyor belt.
- Page 14 Use and maintenance manual When the right indicator light is on, it means that the conveyor belt has reached cooking speed and, consequently, the set cooking time will be respected with a tolerance of ±3 seconds. The indicator light is GREEN. When the left indicator light is on, the conveyor belt is at a standstill due ...
- Page 15 Use and maintenance manual 5.2.3 – Floor temperature control Controlling the floor temperature is particularly easy. Simply set the desired temperature in the SETPOINT field and press the grey software pyrometer activation button. The numerical field above the setpoint is the actual floor temperature detected by the ther- mocouple.
- Page 16 Use and maintenance manual of the temperature. Switch off the oven, wait for it to cool down and re- start the cooking cycle. Should the error persist, contact the technical as- sistance service. IMPOR TANT: When the software pyrometers are active, the grey but- tons change colour and turn orange.
- Page 17 Use and maintenance manual 5.3.2 – Alarms list The following is a list of the alarms managed by the system. Every alarm has a specific code to communicate to the technical assistance service should it be necessary. BW_ERR_01: TCB top reading error:Broken-wire error on the top heating ...
- Page 18 Use and maintenance manual COOL DOWN BEFORE SWITCHING IT BACK ON. Should the alarm recur, contact the technical assistance service immediately. PR_ERR_01: Incorrect top T control parameters!:Error in top temperature control software pyrometer factory parameter setting. Should this alarm occur, the software pyrometer parameters must be reset.
- Page 19 Use and maintenance manual 5.4 – Display setup The oven control display settings can be customised. You can change the system language from Italian (default language) to English. The temperature can also be displayed in degrees Fahrenheit should the oven be destined for Anglo-Saxon markets.
- Page 20 Use and maintenance manual...
- Page 21 Use and maintenance manual 5.5 – Using the recipes Pressing the RICETTE (RECIPE) button accesses the recipe management pages. Using the recipes allows the operator to streamline oven setup when moving from cooking one food to another. Every work recipe saves all the oven work data, that is, TEMPO DI COTTURA (COOKING TIME), TEMPERATURADELCIELO (TOPTEMPERATURE) and TEMPERATURADELLAPLATEA (FLOORTEMPERATURE).
- Page 22 Use and maintenance manual Set the number of the recipe to save. You can set values from 1 to 25. Wait for the recipe to load (the square indicator light between the Attiva (Activate) and Salva (Save) buttons turns green). Make sure that the loaded values (tempodicottura - cookingtime, ...
- Page 23 Use and maintenance manual When cleaning the removable parts, after they have been washed using water, sponges and normal detergents, it is advisable to also rinse well with a jet of water, to prevent any risk of accumulation of dirt or detergent residue which risk contaminating the products.
- Page 24 Use and maintenance manual Any maintenance carried out by non-qualified personnel may cause damage to the oven, to persons, animal or things. In order to undertake repairs and checks, it is, in most cases necessary to remove the fixed guard elements: this will render the live conductors accessible, involving some risks.
- Page 25 Use and maintenance manual...
- Page 26 Use and maintenance manual NOTE: ________________________________________________________________________________ ________________________________________________________________________________ ________________________________________________________________________________ ________________________________________________________________________________ ________________________________________________________________________________ ________________________________________________________________________________ ________________________________________________________________________________ ________________________________________________________________________________ ________________________________________________________________________________ ________________________________________________________________________________ ________________________________________________________________________________ ________________________________________________________________________________ ________________________________________________________________________________ ________________________________________________________________________________ ________________________________________________________________________________ ________________________________________________________________________________ ________________________________________________________________________________ ________________________________________________________________________________ ________________________________________________________________________________ ________________________________________________________________________________ ________________________________________________________________________________ ________________________________________________________________________________ ________________________________________________________________________________ ________________________________________________________________________________ ________________________________________________________________________________ ________________________________________________________________________________ ________________________________________________________________________________ ________________________________________________________________________________ ________________________________________________________________________________ ________________________________________________________________________________ ________________________________________________________________________________ ________________________________________________________________________________ ________________________________________________________________________________ ________________________________________________________________________________ ________________________________________________________________________________ ________________________________________________________________________________ ________________________________________________________________________________ ________________________________________________________________________________...
Need help?
Do you have a question about the TSA and is the answer not in the manual?
Questions and answers