Table of Contents
Advertisement
Available languages
Available languages
Advertisement
Chapters
Table of Contents

Related Manuals for DNT DigiMicro Profi HDMI


Summary of Contents for DNT DigiMicro Profi HDMI
- Page 1 DigiMicro Profi HDMI Bedienungsanleitung user manual...
-
Page 2: Table Of Contents
Umweltgerechte Entsorgung ......20 Servicehinweise ..........20 CE-Erklärung ..........21 Garantiebedingungen........39 Inverkehrbringer: Drahtlose Nachrichtentechnik Entwicklungs- und Vertriebs GmbH Voltastraße 4 D-63128 Dietzenbach Tel. +49 (0)6074 3714-0 Fax +49 (0)6074 3714-37 Service-Hotline +49 (0)6074 3714-31 Internet http://www.dnt.de Email dnt@dnt.de Änderungen vorbehalten - 2 -... -
Page 3: Sicherheitshinweise
Sicherheitsbestimmungen Bitte lesen Sie diese Hinweise vor dem ersten Gebrauch sorgfältig durch. Sicherheitshinweise Allgemeine Hinweise Stellen Sie das Gerät niemals auf einen instabilen Untergrund. Durch ein Herabfallen kann das Gerät beschädigt werden. Das Gerät gehört nicht in Kinderhände. Es ist kein Spielzeug. Beachten Sie auch die Sicherheitshinweise und die Bedienungsanleitungen der übrigen Geräte, an die das Gerät angeschlossen wird. -
Page 4: Systemvoraussetzungen
Lieferumfang Systemvoraussetzungen Betriebssystem: MS Windows Vista/ Windows7/Windows10 und MAC OS ab 10.7 (ohne Messsoftware) min. Prozessor Pentium 1800 oder vergleichbarer AMD Prozessor 100 MB freier Festplattenspeicher empfohlen 512 MB RAM 24 Bit Farb-Videokarte freie USB 2.0 Schnittstelle CD-ROM Laufwerk Lieferumfang DigiMicro Profi... -
Page 5: Geräteansicht
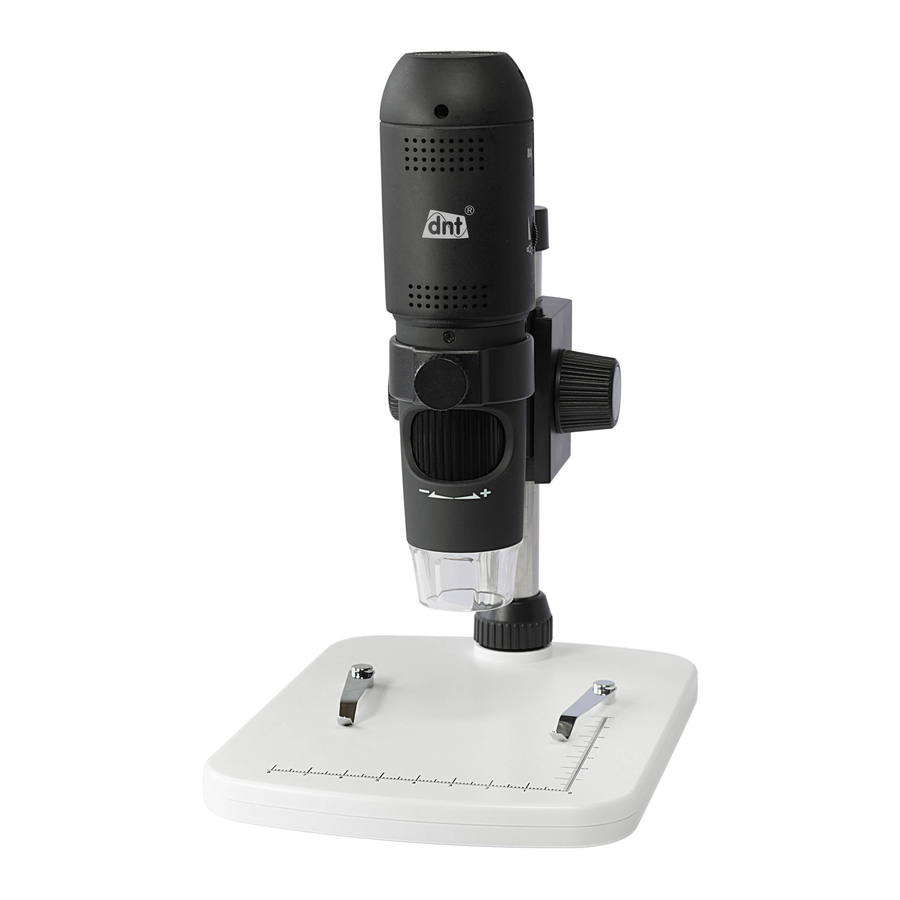
Geräteansicht Geräteansicht von links USB-Buchse HDMI-Buchse microSD-Karten Slot Kabelführung LED-Helligkeitseinsteller Mikroskop Hoch/runter Befestigungsschraube Grobeinstellung Arretierung Rändelschraube für Feinfokussierung Metallrohr Optik Beleuchtung Befestigungsmutter Objektträger von rechts Mikroskop-Schlitten Tastatur Hoch/runter Feineinstellung/ Fokus - 5 -... -
Page 6: Erstinbetriebnahme
Inbetriebnahme Erstinbetriebnahme Vor der Inbetriebnahme muss der Ständer montiert werden. Schieben Sie die Befestigungsmutter auf das Metall- rohr. Schieben Sie das Metallrohr in die dafür vorgesehen Öffnung des Objektträgers. - 6 -... - Page 7 Inbetriebnahme Ziehen Sie die Befestigungsmutter an. Danach führen Sie das Mikroskop in den Halte- ring ein und drehen die Befestigungsschraube an. Damit ist der Ständer montiert. - 7 -...
-
Page 8: Inbetriebnahme
Inbetriebnahme Inbetriebnahme Die komplette Mikroskop-Halterung ist an einem Metallrohr befestigt und kann mit mehreren Einstellungen fl exibel bewegt werden. Ansicht von hinten Bewegt den Mikroskop- Arretiert den Mikroskop-Schlitten Schlitten hoch und Arretiert die komplette Halterung am runter Aluminiumrohr Machen Sie eine Grobeinstellung an der Schraube auf der Rückseite des Ständers. -
Page 9: Tastenbeschreibung/Funktionen
Inbetriebnahme Abschließend führen Sie mit der Rändelschraube eine Fein-Fokussierung bzw. Vergrößerung durch. Tastenbeschreibung/Funktionen Gerät ein-/ausschalten MODE Umschalten zwischen Wiedergabe-Aufnahme MENU Mit jedem Druck auf die Taste: Das Menü aufrufen/das Einstellungsmenü aufrufen/das Menü verlassen. Im Menü die Eingabe bestätigen, ein Foto machen und speichern Im Menü... -
Page 10: Betrieb
Betrieb DigiMicro Profi HDMI am TV-Gerät oder Video-Monitor Verbinden Sie das Mikroskop mit dem HDMI-Kabel mit einem TV-Gerät oder Monitor. Schließen Sie zur Stromversorgung das Mikroskop zusätzlich mit dem USB-Kabel an das Steckernetzteil an. Schalten Sie das Gerät mit der -Taste ein. -
Page 11: Das Menü
Menü Das Menü Um diese Einstellungen durchzuführen muss das DigiMicro Profi HDMI über HDMI mit einem Monitor verbunden sein. Navigation am Monitor: MENU-Taste: Das Menü aufrufen. Das Menü umschalten. Das Menü verlassen. Im Menü navigieren. Eingabe bestätigen. Das Menü gliedert sich in zwei Bereiche: 1. Bildeinstellungen und 2. allgemeine Einstellungen. Bildeinstellung Aufl... - Page 12 Menü Stellen Sie damit die Kompressionsrate ein. Mög- liche Einstellungen sind Fein (geringe Kompression), Normal und Sparsam (hohe Kompression). Schärfe Stellen Sie damit die Kantenschärfe ein. Es gibt Stark, Normal und Weich. In der Einstellung Stark werden die Kanten bei Farbübergängen überzeichnet. Im Einzelfall ist die richtige Einstellung im Versuch zu ermitteln.
- Page 13 Menü Sprache Dient zur Auswahl der Menü-Sprache. Frequenz Dient zum Einstellen der Netzfrequenz. In Europa haben wir eine Netzfrequenz von 50 Hz. Format Über diese Einstellung wird die microSD-Karte forma- tiert. Als verfügbares Speichermedium wird die SD- Karte angezeigt. Speicher formatieren, Alle Daten löschen Wählen Sie OK, um die Formatierung zu starten oder Abbrechen, um in das Menü...
-
Page 14: Softwareinstallation
Softwareinstallation Software installieren (nur Windows) Für die Installation des Gerätes werden keinen zusätzlichen Treiber benötigt. Legen Sie die mitgelieferte CD ins Laufwerk ein. Falls die Installation nicht automatisch startet, wählen Sie auf der CD setup.exe aus, um die Software auf dem Computer zu installieren. Die Installation läuft komplett eigenständig ab. - Page 15 Software Um Einzelbilder zu speichern, drücken Sie im oberen Fensterrahmen auf das Fotokamera- symbol oder drücken die Aufnahmetaste. Fotos werden in den Ordner photos gespeichert Das aufgenommene Bild wird auf der rechten Seite als Miniaturdarstellung angezeigt. Ein Video wird aufgenommen, sobald das Videokamera-Symbol im oberen Fensterrahmen angeklickt wird oder die Aufnahme mit Erfassen >...
-
Page 16: Bildbearbeitung
Software Bildbearbeitung (nur Windows) Gleichzeitig mit dem Hauptprogramm wird auch eine Software installiert, mit der Sie Mes- sungen im Bild durchführen können. Um die Software zu starten, doppelklicken Sie auf ein Bild in der Bildergalerie auf der rechten Seite. Am unteren Fensterrand sehen Sie einen Schieberegler, mit dem Sie die Bilddarstellung ver- größern und verkleinern können. - Page 17 Software Öffnen Sie das Bild in der Bildvorschau. Klicken Sie auf Kalibrierung . Basierend auf dem Bild links ziehen Sie jetzt von Mitte Millimeter Markierung bis zur nächsten Markierung eine Linie mit der Maus. Halten Sie dabei die linke Maustaste gedrückt. Danach öffnet sich ein Fenster und fordert Sie auf die aktuell angezeigte Größe einzugeben.
- Page 18 Software Messwerkzeuge Auswahl-Menü Linien mit Maßgenauigkeit Kreis mit Radius und Durchmesser Dabei werden folgende Daten angezeigt: Radius R, Umfang C und Fläche S. Winkelmessung Eigenschaften von Linien und Text Einheit einstellen mm, cm, Pixel und Zoll. - 18 -...
-
Page 19: Hinweis Zu Den Vergrößerungsangaben
Software Vergrößerungen Die Angaben zur Vergrößerung beziehen sich ausschließlich auf die Darstellung auf einem Moni- tor und nicht auf eventuelle Ausdrucke. Dabei ergeben sich in der Praxis Ungenauigkeiten von ca. 2-5% Vergrößerung 10x und 230x 10x: Das ist die minimale Vergrößerung, die im Bereich des linken Anschlags der Rändelschraube erzielt werden kann. -
Page 20: Technische Daten
Altgeräte. Serviceabwicklung Sollten Sie Grund zur Beanstandung haben oder Ihr Gerät einen Defekt aufweist, wenden Sie sich an Ihren Händler oder setzen Sie sich bitte mit der Serviceabteilung der Fa. dnt in Verbind- ung, um eine Serviceabwicklung zu vereinbaren. Servicezeit: Montag bis Donnerstag von 8.00-17.00 Uhr... -
Page 21: Ce-Erklärung
Technische Informationen EC-Declaration of Conformity marking We, Manufacturer/Importer Dnt Drahtlose Nachrichtentechnik Entwicklungs- und Vertriebs GmbH Voltastr, 4, D-63128 Dietzenbach, Germany Declare that the product DigiMicro Profi HDMI is in conformity with Council Directive 2014/30/EU (EMC Directive) EN 5522: 2010 EN 61000-3-2: 2014, EN 61000-3-3: 2013... - Page 22 Warranty regulations ........39 The company placing the product on the market Drahtlose Nachrichtentechnik Entwicklungs- und Vertriebs GmbH Voltastraße 4 D-63128 Dietzenbach, Germany Tel. +49 (0)6074 3714-0 Fax +49 (0)6074 3714-37 Service-Hotline +49 (0)6074 3714-31 Internet http://www.dnt.de Email dnt@dnt.de - 22 -...
-
Page 23: Security Instructions
Security instructions Please read this information carefully before you use the appli- ance. Sicherheitshinweise General instructions Don’t place the unit on unstable location, if it falls down, people may be injured. The unit is not a toy, please beware of small children. If you connect the unit to other electronic devices, please study also the security instruction of this device. -
Page 24: System Requirements
Delivery content System requirements OS: MS Windows XP SP2/Vista/ Windows7/Windows8/ Windows10 and MAC OS 10.7 min. Processor Pentium4 1800 or compabible AMD Processor 100 MB free storage RAM 512 MB 24 Bit Video card, 64M USB port 2.0 CD-ROM Drive Delivery content DigiMicro Profi... -
Page 25: Appliance Description
Appliance description Appliance description left side USB socket HDMI socket microSD card Slot cable guide LED brightnesscontrol microscope up/down mounting screw rough adjustment lock/release focus adjustment optic metal pole illumination mounting nut carriage stage right side microscope slide buttons up/down rough focus - 25 -... -
Page 26: Getting Started
Getting started Getting started Stand mounting. Slide the mounting nut on the metal pole. Put the metall pole into the female part of the stage. - 26 -... - Page 27 Getting started Fix the Pole on the stage. Put the microscope into the ring of the stand. - 27 -...
- Page 28 Getting started Getting started The microscope is attached to a metal pole and adjusted with different wheels. rear side view Moves the slide To fi x the microscope slide up and down To fi x the holder to the pole Rotate the wheel on the rear side for a rough adjust- ment.
- Page 29 Operation Rotate the wheel to get a fi ne focus. Buttons and functions Device on/off MODE Playback / photo MENU Repeatedly pressing: Select the menu/select the setup/leave the menu Confi rm the setting, take a photo and store a photo navigate the menu LED dimmer microSD card slot...
-
Page 30: Operation
Operation Connect DigiMicro Profi HDMI to TV/Monitor with HDMI cable Connect the microscope to TV or monitor with the HDMI cable. Power the microscope with the supplied power adaptor. Turn on the power of the microscope with the -button. Turn on the power of the TV/monitor and select HDMI input. Capture a photo In the supplied condition you are able to watch items. -
Page 31: The Menu
Operation The menu To setup the DigiMicro Profi HDMI it must be connected to the TV/monitor. Navigation: MENU-button: Select the menu, switch the menu/general setup and exit the menu. Select items in the menu. Confi rm the input. The menue consists of two ranges: 1. photo setup and 2. general setup Photo setup Resolution The microscope has 14MB, 8MB, 5MB interpolated... -
Page 32: General Setup
Menu Quality Setup the compression rate of the photos. The values are Fine/Normal/Economy. Economy has the highest compession and the smallest image size. Sharpness Choose Sharpness and select Strong/Normal or Soft. Exposure This changes the light sensitivity of the camera, not to be mixed with the lighting. - Page 33 Menu Language Setup the OSD language. Frequency Setup of the mains frequency. In Europe the mains fre- quency is 50 Hz. Format Select this menu item to format the microSD card. All data will be deleted Select OK to start formating or Cancel to return to the menu.
-
Page 34: Install The Software
Software installation Install the software Insert the driver CD into CD-ROM Drive - it will automatically start the installation wizard. Click Install PortableCaptureHD and the installation wizard will guide you through the whole process. Full user’s manual can be viewed by clicking User’s Manual. Connect your microscope to your PC USB port, start the software by clicking the Portabel- CaptureHD icon generated on the desktop after installation and you will see the following screen pop up. -
Page 35: Software
Software To take a photo press snapshot button or the camera icon above the preview window. The photos are stored in the Photos Directory. The captured image is displayed on the right side as a thumbnail. To capture a video click on the video camera button above the preview window or select Cap- ture >... -
Page 36: Image Editing
Software Image editing Focus the microscope on the attached calibration ruler and adjust the magnifi cation till the picture is clear. Take a picture for the selected area when the dial is parallel to the crossing as below . Double-click on the picture to enter into measurement interface as below. - Page 37 Software Software Drawing Click icon to choose any kinds of drawing under the pull-down manual as below. properties of the line Click icon and set the font for the text in the popup dialogue Double-click on the picture to enter into measurement interface. Under the ‘Measurement’...
-
Page 38: Specifi Cations
Service information In case of complaints your device shows a defect, please consult your dealer or contact the service department of dnt to agree a servicing. Service time: Monday until Thursday from 8.00-17.00h Friday from 8.00-16.00h... -
Page 39: Garantiebedingungen
Garantiebedingungen 1. Es gelten grundsätzlich die gesetzlichen Garantiebestimungen. Die Garantiezeit beginnt mit der Übergabe des Gerätes. Im Garantiefall ist das Gerät mit dem Kaufbeleg (Kassenzettel, Rechnung o.ä.), dem korrekt ausgefüllten Gerätepass und einer genauen Fehlerbeschreibung einzureichen. Ohne diese Belege sind wir nicht zur Garantie- leistung verpfl... - Page 40 DigiMicro Profi HDMI Garantiekarte Warranty card Carte de garantie Garantiekaart Drahtlose Nachrichtentechnik Entwicklungs- und Vertriebs GmbH Voltastraße 4 D-63128 Dietzenbach Tel. +49 (0)6074 3714-0 +49 (0)6074 3714-37 Service-Hotline +49 (0)6074 3714-31 Internet http://www.dnt.de Email dnt@dnt.de Serien Nr. Serial no. N° de série Seienr.
Need help?
Do you have a question about the DigiMicro Profi HDMI and is the answer not in the manual?
Questions and answers