Table of Contents
Advertisement
Advertisement
Table of Contents

Related Manuals for Ryobi RSH2445S


Summary of Contents for Ryobi RSH2445S
- Page 1 ORIGINAL INSTRUCTIONS Electric Crushing Shredder RSH2445S...
- Page 2 Important! It is essential that you read the instructions in this manual before assembling, operating, and maintaining the product. Subject to technical modification.
-
Page 3: Intended Use
Safety, performance, and dependability have occurring to other people or their property. been given top priority in the design of your PREPARATION electric crushing shredder. ■ Never operate the product in the vicinity of bystanders, especially children and pets. INTENDED USE ■... -
Page 4: Operation
Never modify parts from the product or use ■ Always be sure of your footing. Keep firm parts not recommended by RYOBI, this footing and balance at all times. Do not may increase the risk of serious injury to overreach. Never stand at a higher level yourself or others. -
Page 5: Transportation And Storage
NOTE: Complete any adjustment slowly to avoid damaging the product. Overadjusting ■ Always have any damaged or worn parts the plate can cause serious damage to the repaired, or replaced by qualified personnel product. at an approved RYOBI service centre. -
Page 6: Blade Sharpening
BLADE SHARPENING particles – Wear dust mask with filter when ■ The product performs at its best by following necessary. these steps. Before use, always check that the blades are not in contact with the ■ injury caused by contact with the cutting shaving plate. -
Page 7: What's In The Box
WARNING Branches up Clip off all side growth to 45 mm in with secateurs before The cutting device has a tendency to pull diameter. feeding into the feeding branches/stems into the product. Do not chute. try to impede entry of the material being cut once feeding has started. -
Page 8: Symbols In This Manual
Turn off and remove plug from Reverse REVERSE mains before maintenance or if cord is damaged. FOR PLATE ADJUSTMENT PLEASE FOLLOW THE BELOW STEPS Wear eye and ear protection. Adjustment required Do not use as a step. Wait until all machine components have completely stopped before touching them. -
Page 9: Troubleshooting
are intended to explain the levels of risk associated with this product. DANGER Indicates imminently hazardous situation, which, if not avoided, will result in death or serious injury. WARNING Indicates a potentially hazardous situation, which, if not avoided, could result in death or serious injury. - Page 11 WHAT'S IN THE BOX...
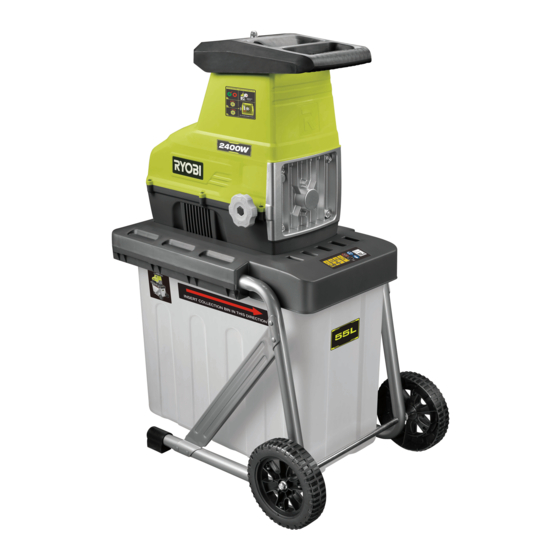
- Page 12 KNOW YOUR PRODUCT Start switch Feeding chute 10. Safety switch Stop switch Handle Material plunger Reverse switch Shaving plate adjusting knob Overload protective device reset Wheel button Collection bin...
- Page 13 GETTING STARTED GETTING STARTED GETTING STARTED GETTING STARTED Wear full eye and ear protection, substantial footwear, and Swing one leg up. Note: Make sure that the product is Insert the wheel shaft. Swing the other leg up. Make sure that the wheel shaft 1.
- Page 15 OVERVIEW Using the shredder Clearing a blockage Unloading the shredder p.15 p.17 p.18 Sharpening the blades Clearing debris p.19 p.21...
- Page 16 OVERVIEW Cleaning the shredder Emptying the collection bin p.23 p.25 Moving the shredder Storing the shredder p.26 p.27...
-
Page 17: Operation
OPERATION USING THE SHREDDER 1. Connect the product to a power outlet. NOTE: To feed material into the shredder, press start switch. move material shredder, press the reverse switch. 2. Press the start switch. NOTE: To feed material, insert the branch first, not the leaves. - Page 18 OPERATION NOTE: Press the stop switch only if there is no material fed into the product. 3. Feed material into the feeding chute. WARNING: Do not put your hands up inside the feeding chute to clear away shredded material while the product is turned on or connected to the mains supply.
-
Page 19: Clearing A Blockage
OPERATION CLEARING A BLOCKAGE 1. Press the stop switch. 2. Press the reverse switch until the blades are cleared of material. 3. Press the start switch to refeed the material. REVERSE START... - Page 20 OPERATION UNLOADING THE SHREDDER NOTE: The product has an overload protective device. When the product overloaded, the protective device shuts down the motor and releases the initially depressed overload protective device reset 5 sec button. 1. Wait for 5 seconds for the product to cool down.
-
Page 21: Maintenance
MAINTENANCE START SHARPENING THE BLADES 1. Press the start switch. 2. Turn the shaving plate adjusting knob clockwise until you hear metal on metal contact or you see fine aluminium shavings in the bottom of the collection bin. NOTE: Contact between the shaving plate and the blades sharpens the blades. - Page 22 MAINTENANCE NOTE: Make sure that you hear no more metal on metal contact or see no more fine aluminum in the bottom of the collection bin to know that the shaving plate and the blades are no longer in contact.
- Page 23 MAINTENANCE CLEARING DEBRIS 1. Press the stop switch and disconnect the product from the power outlet. 2. Using a hex key, remove the front cover of the product. 3. Wearing non-slip, heavy-duty gloves, remove the shaving plate, cutter blades, and debris. WARNING: The cutter blades are extremely sharp.
- Page 24 MAINTENANCE 5. Install the shaving plate. Note the correct position as shown. 6. Wearing non-slip, heavy-duty gloves, install the cutter blades. Note the correct position as shown. WARNING: The cutter blades are extremely sharp. To avoid injury, exercise extreme caution and care when cleaning or working near the blades.
- Page 25 MAINTENANCE CLEANING THE SHREDDER 1. Press the stop switch and disconnect the product from the power outlet. 2. Clean the feeding chute using a brush. 3. Pull down the safety switch, and then pull out the collection bin. 4. Turn the product upside down.
- Page 26 MAINTENANCE 5. Clean the feeding chute using a brush. 6. Clean the rest of the product using a dry cloth. WARNING: Avoid using solvents when cleaning plastic parts. Most plastics are susceptible to damage from various types of commercial solvents and may be damaged by their use.
-
Page 27: Emptying The Collection Bin
MAINTENANCE EMPTYING THE COLLECTION 1. Press the stop switch and disconnect the product from the power outlet. 2. Push down the safety switch. Pull out the collection bin. 3. Empty the contents of the collection bin into a waste container. - Page 28 STORAGE MOVING THE SHREDDER 1. Press the stop switch and disconnect the product from the power outlet. 2. Tilt the product until it rests only on its wheels. 3. Move the product.
- Page 29 STORAGE STORING THE SHREDDER 1. Press the stop switch and disconnect the product from the power outlet. 2. Clean the feeding chute using a brush and the rest of the product using a dry cloth. Empty the contents of the collection bin into a waste container.
-
Page 30: Product Specifications
PRODUCT SPECIFICATIONS Electric crushing shredder Model RSH2445S Rated power 2400 W (P40) Rated voltage 230-240V~ 50Hz Ingress protection IPX4 Maximum cutting diameter 45 mm Idle speed 55 /min Weight 21 kg Noise emission level (in accordance with EN 50434:2014 Annex A-weighted sound pressure 96.3 dB(A) - Page 32 Imported by: Techtronic Industries Australia Pty Ltd 31 Gilby Road, Mount Waverley, VIC 3149 Melbourne, Australia Techtronic Industries N.Z. Limited 2 Landing Drive, Mangere Auckland, 2022, New Zealand 099330003001-02...
Need help?
Do you have a question about the RSH2445S and is the answer not in the manual?
Questions and answers
Can I leave the shredder mulcher out in the garden possibly in the rain?