Table of Contents
Advertisement
Advertisement
Table of Contents

Related Manuals for BIGSTONE C300-LCD


Summary of Contents for BIGSTONE C300-LCD
- Page 1 C300-LCD Instructions Nanjing Bigstone Electronic & Technology co.,Ltd...
-
Page 2: Table Of Contents
CONTENT ABOUT THE USER MANUAL ......................2 OUTLOOK AND SIZE .......................... 2 ......................... 2 ATERIAL AND OLOR BUTTON DEFINITION ........................3 FUNCTION SUMMARY ........................4 .......................... 4 UNCTION UMMARY ..........................6 .......................... 6 ORMAL NORMAL OPERATION ........................7 1、ON/OFF ............................7 2、C ........................... -
Page 3: About The User Manual
Dear users, To ensure better performance of your e-bike, please read through the C300-LCD product introduction carefully before using it. We will inform you all the details concisely(including hardware installation, setting and normal use of the display)when using our display. Meanwhile, the introduction will also help you solve possible confusion and malfunction. -
Page 4: Button Definition
BUTTON DEFINITION C300 has four buttons, including ON/OFF SET UP and DOWN. “ON/OFF” names to “ “ON/OFF” names to “ ”, “SET” names to “SET”, “UP” names ”, “ to “ ” and “DOWN” names to “ ”. page 3... -
Page 5: Function Summary
FUNCTION SUMMARY FUNCTION SUMMARY C300 provides a wide range of functions and indicators to fit the users’ needs. The indicated contents are as below. 1. ON/OFF 2. Current display 3. Speed display 4. KM/H & MPH 5. Backlight indicator 6. 6KM/H work 7. - Page 6 FULL VIEW AREA page 5...
-
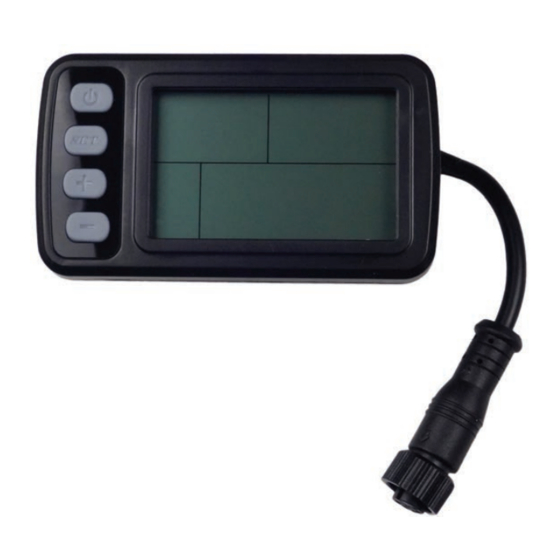
Page 7: Full View Area
NORMAL VIEW AREA The normal viewing area of the C300 is shown below. page 6... -
Page 8: Normal Operation
NORMAL OPERATION 1 ON/OFF Hold ON/OFF and start the display. The display will provide power for the controller. Hold ON/OFF again can open the backlight. With display on, press ON/OFF for 3 seconds to turn off the power. With the display off, there is no battery consumption. -
Page 9: 4、Km/H & Mph
4 KM/H & MPH Select KM/H or MPH for the speed and mileage, display will be the currently selected units display. 5 BACKLIGHT INDICATOR With the power on, click the ON/OFF and turn on the backlight. Click it again and turn off the backlight. 6 6 KM/H WORK Hold UP for 2 seconds and enter into the mode of power assist walk. -
Page 10: 8、Error Code Indicator
8 ERROE CODE INDICAYOR If there is something wrong with the electronic control system, the display will flash at 1 HZ and show the error code automatically. Different error code is corresponding with different fault information, please see the last page Error code table for details. 9 SET OPEARATION 9.1 Reset trip distance, trip time and max speed Hold DOWN for 3 seconds to clear trip distance, trip time and max... - Page 11 Hold SET for 10 seconds to enter into wheel diameter setting. Select the accurate wheel diameter value to ensure the accuracy of display about speed and mileage. Click UP or DOWN to set the wheel diameter. ※ 9.3 Max speed setting Hold UP, DOWN and SET for 1 second to enter into the max speed setting interface.
-
Page 12: 10、Distance Indicator
selection. Limited current setting Hold UP and SET for 3 seconds to set the limited current value. Software version number checking Press DOWN and SET for 2 seconds to display the communication protocol version number. Press SET to save and exit the above setting interface. 10 DISTANCE INDICATOR With the display on, press SET to switch the display information. -
Page 13: 11、Trip Time Indicator
10.1 ODO The ODO records the driving mileage from using. 10.2 Trip distance Trip distance records the driving mileage, it displays as below. 11 TRIP TIME INDICATOR The trip time records the riding time, it displays as below. 12 BATTERY INDICATOR When the battery capacity is high, the six battery segments are all light. -
Page 14: 13、Cable Definition
battery is severely low and needs to be recharged immediately. Low battery flash 13 CABLE DEFINITION 1 Red: Battery + 2 Blue: Weak lock 3 Black: Battery- 4 Green: UART-RECEIVE (RXD) 5 White: UART- SEND (TXD) 14 AUTO SLEEP AFTER 5 MINUTES When the riding speed is 0 km/h for 5 minutes, the system will go to sleep automatically. -
Page 15: Common Problems & Solutions
perspective, and the button is arranged on the easy control position. In the case of power failure the e-bike, the corresponding connector and connector controller instrument for inserting installation can be completed. Attentions! Install the instrument from right to left and avoid stretching buckle over angle. -
Page 16: Quality & Warranty
6. Beyond Warranty period. VERSION CHANGE The instrument instructions are the operating instructions of common software version of Nanjing Bigstone Electronic & Technology Co., Ltd. (V3.1 version). The instrument software version that using on page 15... -
Page 17: Error Code Table
the part of the vehicle are likely different from this specification, with the actual use of version shall prevail. ERROR CODE TABLE The error code is corresponding with the fault definition. Error code definition normal Current error or MOS damaged Throttle error(Start detection) motor no phase position Hall error...
Need help?
Do you have a question about the C300-LCD and is the answer not in the manual?
Questions and answers