Advertisement
Advertisement

Related Manuals for Orbit Starlite SL3


Summary of Contents for Orbit Starlite SL3
-
Page 2: Table Of Contents
Contents I. IMPORTANT PRECAUTIONS..............(1) II. PRODUCT SPECIFICATION ………..........…….…(3) III. ASSEMBLY…………...……………………........………..(4) IV.WORKOUT GUIDELINES …………........…………...(7) V.TREADMILL OPERATION………….…..........….(8) VI. MAINTENANCE…………........…………………….(9)-(10) VII. RECYCLING INFORMATION..………….......…..…….(11) VIIl.ERRORS AND TROUBLESHOOTING ....………………………(11) IX. EXPLODED VIEW and PARTS LIST........(12)-(14) - Page 3 I.IMPORTANT PRECAUTIONS MINIMUN 140 cm 100 kg. USER USER WEIGHT HEIGHT PLACE SAFETY KEY WITH MAGNET ONTO TREADMILL CONSOLE. ATTACH CLAMP TO CLOTHING FIRMLY. THIS TREADMILL WILL NOT START WORKING UNTIL THE SAFETY KEY IS IN PLACE. LUBRICATE TREADMILL RUNNING DECK WITH SILICON OIL AS SET OUT IN MAINTENANCE GUIDE.
-
Page 4: Important Precautions
IMPORTANT SAFETY PRECAUTIONS WARNING: Before starting any exercise program, consult your physician or health professional,especially for person who is above 35 years old or had some health problems before. Neither manufacturer nor distributor should be held responsible for any injuries or discomfort by the user due to above reasons. -
Page 5: Product Specification
II. PRODUCT SPECIFICATION Input Voltage 240V±10% Frequency 50/60 Hz Running area 1210X460mm Time, Speed, distance, Calorie, heart rate, Bluetooth & bluetooth Function speaker Speed Range 1.0-13.5km/h Incline No incline Max user weight 100kgs Power 1.0 CHP... -
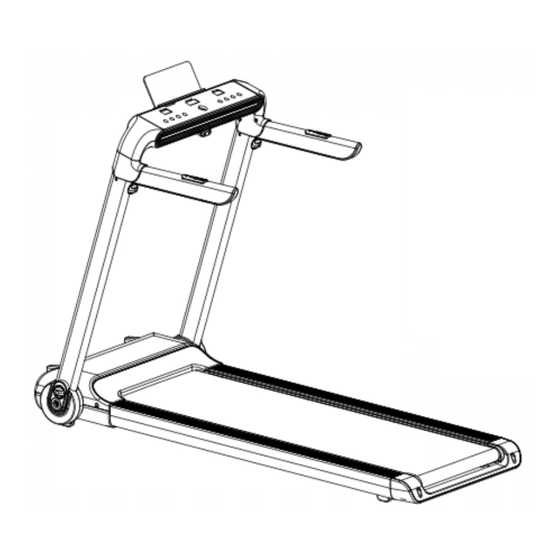
Page 6: Iii. Assembly
III.ASSEMBLY NOTICE:ASSEMBLY REQUIRES TWO PERSONS Part Q'ty 1.Main frame 1set Fittings Q’ty Fittings Q’ty M8 Knob 5mm Wrench ⑥ M10 Knob 6mm Wrench ⑦ Silicone oil Multi Wrench ⑧ Safety Key User Manual ○ ④ M6*10 ⑤ STEP 1 1. - Page 7 STEP 2 1. Fold down console as shown in diagram and lock it with 2pcs M8 knob screws on both sides. Be careful not to pinch wires inside posts. 2. Take out 5mm wrench and 2pcs M6*10 screw, to lock the Ipad holder. Put the safety key on the proper position.
-
Page 8: Iv.workout Guidelines
STEP 4 1. Lift up the treadmill: ① to lock the upright post with 2pcs of M10 knob screws on both sides. ②Switch the supporting frame lock to horizontal position, the supporting frame should extend out automatically. This will leave the treadmill in a steady stand-up position. 2. -
Page 9: V.treadmill Operation
V.TREADMILL OPERATION COMPUTER MANUAL BLUETOOTH SPEAKER APP G APP GFIT... -
Page 10: Maintenance
MAINTENANCE If power cord is damaged, it must be replaced by a qualified electrician or a service technician from the distributor. DO NOT TANGLE THE POWER CORD REGULAR MAINTENANCE OF THE TREADMILL STORAGE: Keep your treadmill indoor in stand-up position, away from dust and moisture. - Page 11 Total running hours vs lubrication frequency: < 3 hours/week 2 months 4 – 7 hours/week 1 month > 8 hours/week 15 days ALIGN THE BELT: If belt has moved to left, start ALIGN AND TIGHTEN THE RUNNING BELT treadmill at 3kph .Use 6mm Wrench to turn the fixed left bolt clockwise or turn the fixed right bolt counterclockwise by a quarter circle.
-
Page 12: Vii.recycling Information
VII.RECYCLING INFORMATION To protect environment, this product must be recycled after its useful life. Please follow local regulation in recycling. VIII. ERRORS and TROUBLESHOOTING : Attn: according to local regulation, you may need to get an electrician or a qualified service technician to perform below repair and service. -
Page 13: Exploded View And Parts List
IX. EXPLODED VIEW and PARTS LIST... - Page 14 Parts List...
Need help?
Do you have a question about the Starlite SL3 and is the answer not in the manual?
Questions and answers