Table of Contents

Related Manuals for ForestAir F001-MP8K


Summary of Contents for ForestAir F001-MP8K
- Page 1 OWNER’S MANUAL MINI PORTABLE SPLIT AIR CONDITIONER F001-MP8K F001-10KR/A IMPORTANT : Please read this manual carefully before running this unit, and save it for future reference. FA-UM-MINI-5176 - v1.0 - 01/2019 © Copyright, ForestAir, 2018...
-
Page 3: Table Of Contents
This instruction manual is the universal-purpose version for the MINI air conditioner manufactured by ForestAir. The appearance of the unit that you have purchased may differ from the ones seen in this manual, however it does not change the basic guidelines on how to operate this air conditioner. -
Page 4: Safety Instructions
1.0. SAFETY INSTRUCTIONS Read the following safety instructions before installing the unit or doing service work. WARNING : Can cause serious personal injury or death. CAUTION : Can lead to injury or structural damage under some conditions. To reduce the risk of fire, electric shock, or personal injury when using this appliance, follow these basic safety precautions. -
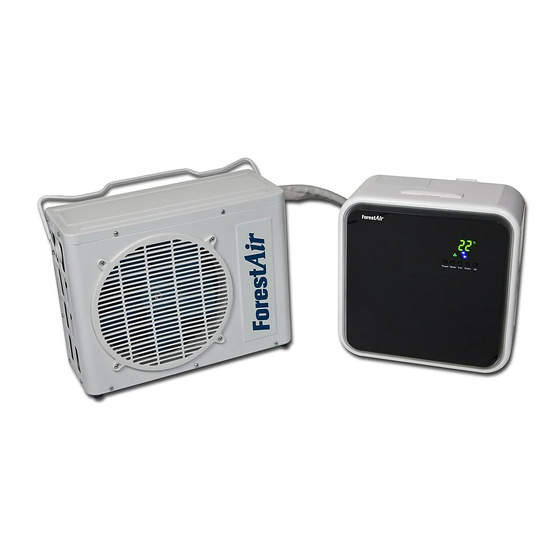
Page 5: Components Overview
2.0. COMPONENTS OVERVIEW INDOOR UNIT – FRONT VIEW INDOOR UNIT – REAR VIEW OUTDOOR UNIT Front panel Remote control Drainage hose Air filter Coolant lines Back compartment cover Handle Remote control holder Handle Control panel Mounting slots Air outlet (warm air) Air outlet (cool air) Power cord Condensation port... -
Page 6: Installation Guide
3.0. INSTALLATION GUIDE █ 3.1. INSTALLATION RECOMMENDATIONS Note : Since cool air is denser than warm air and moves downwards, it is recommended that the indoor unit be installed in an elevated area in order to obtain maximum efficiency. FIG. 1 – Place the indoor unit in an elevated area INDOOR UNIT ▪... -
Page 7: Wall Mounting The Indoor Unit (Optional)
3.0. INSTALLATION GUIDE █ 3.2. WALL MOUNTING THE INDOOR UNIT (OPTIONAL) Notes : ▪ Choose a mounting location situated next to a window or patio door as the coolant lines must be run through a window to connect the indoor and outdoor unit. ▪... -
Page 8: Assembling And Installing The Window Kit
3.0. INSTALLATION GUIDE █ 3.4. ASSEMBLING AND INSTALLING THE WINDOW KIT Your window kit has been designed to fit most standard vertical and horizontal window, and patio door applications, however it may be necessary for you to improvise or modify certain aspects of the installation for certain types of window. - Page 9 3.0. INSTALLATION GUIDE 7. Make sure all panels are connected as seen in the illustration below. Panel A Panel B1 Panel C Panel B2 Opening for coolant lines FIG. 10 – Four panel window kit assembly Finishing the Installation 1. Insert the coolant lines into the side of the rubber connector then fit the connector into panel A making sure the notch is in place.
-
Page 10: Operation Guide
4.0. OPERATION GUIDE █ 4.1. CONTROL PANEL AND REMOTE CONTROL OVERVIEW LCD SCREEN TEMPERATURE / TIME TEMPERATURE UNIT OPERATION MODE TIMER FAN SPEED KEYS POWER MODE FAN SPEED DOWN ON / OFF SELECTION SELECTION DISPLAY SCREEN INDICATORS & CONTROL PANEL KEYS POWER ON / OFF AUTOMATIC MODE COOLING MODE... -
Page 11: Button Functions
4.0. OPERATION GUIDE █ 4.2. BUTTON FUNCTIONS Note : Operation of functions is the same when using remote or control panel, unless otherwise stated. CONTROL REMOTE PANEL CONTROL POWER ON / OFF Press this button to turn the unit ON or OFF. MODE SELECTION While the unit is running, press this button (on the remote, the button corresponding to the desired mode) to switch between operation modes : Automatic (... -
Page 12: Remote Control Operation
4.0. OPERATION GUIDE █ 4.3. REMOTE CONTROL OPERATION Before using the remote, remove the protective insulation film covering the battery by pulling on the tab. FIG. 14 – Pull the tab to remove film Changing the Batteries 1. Simultaneously press on the latch (A) and pull the battery housing (B) to slide it out of the remote. 2. -
Page 13: Care & Maintenance
5.0. CARE AND MAINTENANCE Caution : If any type of non-routine maintenance is needed, such as any maintenance not described in Section 5.0 of this manual, please contact Customer Service or a certified HVAC professional as the unit contains refrigerant. Never attempt to disconnect the coolant lines. █... -
Page 14: Water Drainage
5.0. CARE AND MAINTENANCE █ 5.2. WATER DRAINAGE In most cases, the indoor unit will not require draining, however in some special instances it may be necessary. If this is your case, follow the instructions below. Warning : Make sure the power is off and the power plug is removed from the electric outlet before performing any maintenance on the unit. -
Page 15: Troubleshooting
6.0. TROUBLESHOOTING █ 6.1. COMMON PROBLEMS Before you call for service, review the following list. It may save you time and expense. This list includes common occurrences that are not the result of a defect in workmanship or materials. SITUATION POSSIBLE CAUSES SOLUTIONS The air conditioner... -
Page 16: Error Codes
6.0. TROUBLESHOOTING █ 6.2. ERROR CODES When the MINI encounters errors, the display may show certain error codes. Refer to the table below. CODE DESCRIPTION SOLUTIONS Unplug the unit. Empty the drainage hose and dry the inside of the appliance. Replug and restart the unit. Water has collected in the unit If the problem persist, the problem may be due to a faulty drain float or water pump, or clogged drain. -
Page 17: Warranty
FIVE (5) years on compressor from the date of original purchase in Canada. During the warranty period, if the appliance fails under normal use, ForestAir will, at its option, either repair the unit or replace it, free of charge, within a reasonable period of time after the product is returned. - Page 18 NOTES...
Need help?
Do you have a question about the F001-MP8K and is the answer not in the manual?
Questions and answers