RealWear hmt-1Z1 User Manual
Hide thumbs
Also See for hmt-1Z1:
- User manual (91 pages) ,
- Manual (64 pages) ,
- Safety instructions (5 pages)
Table of Contents

Related Manuals for RealWear hmt-1Z1


Summary of Contents for RealWear hmt-1Z1
- Page 1 User Guide (English) Version 1...
- Page 2 RealWear may update this guide from time to time. You should ensure you are using the most current version which can be found at https://realwear.com.
-
Page 3: Table Of Contents
HMT-1Z1 Parts and Functions — Front View - - - - - - 22 HMT-1Z1 — Parts Representation — Side View - - - - - - 23 HMT-1Z1 — Parts Representation — Side View with Micro USB Port - - - - - - 25... - Page 5 Control Buttons in Home Screen - - - - - - 74 Selecting HMT-1Z1 Interface Language - - - - - - 75 Accessing Home Screen - - - - - - 75 Accessing Application Launcher - - - - - - 75...
- Page 6 Declaration of Conformity - - - - - - EU Regulatory Conformance - - - - - - 103 Declaration of Conformity - - - - - - 104...
-
Page 7: Safety Usage Warnings
Safety Usage Warnings • — Do not use HMT-1Z1 while driving. • — Always use your dominant eye for comfortable viewing. Disposal of Old Electrical and Electronic Equipment The symbol of the crossed-out wheeled bin indicates that within the countries in the European Union, this product, and any... -
Page 8: Guideline For Headphone And Earphone
Guideline for Headphone and Earphone To prevent possible hearing damage, do not listen at high volume levels for long periods. A pleine puissance, l’écoute prolongée du baladeur peut endommager l’oreille de l’utilisateur. -
Page 9: I.safe Safety Instructions
(in form of translation or printing errors), the English version shall apply. Application ATEX & IECEx The HMT-1Z1 model T1100S is approved for use in zone 1, zone 2, zone 21 and zone 22 in accordance with directives 2014/34/EU (ATEX) and the IECEx System. NEC & CEC The HMT-1Z1 model T1100S is approved for use in Division 1 and 2 Class I, II, III. -
Page 10: Ex-Relevant Safety Regulations
Faults and Damages Before entering ex-hazardous areas, the safety of the device must be checked. If there is any reason to suspect that the safety of the device has been compromised, it must be withdrawn from use and removed from any ex-hazardous areas immediately. Measures must be taken to prevent any accidental restarting of the device. - Page 11 • During charging any headset or accessory must be unplugged from the audio jack • The device may only be charged outside ex-hazardous areas using the i.safe PROTECTOR 1.0 USB-cable or other equipment approved by i.safe MOBILE GmbH • The device may only be charged at temperatures between 5°C ... 40°C •...
-
Page 12: General Information
Head Mounted Tablet Models Covered This user guide covers the following RealWear HMT-1Z1 model: T1100S. You can find the model name on the HMT-1Z1 device label on the rear side of the tablet. -
Page 13: Operating Frequency Bands
Operating Frequency Bands Wi-Fi operating frequency band(s) details and EIRP are as follows: • 2412-2472: 15.89dBm • 5180-5320: 17.09dBm • 5500-5700: 17.37dBm • 5745-5825: 12.98dBm Bluetooth operating frequency band and EIRP is: 2402-2480: 12.16dBm 5G Wi-Fi Connection Information Operations in the 5.15 — 5.35GHz band are restricted to indoor use only. -
Page 14: Realwear Support Information
RealWear Support Information For additional product and support information, use the following information: • E-mail: support@realwear.com • Website: http://www.realwear.com • Postal address: 600 Hatheway Road, Vancouver, WA — 98661... -
Page 15: Safety Guidelines
Safety Guidelines Battery Performance A rechargeable battery powers your device. The device comes with an inbuilt battery which is not replaceable. Never use any uncertified charger. Use the battery only for its intended purpose. Never use any charger or battery that is damaged. If the battery is completely discharged, it may take a few minutes before the charging indicator appears on the display or before the device can be used. -
Page 16: Battery Disposal
Stop using RealWear HMT-1Z1 or its display immediately if you experience a headache, vertigo, dizziness or nausea. Do not use the HMT-1Z1 display while operating any vehicle. Move the boom arm completely out of your line of sight when not using the display. Maintain situational... -
Page 17: Sar Information
United States and Canada. The limit recommended by FCC and IC is 1.6 W/kg averaged over one (1) gram of tissue. The highest SAR value of the HMT-1Z1 for use: • By the ear is 1.31 W/kg (1g) Radiation Exposure Statement —... -
Page 18: Charger Use Safety Instructions
— Before cleaning the cable or charger, disconnect from power supply • — When using an extension cable, check the integrity of the ground conductor • — Disconnect the charger from HMT-1Z1, once the battery is fully charged • — Do not use this charger in wet areas... - Page 19 • — Do not insert or remove the plug with wet hands • — Do not open the charger. For any issues, contact support • — Do not cut, break or bend the cable in a knot • — Do not put any objects on the cable that may let it overheat. It may damage the cable and cause fire or electrocution...
-
Page 20: Introduction
Rear pad (detachable) About the RealWear HMT-1Z1 RealWear HMT-1Z1 is the first-generation intrinsically safe head mounted rugged tablet. You can operate the tablet completely hands-free using only voice commands and head gestures This hands-free operation is done using WearHF™ software, built into every RealWear device. The... -
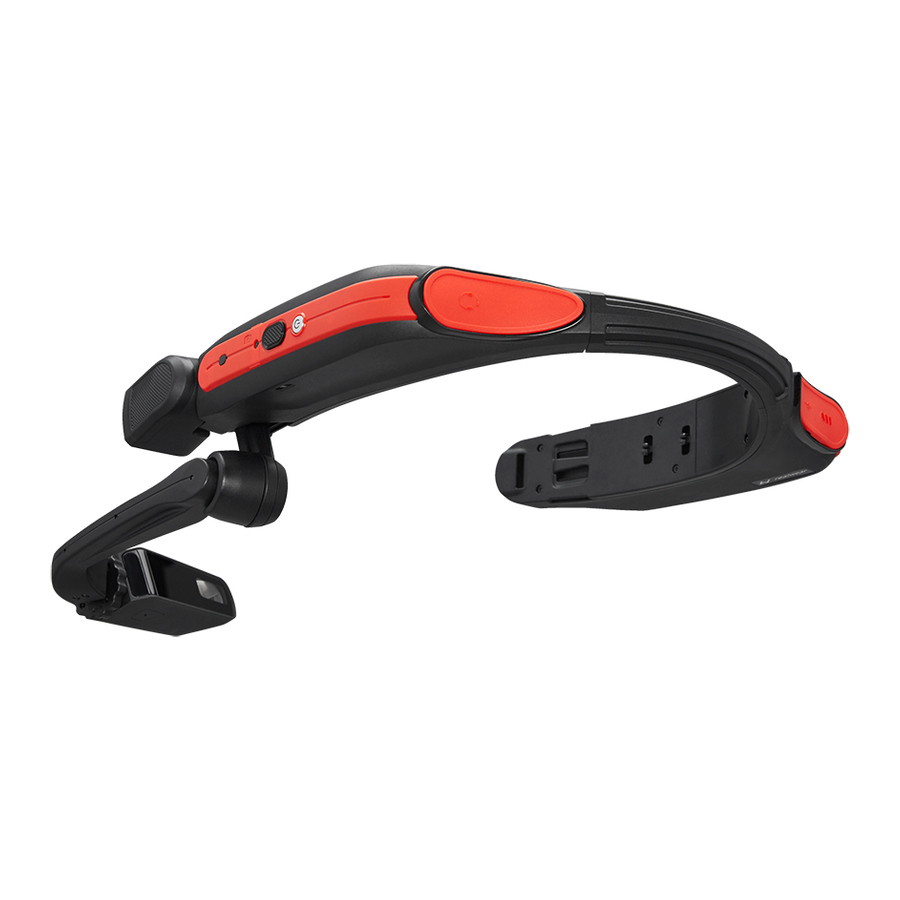
Page 21: Hmt-1Z1- Parts Representation - Front View
HMT-1Z1- Parts Representation — Front View... -
Page 22: Hmt-1Z1 Parts And Functions - Front View
HMT-1Z1 Parts and Functions — Front View Part Name Action 1 — Overhead strap Supports HMT-1Z1 on the head. 2 — Camera pod Holds a camera to take photos and videos. 3 — Mic A2 — located on Auxiliary microphone for voice commands. -
Page 23: Hmt-1Z1 - Parts Representation - Side View
HMT-1Z1 — Parts Representation — Side View Part Name Action 1 — Display pod Holds the main LCD display to operate the HMT-1Z1. 2 — Speaker Outputs audio from the HMT-1Z1. 3 — Micro SD card Holds the microSD card. - Page 24 Part Name Action 6 — Audio jack Connects to audio device using 3.5 mm audio jack. Regional USB charger shipped in separate box.
-
Page 25: Hmt-1Z1 - Parts Representation - Side View With Micro Usb Port
HMT-1Z1 — Parts Representation — Side View with Micro USB Port Part Name Action 1 — Micro USB Connects HMT-1Z1 to a computer — for data transfer and ADB interface. 2 — Battery Fixed Battery. housing with rubber lid... - Page 26 HMT- 1Z1 at a comfortable position. Adjusting Display Pod After positioning HMT-1Z1, adjust the display pod about 1-2 inches from the eye. Position the display pod below the line of sight for viewing the display...
- Page 27 Sometimes, to get the complete view of the display pod, you might have to adjust the whole unit on the head either left or right when part of the screen is not visible on the left or right side. Position the display pod just below your dominant eye. You can switch the HMT-1Z1 from left-eye to right-eye.
- Page 28 Fitting HMT with Optional Accessory Mounts You can wear your safety goggles and hard hat with the HMT-1Z1. Hardhat mounting using optional accessory clips (check RealWear Website for specific model availability) Charging HMT-1Z1 To recharge the battery: Connect the i.safe PROTECTOR 1.0 USB-cable to the USB port located on the rear side of the main housing under the rubber lid.
- Page 29 Inserting and Setting Up MicroSD Card You can insert a microSD card into the specified slot and store media files and documents. Locate the SD Card section (Below the Action button on the Right-Hand side of the HMT- 1Z1). Unscrew to open the door using a Philips #00 screwdriver.. Bend the top end of the Flap.
- Page 30 Slightly press and slide the plate down. Insert the SD card fully and close the Silver Flip, slightly press and move it upward. Slightly tilt the HMT-1Z1 to ensure that the SD card is placed right and doesn’t fall off. Formatting the MicroSD card When the microSD card is inserted and recognized by HMT-1Z1, a notification is displayed in the top right corner of the screen.
- Page 32 Say “My Notification”. Say “Select Item 1” or SanDisk SD card. Setup SD card page is displayed.
- Page 33 Say command “Use as portable storage” or “Select item 1”. “Use Portable Storage” is selected. Say “Select Item 2” to confirm the microSD card formatting process.
- Page 34 The microSD card formatting progress is displayed. After microSD card formatting is completed, say “Select Item 1” to view the “My Notifications” screen.
- Page 35 Say “My Controls”. The HMT-1Z1 settings page is displayed.
- Page 36 MicroSD card is set as the default storage device and all the media files will be stored in the microSD card. Ejecting MicroSD Card Complete the following procedure the eject and remove the microSD card from HMT-1Z1. Say “My Controls” > “More Settings”. Advanced Settings page is displayed.
- Page 37 Say “Storage”. Storage settings page is displayed. Say “Eject” or “Select Item 5”.
- Page 38 Say “My Controls”. The Settings page is displayed and microSD card status is displayed as “No SD card available”.
- Page 39 Copy the folder and paste it in the desired location When microSD Card is Set as th Portable Storage DCIM folder will be auto created when a photo is captured using HMT-1Z1 camera Movies folder will be auto created when a video is recorded using HMT-1Z1 camera...
- Page 40 Using Voice Commands WearHF™ is an innovative software solution that enables you to use the RealWear HMT-1Z1 as a hands-free device. It is easy to use and loaded with intuitive functions. Speech Recognition — Say What You See HMT-1Z1 operates based on speech recognition. Instead of pressing or tapping a control button on the screen, all you need to do is speak the name of the respective control.
- Page 41 “Show Help” Displays pop-up window with the help for commands associated with the current screen. Echo Cancellation HMT-1Z1 comes with echo cancellation feature to reduce any audio feedback that may be picked by the microphone while the speaker is used.
- Page 42 Auto Mute/Auto-Unmute When the HMT-1Z1 is left idle without any physical movement, either on a desk or on a hardhat, auto-mute feature will get activated after 30 seconds, the speech recognition is disabled automatically. A red warning symbol is displayed on the screen. Once the HMT-1Z1 movement is detected, the speech recognition will resume automatically, and the warning symbol will disappear.
- Page 43 To select a specific control, you need to use the number assigned to it. For example, you can say “Select item 1” to select the first unpronounceable button, or “Select item 2”, to select the second unpronounceable button.
- Page 44 About Notifications When you have any notifications in your HMT-1Z1, the number of notifications is displayed in the top right corner of the display. Say My Notifications to open the list of notifications. Say Open item <notification number>, to view a specific notification.
- Page 45 Mute Microphone To stop the speech recognizer, say “Mute Microphone”. The device will not respond to your voice commands while the microphone is muted, and a red warning sign is displayed on the screen. To restart the speech recognizer, tap the Action button on the side of the device, located next to the Power button.
- Page 46 Voice Command Action “Page Up” Navigates to 1 page up. “Page Down” Navigates to 1 page down. “Page Left” Navigates to 1 page left. “Page Right” Navigates to 1 page right. “Show Help” Displays pop-up window with the help for commands associated with the current screen.
- Page 47 For example, In Settings page, we can use voice command “Page down” to scroll down and “Page Up” to scroll up. At any point of time if you want to use head gestures instead of voice commands, say “scroll enable” and we can use head gestures to scroll up and down. To disable head gestures, say “scroll disable”.
- Page 48 Virtual Hands-free Keyboard HMT-1Z1 has a virtual hands-free keyboard to enter text. This keyboard works based on voice recognition. Whenever a text entry screen appears, the hands-free keyboard is displayed automatically. The various virtual keyboards are, • Alphabet keyboard — to enter alphabets •...
- Page 49 Voice Command Action “Accept” Accepts the entered information and navigates to the next screen in sequence. “Spacebar” Inserts a single space. “Backspace” Deletes the last character. “Clear Text” Clears the text in the Input box. “Caps On” Uses capital letter. “Caps Off”...
- Page 50 Alphabet Keyboard To type a letter say “Letter [followed by the letter you want to use]”. For example, to type kbc, say “Letter kbc”.
- Page 51 Say “Switch Mode”, to switch to the keyboard that recognizes one alphabet at a time and works based on the international radio alphabet codes. For example, if you want to type “a”, you must say “Alpha”.
- Page 52 Symbol Keyboard To view Symbol keyboard, say “All Symbols”. To type a specific symbol, say the “Symbol <symbol name>” provided corresponding to the symbol.
- Page 53 Number Keyboard To type a number say “Number [followed by the numeral you want to use]”. For example, to type 1234, say “Number 1234”.
- Page 54 Dictation Service You can perform dication in English, German and Chinese, without Wi-Fi connection. All the other languages require Wi-Fi connection, to dictate text. To activate dictation service, say “Dictation” in virtual keyboard screen. The screen will change to “Listening” mode. Speak/dictate the text to be entered.
- Page 55 To enter more text, say “Append”. To restart the dictation, say “Restart”. To complete the dictation and proceed to the next screen, say “Accept”. To switch to keyboard mode for entering text/symbols/numbers, say “Show Keyboard”.
- Page 56 You can use the HMT-1Z1 control panel to access the common device configuration settings. You can also use it to access Android system settings. Setting Up HMT-1Z1 Using Remote Configuration When you switch ON the HMT-1Z1 for the first time a remote configuration screen is displayed. Visit https://www.realwear.com/configure and complete the following procedure.
- Page 57 Scan the QR code using the “Configuration” application in the “My Programs” menu. Using Control Panel You can access the control panel from any screen. To access the control panel, say “My Controls”. The Settings screen is displayed.
- Page 58 HMT-1Z1 Settings Voice Action Command “Select Volume 1, Sets the default volume level of the device to specific value — 1 to Select Volume 2, … 5. For example, to set volume to 4 say “Select volume 4”. Select Volume 5...
- Page 59 Displays the Wi-Fi status and the name of Wi-Fi network connected Networks” to the device To access Android Wi-Fi settings, say “Set Wireless Networks”. HMT-1Z1 can connect to wireless networks with hidden SSID. “Flashlight On / Switches On/Off flashlight. Flashlight Off”...
- Page 60 Hides or displays Show Help option displayed in all the screens. Show Help” “Bluetooth Mode Sets the Bluetooth connection mode to master or slave. In Master mode, HMT-1Z1 can connect to audio devices such as Master/Slave” Bluetooth earpieces and Bluetooth speakers. In Slave mode, HMT-1Z1 can connect to mobile phones.
- Page 61 Setting Up Screen Lock Using Android Settings Screen lock protects your HMT-1Z1 from unauthorized access. To setup the screen lock, complete the following procedure. Go to control panel.To access the control panel say “My Controls”. The Settings screen is displayed.
- Page 62 Select PIN to setup the screen lock.
- Page 63 Enter PIN screen is displayed. Input the desired pin with 4 to 15 digits, by saying the digits and say Next.
- Page 64 Re-enter the PIN for confirmation. Select the option to display the notifications on the Home screen, when the device is locked. You can opt to view all the notifications or hide specific notifications. You can also opt to hide all the notifications.
- Page 65 The Screen Lock is enabled.
- Page 66 Unlocking your Device Using Screen Lock When screen lock is enabled, the device gets locked when it goes to sleep or when you press the Power ON button. To unlock the device, Press the Power ON button and say “Unlock device”. Input your PIN.
- Page 67 For example, to enter a PIN 1234, you must say “Nitrogen Sodium Pottasium Magnesium”.
- Page 68 Updating HMT-1Z1 Software Complete the following procedure to check and install software updates. Power ON the HMT-1Z1 and connect to a Wi-Fi network. Navigate to My Programs > Wireless update. Say “Check for updates”. An option to download the package is displayed if there is an update available.
- Page 69 Say “Download” followed by the size in KB/MB or say “Select item (followed by the item number)”. The software update download will start. The download time depends on the size of the package and the network connectivity. Once the download is completed, an option to Install now or later is displayed.
- Page 70 Select “install Now” to install and update the HMT-1Z1 software. If you say “Install later”, a pop-up to set the installation delay time is displayed for about 15 seconds. You can set the installation delay time to by 1, 4 or 8 hours. If the delay time is...
- Page 71 Warning Messages to Note During Software Update Be sure to read the following warning messages before proceeding with the software update. Battery Alert We recommend not to use HMT-1Z1 during the software update. Also ensure that there is at least 30 % charge.
- Page 72 Setting Up Bluetooth Master/Slave Switch You can connect HMT-1Z1 to other Bluetooth devices, as a master or slave. In Master mode, HMT-1Z1 can connect to audio devices such as Bluetooth earpieces and Bluetooth speakers. In Slave mode, HMT-1Z1 can connect to mobile phones.
- Page 73 Press and hold the Power ON button for 2 seconds to Power ON the HMT-1Z1. Home Screen The Home screen is the main screen for performing all activities on the HMT-1Z1. It allows the user to quickly access files, key applications and at the same time provides useful information...
-
Page 74: Control Buttons In Home Screen
Control Buttons in Home Screen You can access the various applications by activating the following controls provided in the Home Screen. Voice Command Action “My Programs” Launches application launcher to see and access all the applications installed in the device. “My Camera”... -
Page 75: Selecting Hmt-1Z1 Interface Language
To access the Home Screen, say “Navigate Home” from any application screen. Accessing Application Launcher You can use application launcher to view and access the applications installed in the HMT-1Z1. You can activate any application by just saying the application name as written underneath the application icon even if the icon is not visible due to scrolling. - Page 76 You can also launch an application by saying the number associated with the application. For example, to launch an application with item number 8, you must say “Select Item 8”. You can see up to 10 applications in a single screen. To scroll and view other applications, move you head to your left or right.
-
Page 77: Accessing Recent Applications
Accessing Recent Applications You can view the list of all the applications running in the background, using the global command “Recent Applications”. To open the applications say “Select [number associated with desired item]” or the name of the application. - Page 78 Voice Action Command “Recent Displays the list of all the applications running in the background, Applications” along with the item number associated with each application. “Page Up” Scrolls to the previous page of recent applications list. Scrolls to the next page of recent applications list. “Page Down”...
-
Page 79: Accessing Power Management Functions
Power manager application allows you to access power management functions using voice commands. To access power manager, go to application launcher and say “Power Manager”. Voice Action Command Puts HMT-1Z1 into sleep mode. Press the Power On button to wake up “Go To Sleep” “Power Off” Switched Off HMT-1Z1 device. -
Page 80: Accessing My Camera
Voice Action Command “Reboot Device” Restarts HMT-1Z1 device Accessing My Camera The camera is a hands—free application for taking photographs and videos. -
Page 81: Camera Functions
Camera Functions Voice Action Command Zooms the camera view by setting the level to specific value — 1 to 5. “Zoom Level — 1 to 5” To set the zoom level for clear scanning say “Zoom level 1—5”. For example to set the zoom level to 3, say “Zoom level 3”. “Take Photo”... -
Page 82: Accessing File Browser
Voice Action Command “Show Help” Displays extra commands. Accessing File Browser You can view the documents, photos and video files locally stored in your HMT-1Z1 using the file browser application. -
Page 83: File Manager Functions
Command “My Media” Displays files stored in the Movies folder and videos recorded using the HMT-1Z1 camera and stored in DCIM folder. The supported file formats are: MP3, 3GP, AMR, OGG, WAV, WMA, AVI, MOV, MP4, WEBM, MKV “My Documents”... -
Page 84: Using Media Player
Using Media Player If you select an audio or video file from the file manager, it is played using the media player. Media Player Functions Voice Action Command “Video Pause “ Pauses video while playing. “Video Play” Plays paused video. “Video Stop”... -
Page 85: Playing Audio Files
Voice Action Command “Video Rewind” Rewinds video by 30 seconds. “Show Help” Displays extra commands. Playing Audio Files You can play audio files using the media player. -
Page 86: Audio Player Functions
Audio Player Functions Voice Action Command “Audio Pause” Pauses audio while playing. “Audio Play” Plays paused audio. “Audio Stop” Stops the audio and goes to My Media screen. “Audio Rewind” Rewinds Audio by 30 seconds. “Select Volume — Sets the default volume level of the device to specified value. 1 to 5”... - Page 87 Microphone Left Eye/Right Eye Indication When the user changes the orientation of HMT-1Z1 from right to left eye or vice versa, a toast message appears on the screen indicating the change in the orientation.
- Page 88 However, when the display pod is folded back, you can use a second set of microphones that are built into the frame of HMT-1Z1. To switch between front and rear microphones,press the Action button three times quickly.
-
Page 89: Using Document Viewer
Using Document Viewer You can open PDF files and image files using document viewer with hands—free control. If you select a PDF or image file from the file manager, it is opened using the document viewer. Document Viewer Functions Voice Action Command “Zoom Level —... -
Page 90: Using Document Viewer - Multi Page Document
Voice Action Command “Control Unfreezes the document and enables document scrolling in response to Document” head gestures. Using Document Viewer — Multi Page Document To view documents with multiple pages, you need to use the following navigations controls. Voice Action Command “Go to page Scrolls to the specified page. -
Page 91: Deleting Files From File Manager
Deleting Files from File Manager You can delete the files from My Media, My Documents or My Photos folder. To delete one or more files, Go to My Media/My Documents/My Photos folder. Say “Edit Mode”. The Edit screen with option to select one or more files is displayed. - Page 92 To select a specific file, you need to use the number assigned to it. For example, you can say “Select item 3”, to select the third file, or “Select item 5”, to select the fifth file. To select all the files say “Select All”. To delete the selected files, say “Delete selected”...
-
Page 93: Using Barcode Scanner
To cancel the delete and retain the files, say “Cancel”. Using Barcode Scanner You can use the handsfree barcode reader built-in with the HMT-1Z1, to scan any barcode. When launched, the barcode reader scans any barcode that is detected and displays the details automatically. -
Page 94: Supported Barcode Types
Voice Action Command “Flashlight ON/ Switches On/Off flashlight. OFF” Supported Barcode Types The supported barcode types are — UPC, EAN, QR Code, Data Matrix, and Code 128. -
Page 95: Limited Warranty And Software License
Software and Documentation The Software and Documentation are licensed not sold, and are provided “AS IS”, without any warranty. RealWear and its licensors retain all rights in the Software and Documentation, and grant you only the following limited, personal, non-transferrable licenses: Documentation: You may reproduce a reasonable number of copies of the Documentation for your internal use. -
Page 96: Limited Hardware Warranty
This is the only warranty RealWear gives for your Hardware and RealWear gives no other guarantee, warranty, or condition, express, statutory, implied, or collateral. - Page 97 If you do not have Internet access, you can phone +1(669) 235-5751. iii. Before sending your Hardware to RealWear for service, be sure to keep a copy of any data you want to save, and delete anything you consider confidential. RealWear is not responsible for your data and may erase it.
- Page 98 F. Warranty Exclusions: RealWear is not responsible and this warranty does not apply if your Hardware is: intentionally abused or used in other than Normal Use Conditions (as determined by RealWear in its sole judgment); used with any battery not provided by RealWear;...
-
Page 99: Exclusion Of Certain Damages, Limitation Of Liability
Limitation of Liability: REALWEAR’S TOTAL LIABILITY FOR ANY AND ALL CLAIMS ARISING OUT OF OR IN CONNECTION WITH THESE TERMS OR THE PRODUCTS WILL NOT EXCEED THE TOTAL AMOUNT RECEIVED BY REALWEAR FROM YOU DURING THE PRIOR 12 MONTHS FOR THE SPECIFIC PRODUCT GIVING RISE TO THE CLAIM. - Page 100 arbitration will be in conducted in English and held in Vancouver, WA. Governing Law: This Agreement is governed by, and the arbitrator will apply, the substantive laws of the State of Washington excluding its conflicts of law provisions. The United Nations Convention on Contracts for the International Sale of Goods does not apply to this Agreement.
-
Page 101: Regulatory Statements
Regulatory Statements WARNING: Changes or modifications made to this equipment not expressly approved by RealWear, Inc. for compliance could void the user’s authority to operate the equipment. FCC Statement This device complies with Part 15 of the FCC Rules. Operation is subject to the following two conditions: (1) This device may not cause harmful interference, and (2) this device must accept any interference received, including interference that may cause undesired operation. -
Page 102: Fcc Caution
FCC Caution Any changes or modifications not expressly approved by the party responsible for compliance could void the user’s authority to operate this equipment. This transmitter must not be co-located or operating in conjunction with any other antenna or transmitter. Operations in the 5.15-5.25GHz band are restricted to indoor usage only. -
Page 103: Ic Statement - For Wlan 5Ghz Device
• l’utilisateur de l’appareil doit accepter tout brouillage radioélectrique subi, même si le brouillage est susceptible d’en compromettre le fonctionnement Cet appareil numérique de la classe B est conforme à la norme NMB-003 du Canada. Cet appareil est conforme à la norme RSS-310 d’Industrie Canada. L’opération est soumise à la condition que cet appareil ne provoque aucune interférence nuisible. - Page 104 Avertissement les dispositifs fonctionnant dans la bande 5150-5250 MHz sont réservés uniquement pour une utilisation à l’intérieur afin de réduire les risques de brouillage préjudiciable aux systèmes de satellites mobiles utilisant les mêmes canaux. le gain maximal d’antenne permis pour les dispositifs utilisant les bandes 5250-5350 MHz et 5470-5725 MHz doit se conformer à...
- Page 105 Declaration of Conformity EU Regulatory Conformance Hereby,We, i.safe MOBILE GmbH declare that the radio equipment type T1100S is in compliance with Directive 2014/53/EU.
- Page 106 Declaration of Conformity RF_067, Issue 01 EU Declaration of Conformity (DoC) Hereby, Name of manufacturer: i.safe MOBILE GmbH Address: i_Park Tauberfranken 10 97922 Lauda-Koenigshofen, City: Lauda-Koenigshofen, Country: Germany declares that the DoC is issued under its sole responsibility and that this product: Product description: Head Mounted Tablet Type designation(s):...
Need help?
Do you have a question about the hmt-1Z1 and is the answer not in the manual?
Questions and answers