Table of Contents
Advertisement
Available languages
Available languages
23888 – 23889
Inhalt
Table of contents
Batterie
Inserting
einsetzen
batteries
Aufladen
Charging
Contenu
Mise en place
Batterijen
des piles
A A A
A A A
Recharge
© 2016 Revell GmbH,
Henschelstr. 20-30, D-32257
Bünde. A subsidiary of Hobbico,
Inc. REVELL IS THE REGISTERED
TRADEMARK OF REVELL GMBH,
GERMANY. Made in China.
www.revell-control.de
3
SPEED
LEVEL
Inhoud
Contenido
Montaje
plaatsen
baterías
Opladen
Carga
45
45
min.
min.
FLIP
Contenuto
Inserire le
batterie
A A A
A A A
Ricarica
Advertisement
Table of Contents

Related Manuals for REVELL Control Nano Quad Fun XS


Summary of Contents for REVELL Control Nano Quad Fun XS
- Page 1 23888 – 23889 © 2016 Revell GmbH, Henschelstr. 20-30, D-32257 Bünde. A subsidiary of Hobbico, Inc. REVELL IS THE REGISTERED TRADEMARK OF REVELL GMBH, GERMANY. Made in China. www.revell-control.de SPEED LEVEL FLIP Inhalt Table of contents Contenu Inhoud Contenido Contenuto...
- Page 2 FLIP ! PIEP ! SPEED LEVEL ! PIEP !
- Page 3 Deutsch 1 STARTVORBEREITUNG 1A Den ON-/OFF-Schalter der Fernsteuerung auf „ON“ stellen. Die Power-LED an der Fernsteuerung blinkt und piept einmal. 1B Den ON-/OFF-Schalter des Modells auf „ON“ stellen. Bewegen Sie den Schubregler (den linken Knüppel der Fernsteuerung) einmal ganz nach oben und wieder ganz nach unten, um die Fernsteuerung zu entriegeln.
-
Page 4: Fehlerbehebung
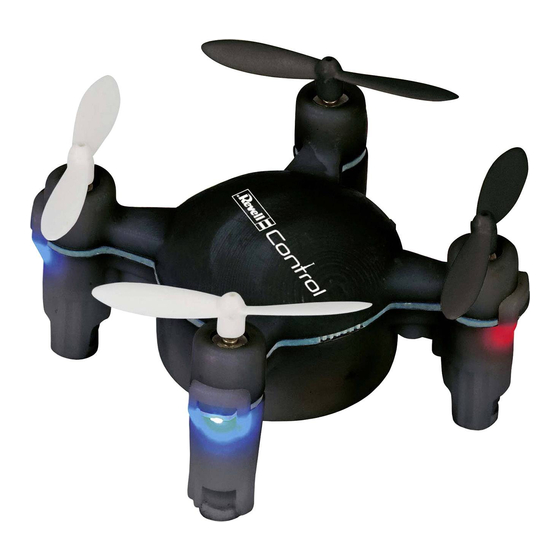
Das Modell dreht sich nur noch um seine Hochachse, überschlägt sich beim Start oder hebt nicht ab. Ursache: • Falsche Anordnung der Propeller. Abhilfe: • Propeller wie in der Anleitung beschrieben einbauen. Weitere Tipps und Tricks finden Sie im Internet unter www.revell-control.de. -
Page 5: Start Preparation
English 1 START PREPARATION 1A Switch the ON/OFF switch on the remote control to „ON“. The power LED on the remote control blinks and beeps once. 1B Switch the ON/OFF switch on the model to „ON“. Move the thrust control (the left joystick of the remote control) completely up once and then completely down again to unlock the remote control. -
Page 6: Changing The Propellers
The model only turns on its vertical axis or rolls over when started or does not lift off. Cause: • Incorrect arrangement of propellers. Remedy: • Install the propellers as outlined in the manual. Additional tips and tricks can be found online at www.revell-control.de. - Page 7 Français 1 PRÉPARATION AU DÉMARRAGE 1A Placer l’interrupteur ON/OFF de la télécommande sur „ON“. Le témoin d’alimentation de la radiocommande clignote et émet un bip sonore. 1B Placer l’interrupteur ON/OFF de la maquette sur „ON“. Déplacer le régulateur de poussée (levier gauche de la radiocommande) une fois complètement vers le haut, puis complètement vers le bas pour déverrouiller la radiocommande.
-
Page 8: Dépannage
Problème : La maquette ne fait plus que tourner autour de son axe vertical, culbute lors du décollage ou ne décolle pas. Cause : • Disposition incorrecte des hélices. Solution : • Installer les hélices tel que décrit dans le mode d'emploi. Vous trouverez d‘autres conseils sur notre site Internet www.revell-control.de. - Page 9 Nederlands 1 STARTVOORBEREIDING 1A Zet de ON/OFF-schakelaar van de zender op „ON“. De Power-led op de zender knippert en de zender piept eenmaal. 1B Zet de ON/OFF-schakelaar van het model op „ON“. Beweeg de regelaar voor liftkracht (de linkerknuppel op de zender) eenmaal helemaal naar boven en weer helemaal naar beneden om de zender te ontgrendelen.
- Page 10 Oorzaak: • Verkeerde rangschikking van de propellers. Oplossing: • Propellers monteren zoals beschreven in de handleiding. Op www.revell-control.de vindt u meer tips en trucs. Español 1 SECUENCIA DE ENCENDIDO 1A Coloque el interruptor ON/OFF de la emisora en la posición „ON“. El LED de estado de la...
- Page 11 1B Coloque el interruptor ON/OFF del modelo en la posición „ON“. Mueva la palanca de gas (la palanca izquierda de la emisora) una vez completamente hacia arriba y abajo para desbloquear la emisora. El modelo tarda unos segundos en inicializar el giroscopio y establecer la conexión con la emisora.
-
Page 12: Solución De Problemas
Causa: • posición incorrecta de las hélices. Solución: • monte las hélices según se describe. Encontrará más consejos en Internet en www.revell-control.de Italiano 1 PREPARAZIONE DELL‘AVVIO 1A Posizionare l’interruttore ON/OFF del radiocomando su “ON”. Il LED di alimentazione del radiocomando lampeggia ed emette un segnale acustico. - Page 13 Attenzione! Collocare il modellino necessariamente su una superficie orizzontale – il sistema elettronico di comando allinea la sua posizione di folle sul terreno! 2 FUNZIONE DI DECOLLO E ATTERRAGGIO 2A Decollo: Premere il pulsante in alto (pulsante di decollo), i motori si avviano e il modellino si erge a circa 0,5-1 m di altezza.
-
Page 14: Eliminazione Dei Guasti
Problema: Il modellino ruota solo attorno al proprio asse verticale, si capovolge durante il decollo o non si solleva. Causa: • Errata disposizione delle eliche. Soluzione: • Montare le eliche come descritto nelle istruzioni. Per ulteriori suggerimenti visitare il sito internet www.revell-control.de.
Need help?
Do you have a question about the Control Nano Quad Fun XS and is the answer not in the manual?
Questions and answers