Advertisement
Available languages
Available languages
Table of Contents
- 1 Herzlichen Glückwunsch
- 2 Allgemeine Hinweise
- 3 Anschluss- und Bedienelemente
- 4 Input Sensitivity
- 5 Highlevel Input
- 6 Optical Input
- 7 Status LED
- 8 Control Input
- 9 Anschluss an den Computer
- 10 Technische Daten
- 11 General Instructions
- 12 Line Output
- 13 Installation
- 14 Technical Data
- 15 Warranty Disclaimer
- Download this manual
Advertisement
Table of Contents

Related Manuals for HELIX DSP-3


Summary of Contents for HELIX DSP-3
- Page 1 DSP.3 Digitaler High-Res 8-Kanal Signalprozessor mit 96 kHz / 32 Bit Signalweg Digital High-Res 8-channel signal processor with 96 kHz / 32 Bit signal path...
-
Page 2: Herzlichen Glückwunsch
Verarbeitung und eine tigen HELIX-Signalprozessors. überzeugende Anwendung ausgereifter Technolo- gien aus. Audiotec Fischer setzt mit dem HELIX DSP.3 neue Maßstäbe im Bereich der Signalprozessortechnik. Viel Freude an diesem Produkt wünscht Ihnen das Dabei profitieren Sie als Kunde direkt von unserer Team von nahezu 30-jährigen Erfahrung in der Forschung und... -
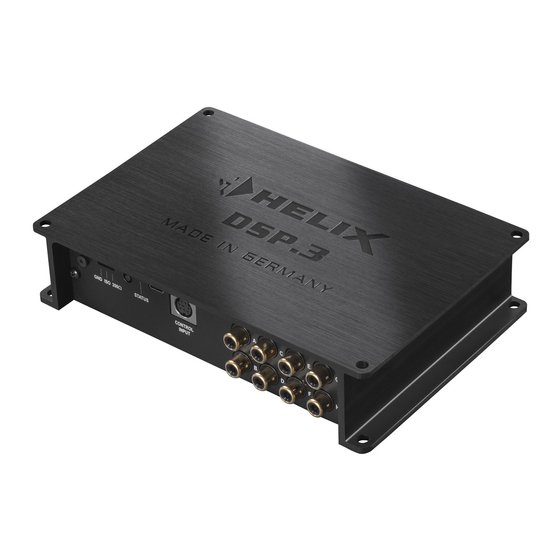
Page 3: Anschluss- Und Bedienelemente
Control Taster Anschluss einer Fernbedienung Dient zum Umschalten der Sound Setups weiterem HELIX Zubehör. oder zum Resetten des Gerätes. Line Output Status LED Vorverstärkerausgänge zum Anschluss des / Die Status LED zeigt den Betriebszustand der Verstärker/s. Zur Einschaltung eines und den ausgewählten Speicherbereich an. -
Page 4: Input Sensitivity
Inbetriebnahme und Funktionen 1 Line Input Achtung: Der Highlevel- und der Vorverstärker- 6-Kanal Vorverstärkereingang zum Anschluss von signaleingang eines einzelnen Kanals darf nicht Signalquellen, z.B. Radios. Die Eingangsempfind- gleichzeitig genutzt werden, da dies zu Schäden an lichkeit ist für alle Kanäle ab Werk auf 4 Volt ein- ihrem Autoradio führen kann. -
Page 5: Status Led
USB Eingang Sound Setups. Mit Hilfe des Control Tasters lässt sich zwischen zwei Speicherplätzen umschalten. Mit Hilfe dieses Eingangs wird der HELIX DSP.3 über Diese können im DSP PC-Tool festgelegt werden. das beiliegende Kabel mit dem Computer verbunden Hinweis: Werkseitig sind die Speicherbereiche eins und kann anschließend über das DSP PC-Tool kon-... - Page 6 Kanal den Highlevel- bedeutet, dass an den Signalausgängen des und an einem anderen Kanal den Vorverstär- HELIX DSP.3 der volle Pegel anliegt und die kersignaleingang zu verwenden. angeschlossenen Verstärker voll ausgesteuert werden. Dies kann im Extremfall die Lautspre- 2.
- Page 7 Seitenblech der Geräteseite mit dem USB- teiler angeschlossen, der mit dem Pluspol der Batterie verbunden ist. Die Stromaufnahme Eingang indem Sie die fünf Schrauben (eine des HELIX DSP.3 ist mit ca. 450 mA zwar sehr Inbus- und vier Kreuzschlitzschrauben) lösen.
- Page 8 Einbau und Installation Nun können Sie das Bodenblech aus dem 8. Konfiguration des DSPs Kühlkörper zur Seite hinausziehen und erhalten Es wird dringend empfohlen, vor der ersten so Zugriff auf den Schalter. Dieser befindet sich Inbetriebnahme die grundlegenden Einstel- lungen im DSP mit Hilfe der DSP PC-Tool in der Nähe der Highlevel-Lautsprechereingän- ge (siehe Markierung im nachfolgenden Bild).
-
Page 9: Anschluss An Den Computer
USB-Kabel an den Computer an. DSP Kanäle separat eingestellt werden. Wenn Sie längere Distanzen zu überbrücken Bevor Sie den HELIX DSP.3 das erste Mal an ei- haben, verwenden Sie bitte eine aktive USB- Verlängerung mit integriertem Repeater und nen Computer anschließen, gehen Sie auf unsere Homepage und laden die aktuellste Software Ver- kein passives USB-Kabel. - Page 10 Konfigurationshinweise für die DSP-Soundeffekte Der HELIX DSP.3 bietet einzigartige DSP-Sound- FX-Menüs die „Active Setup Link“-Funktion effekte wie das „Augmented Bass Processing“, den durch Setzen eines Hakens. „StageXpander“, den „RealCenter“ und noch mehr. Um in den Genuss der DSP-Soundeffekte zu kom- men, müssen bei der Hard- und Softwarekonfigu-...
- Page 11 Diese zwei Speicherplätze können in der „URC Setup Switch Configuration“ festgelegt wer- den. Werkseitig sind die Speicherbereiche eins und zwei ausgewählt. Um zwischen allen internen Spei- cherplätzen umschalten zu können, wird die optional erhältliche Display-Fernbedienung DIRECTOR oder die HELIX WIFI CONTROL empfohlen.
- Page 12 Einbau einer HELIX Extension Card Der HELIX DSP.3 kann durch die Montage einer 6. Achten Sie auf den richtigen Sitz des HEC Mo- HELIX Extension Card (HEC) um weitere Funk- duls und darauf, dass alle Kontaktstifte vollstän- tionen erweitert werden – beispielsweise um eine dig im Sockel stecken.
- Page 13 Spezielle Features des HELIX DSP.3 96 kHz Abtastrate Start-Stopfähigkeit Der HELIX DSP.3 bietet eine Signalverarbeitung Das Netzteil im HELIX DSP.3 stellt die interne Spannungsversorgung auch bei kurzfristigen Ein- mit einer doppelten Abtastrate von 96 kHz. Dadurch brüchen bis hinab zu 6 Volt sicher.
-
Page 14: Technische Daten
Technische Daten Eingänge ................. 6 x Cinch 6 x Hochpegel-Lautsprechereingang 1 x Optisch SPDIF-Format (12 - 96 kHz) 1 x Remote In Eingangsempfindlichkeit ..........Cinch 2 - 4 Volt Hochpegel 5 - 11 Volt Ausgänge ................ 8 x Cinch 1 x Remote Out Ausgangsspannung ............6 Volt Frequenzbereich..............10 Hz - 44.000 Hz DSP Auflösung ..............64 Bit... -
Page 15: General Instructions
Use only the provided connectors for connec- uct installed by an authorized HELIX dealer. tion of the HELIX DSP.3. The use of other con- Install your HELIX DSP.3 in a dry location with suf- nectors or cables can result in damage of the... - Page 16 Ground lift switch USB input Can be used to define the connection Connects the HELIX DSP.3 to your PC. between the power ground and signal ground of the inputs and outputs. Control Input Multifunction interface for e.g. an optional Control pushbutton remote control or other HELIX accessory.
- Page 17 Attention: Solely use the pluggable screw-terminal 4 Highlevel Input which is included in delivery to connect the HELIX 6-channel highlevel loudspeaker input to connect DSP.3 to the power supply! Important: Never use a different signal than the...
-
Page 18: Line Output
The output voltage is 6 Volts max. Please Attention: After erasing the setups from memo- make sure that you always turn on / off external am- ry the HELIX DSP.3 will not reproduce any audio plifiers using the remote output of the signal proces- output. -
Page 19: Installation
Keep in mind that this cause severe damage to the lowlevel line out- will lead to full level on the outputs of the HELIX puts of your head unit / car radio. Nevertheless DSP.3 and your connected amplifiers. This may it is possible to use the Highlevel Input of one cause severe damage to your speakers. - Page 20 (see marking in the Solely use the included screw-type terminal following picture). to connect the HELIX DSP.3 to a power sup- ply. Make sure of correct polarity. The ground wire must be connected to the vehicle chassis at a non-insulated point.
- Page 21 Connection to a PC 2. Connect the signal processor to your computer It is possible to freely configure the HELIX DSP.3 using the USB cable that is included in delivery. with our DSP PC-Tool software.
- Page 22 Configuration notes for the DSP sound effects The HELIX DSP.3 offers unique DSP sound effects like “Augmented Bass Processing”, “ StageXpander”, “RealCenter” and many more. In order to enjoy the DSP sound effects, specific set- tings have to be made in the hardware and software 5.
- Page 23 Notes for Augmented Bass Processing with 4. Now switch to the FX menu and activate the de- its functions Dynamic Bass Enhancement and sired sound effect by placing a tick. SubXpander There are as well some adjustments necessary if the Augmented Bass Processing and its sound ef- fects shall be used.
- Page 24 “URC Setup Switch Configuration”. The memory locations one and two are preassigned ex works. To switch between all internal memory locations, the optionally available DIRECTOR display remote control or the HELIX WIFI CONTROL is recommended.
- Page 25 Streaming module, an additional optical digital in- put, an AUX input or an USB audio input. To install a HELIX Extension Card it is necessary to remove the side panel of the DSP.3 and replace it by the new side panel that comes with the HEC module.
- Page 26 Unique features of the HELIX DSP.3 96 kHz sampling rate Power Save Mode The HELIX DSP.3 allows to handle all signals with The Power Save Mode is incorporated in the basic the doubled sampling rate of 96 kHz. Thus the au- setup.
-
Page 27: Technical Data
Technical Data Inputs ................6 x RCA / Cinch 6 x Highlevel speaker input 1 x Optical SPDIF (12 - 96 kHz) 1 x Remote In Input sensitivity ..............RCA / Cinch 2 - 4 Volts Highlevel 5 - 11 Volts Outputs ................ - Page 28 Audiotec Fischer GmbH Hünegräben 26 · 57392 Schmallenberg · Germany Tel.: +49 2972 9788 0 · Fax: +49 2972 9788 88 E-mail: helix@audiotec-fischer.com · Internet: www.audiotec-fischer.com...
Need help?
Do you have a question about the DSP-3 and is the answer not in the manual?
Questions and answers