Advertisement
Tuscan Gas Fire Table
Model No. 085-1571-2
Design certified under ANS
Z21.97 - CSA 2.41-(2014)
Requirements for Outdoor Gas
Fireplaces
Assembly Instructions
Toll-free: 1-877-483-6759
IMPORTANT: Please read this manual carefully before beginning assembly of this product.
Keep this manual for future reference.
DANGER
If you smell gas:
1. Shut off gas to the appliance.
2. Extinguish any open flame.
3. If odour continues, keep away from
the appliance and immediately call
your gas supplier or fire department.
WARNING
Do not store or use gasoline or other
flammable vapours and liquids in the
vicinity of this or any other appliance.
An LP-cylinder not connected for use
shall not be stored in the vicinity of
this or any other appliance. If you
are assembling this unit for someone
else, give this manual to him or her to
read and save for the future.
WARNING
For outdoor use only.
This appliance can produce carbon monoxide
which has no odour.
Using it in an enclosed space can kill you.
Never use this appliance in an enclosed space
such as a camper, tent, car or home.
Advertisement
Table of Contents

Related Manuals for for Living Tuscan 085-1571-2


Summary of Contents for for Living Tuscan 085-1571-2
-
Page 1: Assembly Instructions
Tuscan Gas Fire Table Model No. 085-1571-2 DANGER If you smell gas: 1. Shut off gas to the appliance. 2. Extinguish any open flame. 3. If odour continues, keep away from the appliance and immediately call your gas supplier or fire department. WARNING Do not store or use gasoline or other flammable vapours and liquids in the... - Page 2 Imported by Trileaf Distribution Trifeuil Toronto, Canada M4S 2B8 | Made in China...
-
Page 3: Important Safety Instructions
Important Safety Instructions Parts List Assembly Operation Cleaning and Maintenance Technical Specifications Warranty Warning! Please read and understand this entire manual before attempting to assemble, operate or install the product. Failure to follow the dangers, warnings and cautions contained in this instruction manual may result in a fire or explosion causing damage to property, serious bodily injury or death. - Page 4 Model No. 085-1571-2 gas tank may be hazardous and should be checked by your gas supplier prior to use. • Do not burn any other materials than are supplied with and intended for use in this fireplace. • Pumice stones could hit somebody’s face or eyes during initial start of this unit, so please keep away from the fireplace for the first 20 minutes after it has been ignited.
- Page 5 • Inspect the hose before each use of this fireplace. If the hose shows signs of cracks, abrasion, cuts or damage, do not use this fireplace. Fix the hose as required before using appliace. • Remove the hose out of pathways where it may be tripped over or subject to accidental damage. •...
-
Page 6: Table Of Contents
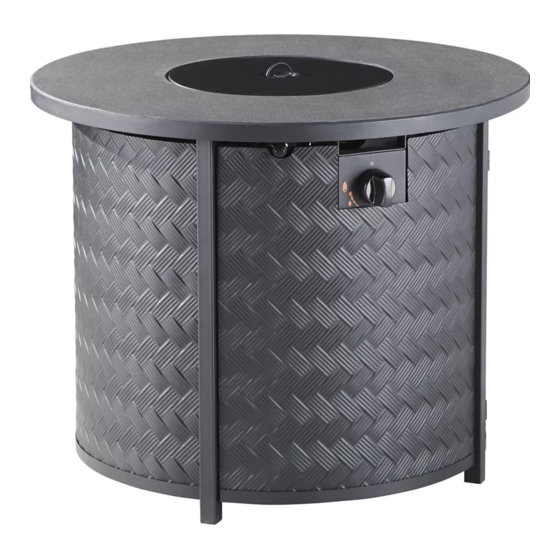
Model No. 085-1571-2 Lid - 1 Lava Rocks - 1 box Tabletop - 1 Metal Stand - 1 M6 x 10 Screw - 20 Side Panel - 2 M6 x 20 Screw - 4 Door - 1 Front Panel - 1 M6 x 10 Screw - 1 Right Front Leg - 1 M6 Washer - 1... -
Page 7: Requires
Let us help you! DO NOT RETURN YOUR PRODUCT TO THE STORE. CALL US FIRST! 1-877-483-6759 If you have questions regarding your product, require warranty assistance, or have damaged or missing parts, please call our customer service toll-free helpline. Contact us for assistance; we’re here to help. IMPORTANT: Please read and understand this manual before any assembly. -
Page 8: Step
Model No. 085-1571-2 Step 1 Requires 2 Unpack and identify all parts using the parts list provided. Check each part before using the product. Make sure the gas supply system is turned “OFF” before assembling. Step 2 Requires 6, 7, 8, 11, B Attach right front leg 6, right back leg 7 and both left legs 8 to the metal stand 11 using four M6 x 20 screws B and four nuts F. - Page 9 Step 3 Requires 3, 5, A Attach the two side panels 3 and front panel 5 to the legs using twelve M6 x 10 screws A. Step 4 Requires 2, A Attach steel base to the bottom part of the tabletop 2 using eight M6 x 10 screws A.
- Page 10 Model No. 085-1571-2 Step 5 Requires 4, 6, C, D, E Insert the door 4 to the right front leg 6 and attach door knob E to the door using one M6 x 10 screw C and washer D. Step 6 Attach hose regulator tightly to the bracket on the inside of the table body.
- Page 11 Step 7 Requires 11 Place propane gas tank (not included) into the metal stand 11. Make sure the gas tank sits on the metal stand 11 completely. Turn the preassembled wing screw on the outer part of metal stand 11 clockwise to secure the propane gas tank tightly.
- Page 12 Model No. 085-1571-2 Step 9 Requires 9 Remove the rubber cap on the electronic igniter by unscrewing and slide battery 9 into the battery slot. Make sure the positive side of the battery faces outwards. Screw the electronic igniter cap over the battery tightly.
- Page 13 Before performing a leak test, be sure that no sparks can occur and you are in a spacious outdoor area. Connect the propane gas tank to the regulator and turn the valve on the unit to the “OFF” position. Brush a soap and water mixture on all connections. Turn the gas supply on; if bubbles occur on any connection there may be a leak.
- Page 14 Product weight 26.8 kg This For Living product carries a one (1) year warranty against defects in workmanship and materials. Trileaf Distribution agrees to replace the defective product free of charge within the stated warranty period, when returned by the original purchaser with proof of purchase. This product is not guaranteed against wear...
Need help?
Do you have a question about the Tuscan 085-1571-2 and is the answer not in the manual?
Questions and answers