Table of Contents
Advertisement
QuanzhouLANCHONLH Electronics Co., Ltd.
Add: TangfangMiddle Road, BeifengSubdistrict Office,
Fengze District, Quanzhou
City
Mobile:
13799506783
:
www.qzlcdz.com
QQ: 2186719536
HG-UV98
HG-UV98
NOCALL-8
S
VOX
CTC R
W
+
APRS
145.025
CH
00
128
H
双段
双段
VOX
CCS R
N -
国内首款
国内首款
439.700
CH
00
128
L
确定
取消
APRS
APRS
专业对讲机
专业对讲机
Advertisement
Table of Contents

Subscribe to Our Youtube Channel
Summary of Contents for LANCHONLH HG-UV98
- Page 1 HG-UV98 HG-UV98 NOCALL-8 CTC R APRS 145.025 QuanzhouLANCHONLH Electronics Co., Ltd. APRS APRS 双段 双段 CCS R 国内首款 国内首款 专业对讲机 专业对讲机 439.700 Add: TangfangMiddle Road, BeifengSubdistrict Office, Fengze District, Quanzhou City 确定 取消 Mobile: 13799506783 www.qzlcdz.com QQ: 2186719536...
- Page 2 Caring tips from Fujian Provincial Bureau of Information Industry (Fujian Radio Management Office): The purchase and use of this device belong to the setup and use behavior of a radio (station) and DISTRIBUTOR: must go through relevant approval formalities for the setup of radio station and get a radio license. During use, users are supposed to work as approved by the radio license. Wuxi Venus Information Technology Co., Ltd Administrative penalties shall be imposed on the setup of a radio (station) without authorization, https://ba4tb.qth.com interference with radio business, not working as approved by the radio license and other behaviors against radio regulations. Severe radio illegal behaviors may also violate Article 288 of “Criminal Law” or Article 28 of “Law of the PRC on Penalties for Administration of Public Security” and be sentenced to less than 3 years of imprisonment, detention or public surveillance, concurrently or independently sentenced to a fine as criminal punishment or detention by a public security organ as administrative penalty. WARNING ! >>Explosive environment (gas, dust and smoke, etc.) >>Please turn off the walkie-talkiewhen refueling or parking at a gas station....
- Page 3 CAUTION TABLE OF CONTENTS Unboxing and Device Inspection.......................................................................................01 walkie-talkie is a product with excellent design and advanced technology. The following recommendations will help you fulfillyour obligations under warranty terms, learn and understand the Installation before Use.......................................................................................................02 safety of the use of walkie-talkies. Get Familiar with This Machine...................................................................................03-07 1. Please put the walkie-talkie and all the components and accessories out of reach of children. .................................................................................................................03 I. Functions and Features 2. Don’t try to disassemble the walkie-talkie. The processing by a non-professional person may damage it. ...............................................................................................................04 II. Technical Specifications 3. Please use a battery pack and charger made by our company, in case that the walkie-talkie is damaged. ..........................................................................................................................05-07 4. Please use an antenna made by our company, in case that the range is shortened. III. Structure ...........................................................................................................................08-09 5. Don’t expose the walkie-talkie to sunlight or put it in a hot place for a long time. I. Shortcuts 6. Don’t put the walkie-talkie in adusty or damp place. ...............................................................................................................08-09 Common Operations 7. Don’t clean the walkie-talkie with strongchemicals, detergents or strong detergents. .................................................................... 09 II. This machine has a total of 8 menus (see Figure 3 for details) 8. Don’t transmit without an antenna. .............................................................................................................10-15 How to Operate Menus 9. If the walkie-talkieemits an odor or smoke, please turn it off immediately, remove the battery pack and .................................................................................................15-29 contact your dealer. Backlight Timeout (ABR)- Menu 1 ..............................................................................................15 Battery Saver (SAVE)- Menu 2................... Notice .........................................................................................................15 Step Frequency (STEP)- Menu 3 >>All of the above recommendations are equally applicable to walkie-talkieand its accessories.If they don’t work properly, ......................................................................................................16...
- Page 4 TABLE OF CONTENTS TABLE OF CONTENTS ...................................................................................................16 ....................................................................................................21 Repeater Shift Direction (SFT-D)- Menu 6 Busy Channel Lockout (BCL) ̄Menu 23 .....................................................................................................................16 ........................................................................................................22 Time Out Timer (TOT)- Menu 24 VOX-GRD- Menu 7............. ........................................................................................................22 ..................................................................................................................17 Time Out Alarm (TOA)- Menu 25 Squelch Level (SQL)- Menu 8 .......................................................................................................22 ..................................................................................................................17 VOX Delay (VOX-DLY)- Menu 26 Roger Beep (ROGER)- Menu 9 .........................................................................................................23 .........................................................................................................18 Scan Mode (SC-REV)- Menu 27 Operation Mode (CH-MDF)- Menu 10 .....................................................................................................23 ................................................................................................................18 Lock Mode (LOCKMODE)- Menu 28 Channel Mode (V/M)- Menu 11 ......................................................................................................23 Auto Lock (AUTOLOCK)- Menu 29 ...........................................................................................................18 CDCSS Encode (TX-DCS)- Menu 12 .................................................................................................24 Single-tone Setting (TONE)- Menu 30 ...........................................................................................................18 CTCSS Encode (TX-CTC)- Menu 13 ...............................................................................................24 PF1 Short Press (PF1-SHORT)- Menu 31 ...........................................................................................................19 CDCSS Decode (RX-DCS)- Menu 14 .................................................................................................25 PF1 Long Press (PF1-LONG)- Menu 32 ...........................................................................................................19...
- Page 5 TABLE OF CONTENTS TABLE OF CONTENTS ...........................................................................................................28 .........................................................................................................................39 Battery Voltage (V-BAT)- Menu 40 Fixed Site- Menu 7 .............................................................................................................28 ....................................................................................................................39 CTCSS Scan (CT-SCN)- Menu 41 Fixed Latitude- Menu 8. ...........................................................................................................28 ..................................................................................................................39 CDCSS Scan (DCS-SCN)- Menu 42 Fixed Longitude- Menu 9 ............................................................................................................28 BEACON SETUP.............................................................................................................40-43 CSS Save Type (SC-QT)- Menu 43 ........................................................................................................29 ..............................................................................................................................40 Scan and Add (SCAN-ADD)- Menu 44 CALL- Menu 1 ..........................................................................................................29 ..............................................................................................................................40 Priority Channel (PRI-CH)- Menu 45 SSID- Menu 2 ............................................................................................................29 ..............................................................................................................40 Priority Scan (PRI-SCN)- Menu 46 SSID Symbol Table- Menu 3 ....................................................................................................................29 ........................................................................................................................40 Initialize (RESET)- Menu 47 Comment- Menu 4 Detailed Description of Some Functions........................................................................30-33 .........................................................................................................................41 SYMBOL- Menu 5 Technical Parameters (CTCSS/CDCSS)..........................................................................34-37 ..................................................................................................................41 MIC-E ON/OFF- Menu 6 ......................................................................................................................41 GPS SETUP.........................................................................................................................38-39...
- Page 6 TABLE OF CONTENTS TABLE OF CONTENTS ......................................................................................................................43 Pressure Report- Menu 14 ....................................................................................................................46 Remote Password- Menu 7 ...........................................................................................................................43 BLUETOOTH SETUP.................................................................................................................47 TX Pressure- Menu 15 ............................................................................................................................43 TX Mileage- Menu 16 ........................................................................................................................47 DATA OUTPUT- Menu 1 BEACON MODE....................................................................................................................43-45 ..........................................................................................................................47 GPS OUTPUT- Menu 2 ...............................................................................................................................43 PTT After- Menu 1. ............................................................................................................................47 BT POWER- Menu 3 ...........................................................................................................................44 VERSION.............................................................................................................................47-48 Smart Mode- Menu 2 ............................................................................................................................44 Time Mode- Menu 3 ....................................................................................................................47 Hardware Version- Menu 1 ..........................................................................................................................44 .........................................................................................................................48 Time Interval- Menu 4 Local Version- Menu 2 ..........................................................................................................................44 ........................................................................................................................48 Queue Mode- Menu 5 APRS Version- Menu 3 ........................................................................................................................45 ADVANCED SETUP...........................................................................................................48-51 Queue Interval- Menu 6 DIGI SETUP.........................................................................................................................45-46 ..........................................................................................................................48 APRSRXCH- Menu 1...
- Page 7 TABLE OF CONTENTS Unboxing and Device Inspection ...................................................................................................................50 Please carefully remove your walkie-talkie from the package box. We suggest that you confirm whether items Mileage Memory- Menu 8 ........................................................................................................................50 listed in the following table are availablein the box before discarding the packagingmaterials. If any items are lost CH A MUTE- Menu 9 .......................................................................................................................50 or damaged during handling, please check with your dealer. CH B MUTE- Menu 10 .......................................................................................................................50 RX-TONEO- Menu 11 List of Accessories .......................................................................................................................50 TX-TONEO- Menu 12 ........................................................................................................................51 RX POPUP- Menu 13 .........................................................................................................................51 List Clean- Menu 14 ..................................................................................................................51 Factory Setting- Menu 15 Detailed Description of APRS Functions ......................................................................52-69 Instructions on How to Query a Track on the Computer ..................................................70 Description about the Firmware Upgrade of APRS ....................................................71-71 Walkie-talkie High-gain antenna Polymer battery pack AC adapter Description about the Firmware Upgrade of the Walkie-talkie .................................73-75 Optional Accessories............................................................................................................76 Troubleshooting....................................................................................................................77 Statement..............................................................................................................................78 Belt clip Hand strap...
- Page 8 Installation before Use Get Familiar with This Machine I. Functions and Features Install/remove the battery pack 15. Support the setting and memory of various APRS parameters 1. Suitable for frequenciesin different countries and regions 16. Support the storage and export of beacons Standard frequencies CAUTION ! 17. Support firmware upgrade Area A: Area B: 18. Day/night mode >>Thebattery pack is featured with short-circuitprotection.When short circuit occurs, please activate it using TX:136-174MHz(FM) TX:136-174MHz(FM) the attached charger before use. 19. The editing and displayof channel names in Chinese or English 400-470MHz(FM) 400-470MHz(FM) (to be edited in the supporting >> Don’t short-connect the battery terminals or put the battery into fire. 2. UHF/VHFdual-frequency, dual-display and dual-reception 20. 50 CTCSS codes, 210CDCSS codes >> Don’t try to take downthe case from the battery pack. 3. TFT large screen 21. Multiple scanning modes 1 Insert the top of the battery pack into the top of the back of the walkie-talkie and fit the battery pack into the 4. High power: UHF:4W VHF:5W, low power: UHF/VHF:1W 22. VOX (Voice Activated Transmit) bottom of the walkie-talkie until the battery pack latch is locked(see Figure 1 for details). 5. Chinese/English menus, Chinese/English voice prompts 23. Customside keys 2 To remove the battery pack, pull up the latch at bottom of the battery pack, until the latchis entirely disengaged 6. Complete APRS beaconreception and transmission 24. Multiple single-tone pulses(1750HZ, 2100HZ, 1000HZ and from the walkie-talkie. Remove the battery pack normally (see Figure 2 for details). 7. Support multiple satellite systems, GPS/ BeiDou /GLONASS/automatic recognition 1450HZ) 8. Support the complete display of GPS information 25. Multiple keyboard lockoutmethods 9. Support the reporting of temperature, atmospheric pressure and battery voltage 26. Wideband and narrowband...
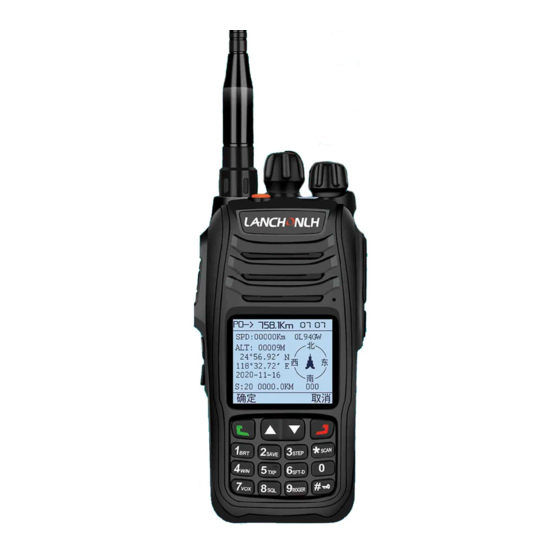
- Page 9 Get Familiar with This Machine Get Familiar with This Machine II. Technical Specifications III. Structure Screen: Overall Receiver Wideband Narrowband Adjacent Area A: Area B: Channel ≤70dB ≤60dB On the screen, various indicators that represent the selected content can be seen. Selectivity Intermodula ≤65dB ≤60dB TX:136-174MHz(FM) TX:136-174MHz(FM) Frequency tion NOCALL-8 Spurious ≤70dB ≤70dB Match Response CTC R APRS 400-470MHz(FM) 400-470MHz(FM) +1~3dB +1~3dB 145.025 Audio Response (0.3~3KHz)
- Page 10 Get Familiar with This Machine Get Familiar with This Machine Antenna Encoder Power and Volume Top Key Tx Indicator (Red) Rx Indicator (Green) HeadphoneJack Loudspeaker Area Push-to-talk (PTT) (MIC) Side Key PF1 Screen Side Key PF2 EXIT/VFO/MR Function Key/OKKey Reverse Frequency/Scan Charging Port Numeric Keys Charging Indicator Find Beacon/Lock Up and Down Keys Lamp 1. Short/long press of Side Key PF1: backlight, scan, squelch, flashlight and AB key 2. Short/long press of Side Key PF2: send beacon, find beacon,flashlight and backlight 6 7 3. Short/long press of Top Key: on-spot alarm, remote alarm and flashlight...
- Page 11 Common Operations Common Operations (4) [ ] key I. Shortcuts In the wait state: Short press: start or stop reverse frequency (1) Master frequencyswitch Long press: long press for 2 seconds to start scanning When the walkie-talkie leaves the factory, the default short-press function of Side Key PF1 is AB key (master frequency switch key). (5) [ # ] key Ticklethe Side Key PF1 to change the master frequency once. The region to which the master frequency arrow is In the wait state: directed is the operation region. Short press:{#} once, to switch between {GPS Interface}{Beacon List} and{Real-time Beacon}. For example, if the master frequency arrow is directed to Area A, when [PTT] is pressed, signals will be Long press :{#} to lock the keyboard (6) The use of a smart AC adapter transmittedaccording to the frequency or channel parameters set for Area A. When the power is low, the walkie-talkie will give a “low power”voice reminder and send a “low power”voice For example, when the master frequency arrowis directed to Area A,When Function Key [ ] is pressed, the reminderevery 30 seconds. change of parameters is targeted at Area A. 1. When the battery pack is connected to an AC adapter, the red light willstay solid on, indicating that the walkie-talkie is being (2) Quick search charged. When the green light stays solid on, it means that the charging has been completed. II. This machine has a total of 8 menus (see Figure 3 for details) When setting various functions or functional parameters, various parameterscan be searchedup or down quickly, by pressing△ or▽ once. 1. LOCAL SETUP 6. BLUETOOTH SETUP (3)ESC/VFO/MR 2. GPS SETUP 7. VERSION Short press [ ] to return or Esc.Long press [ ] for 2 seconds to switch between operation modes (frequency mode and channel 3. BEACON SETUP 8. ADVANCED SETUP mode). 4. BEACON TYPE The channel mode can be set using “Menu 10: Operation mode”. Detailed operation: See p.30 {Channel Memory} for details. 5. RELAY SETUP Figure 3...
- Page 12 How to Operate Menus How to Operate Menus Function Function Enter Function Screen Select Optional OK Return to the press ▲/▼ OFF/Squelch squelch level 8 to select SQL Levels 1-9 No. Name Settings Display Parameters Parameters Standby State 5 parameters press ▲/▼ backlight press ▲/▼ 1 timeout to select OFF/05-150秒 ABR OFF/BOT/EOT Roger Beep 9 ROGER to select ...
- Page 13 How to Operate Menus How to Operate Menus press ▲/▼ menu language Chinese/English 18 MENULANG to select Chinese press ▲/▼ keyboard/keyboard parameters lock mode +encoder/keyboard 28 LOCKMODE to select press ▲/▼ keyboard +encoder+PTT voice switch parameters ON/OFF 19 VOICE to select press ▲/▼ OFF parameters 1.turn on auto lock; auto lock 29 AUTOLOCK to select ...
- Page 14 How to Operate Menus Description of local settings press ▲/▼ press ▲/▼ channel priority scan 37 MEN-CH 125 channels 46 to select ON/OFF to select PRI-SCN memory OFF parameters parameters CH-128 press ▲/▼ press ▲/▼ channel 125 channels 38 to select initialize DEL-CH 47 RESET to select VFO/ALL deletion VFO...
- Page 15 Description of local settings Description of local settings Bandwidth Setting (W/N)-Menu 4 Function: By default, this menus is used for transmission and reception, to set thewalkie-talkie to work in By using VOX, there is no need to press [PTT]manually in every transmission. Once the VOX circuit detects that you widebandFM(25K) mode, or narrowbandFM(12.5K)mode speak into the microphone, the walkie-talkie will enter thetransmission stateautomatically. When using VOX, please Option: Wideband/narrowband select VOX gain properly. The higher gain, the louder you need to speak, so that the VOX circuit can detect and enter Default: Wideband thetransmission state. To ensure the continuity of VOX detection, you can also set up Menu 26[VOX-DLY]. Tx Power(TXP)-Menu 5 Option: Levels 1-9 Function: To select the output power of the walkie-talkie Default: OFF Option: High or low. UHF H:4W,L:1W Special Tips VHF H:5W,L:1W >>VOX function is onlyvalid for master frequency. >> VOXcan only be used for FMBands A/B. Default: High power Squelch Level (SQL)-Menu 8 Function: The purpose of squelch is to mute the speaker when there is no signal.If the squelch level is correctlyset, Function: To set whether the transmittingfrequencyis higher than (+) or lower than (-) the receiving frequency the sound will only be heardwhen a signal is actually received.The higher squelch level, the stronger the signal has Option: OFF/+/- to be in order to be received. Default: OFF Option: Levels 1-9 注:在信道模式下不能设置。 16 17 Default: 5...
- Page 16 Description of local settings Description of local settings Roger Beep(ROGER)-Menu 9 CTCSS Encode (TX-CTC)-Menu 13 The roger beep is used as a single tone for the transmission and end oftransmission of the walkie-talkiewhen PTT is pressed. Function: To transmitCTCSS. Option: OFF/BOT/EOT/BOTH Option: OFF/50 standard CTCSS codes Default: OFF Default: OFF Operation Mode (CH-MDF)-Menu 10 CDCSS Decode(RX-DCS)-Menu 14 Option: Channel display/frequency display Function: To receive CDCSS Default: Frequency display Option: OFF/105 standard CDCSS codes Channel Mode (V/M)-Menu 11 Default: OFF.Note: Decode is invalid in APRS mode. Option: Frequency+channel number/channel number/channel name CTCSS Decode(RX-CTC)-Menu 15 Default: Channel name Function: To receiveCTCSS CDCSS Encode (TX-DCS)-Menu 12 Option: OFF/50 standard CTCSS codes Function: To transmit CDCSS Default: OFF.Note: Decode is invalid in APRS mode. Option: OFF/105 standard CDCSS codes Default: OFF 18 19...
- Page 17 Description of local settings Description of local settings Function: To turn on or off the prompt tone for menu operation. Single-display(TDR)-Menu 16 Option: ON/OFF Option: Single-band/dual-band Default: ON Default: Dual-band BeepSwitch(BEEP)-Menu 20 Offset Frequency(OFFSET)-Menu 17 Function: The beep is a prompt tone to identify operation tips, errors or troubles of the walkie-talkie Function: To set offset frequency Option: ON/OFF Option: Optional from0 to 69.99500MHz Default: ON Default: 00.00000 Display Mode (DIS-MODE)-Menu 21 注:在信道模式下不能设置。 Option: Day/night Menu Language (MENULANGE)-Menu 18 Default: Day Function: To select the language for menu display and voice prompt Backlight Level (ABR-LV)-Menu 22 Option: Chinese/ English Option: Optional between 1 ̄10 Default: Chinese Default: 10 Voice Switch(VOICE)-Menu 19 20 21...
- Page 18 Description of local settings Description of local settings Busy Channel Lockout(BCL) ̄Menu 23 VOX Delay (VOX-DLY)-Menu 26 Function:If the selected channel or frequency is being occupied by another channel or frequency, once enabled, this function can Function: VOX-DLY refers to the delayedrelease of PTT after VOX is activated, when VOX is ON. prevent conflicts with other radio stations that are in communication. At this moment, the walkie-talkie cannot transmit, even if PTT is Option: 1-10S pressed. Default: 1S Option: ON/OFF Scan Mode (SC-REV)-Menu 27 Default: OFF Time Out Timer (TOT)-Menu 24 Function: To choose a scan mode TOT refers to the time limit for each transmission. When the transmission time reaches apre-set time, the transmission Option: TO/CO/SE will stop automatically, whether you hold PTT or not. Meanwhile, the walkie-talkie will send a [TOT] voice prompt. Default: SE Option: 15-900S, with a15S step Note: Default: 90S TO:To continue scanning if no operation is input within 5 seconds, after a carrier signal is scanned. Time out Alarm (TOA)-Menu 25 CO: To stop scanning after a carrier signal is scanned and continue scanning3 seconds after the carrier signal Function: TOA refers to an alarm before a transmission timeout is reached. At this moment, a prompt tone will be given. disappears. Option: OFF/1-10S, with a 1S step SE: To stop scanning after a carrier signal is scanned. Default: OFF Lock Mode (LOCKMODE)-Menu 28 22 23...
- Page 19 Description of local settings Description of local settings Function: Long press # key for 1 second to lock or unlock the keyboard in the wait state PF1Short Press(PF1-SHORT)-Menu 31 Option: Keyboard/keyboard+encoder/keyboard+encoder+PTT Function:To define the short press function of Side Key PF1. Default: Keyboard Option: Backlight/scan/squelch/flashlight/ master frequency Special Tips: Default: Master frequency If “keyboard” is selected, only the key area will be locked. Scan: Short press to turn on/off scan If “keyboard+encoder” is selected, the key area and the encoder will be locked. Squelch: Short press to turn on/off squelch If “keyboard+encoder+PTT” is selected, all of the above keys will be locked. Master frequency: Short press to switch between Bands A and B Auto Lock (AUTOLOCK)-Menu 29 Flashlight: Turn on/off the flashlight Function: When “AUTOLOCK” is activated, the system will lock the keyboardautomatically15S after the keyboardstops operating. PF1Long Press(PF1-LONG)-Menu 32 Option: Auto/manual Default: Manual Function: To define the long press function of Side Key PF1. Option: Backlight/scan/squelch/flashlight/ master frequency Single-tone Setting (TONE)- Menu 30 Default: Squelch Function: Toset the single-tone pulse frequency required for transmission (mainly used to start the relay) Scan: Short press to turn on/off scan Option: 1000HZ,1450HZ,1750HZ and 2100HZ Squelch: Short press to turn on/off squelch Default: 1750HZ 24 25...
- Page 20 Description of local settings Description of local settings Default: Flashlight Master frequency: Short press to switch between Bands A and B Flashlight: Turn on/off the flashlight Flashlight: Turn on/off the flashlight Emergency Alarm: When this key is pressed, the master frequency will start transmitting, and the loudspeaker will give an PF2Short Press(PF2-SHORT)-Menu 33 alarm. TOPLong Press(TOP-LONG)-Menu 36 Function: To define the short press function of Side Key PF2. Function: To define the long press function of Top Key. Option: Send beacon/find beacon/flashlight/backlight Option: On-spot alarm/remote alarm/flashlight Default: Send beacon Default: Remote alarm PF2Long Press(PF2-LONG)-Menu 34 Flashlight: Turn on/off flashlight Emergency Alarm: When this key is pressed, the master frequency will start transmitting, and the loudspeaker will give an alarm. Function: To define the long press function of Side Key PF2. Channel Memory (MEM-CH)-Menu 37 Option: Send beacon/find beacon/flashlight/backlight Default: Find beacon Function: To store a required frequencyto a specified channel TOPShort Press(TOP-SHORT)-Menu 35 Option: A total of 128 channels Channel Deletion (DEL-CH)- Menu 38 Function: To define the short press function of Top Key. Function: To delete a useless channel Option: On-spot alarm/remote alarm/flashlight Option: A total of 128 channels 26 27...
- Page 21 Description of local settings Description of local settings Repeater Echo(RPT-RCT)-Menu 39 Option: Decode/encode/encode, decode Function: Repeater echo refers to an acknowledgement tone of off-line received when the repeater goes offline after it relays and transfers a signal. Default: Decode Option: ON/OFF Scan and Add (SCAN-ADD)-Menu 44 Default: OFF Function: To set whether the selected channel is involved in channel scanning. Battery Voltage (V-BAT)-Menu 40 Option: ON/OFF Default: ON Function: To query the current voltage of the battery. CTCSS Scan (CT-SCN)-Menu 41 Priority Channel(PRI-CH)-Menu 45 Function: To choose to scan CTCSS Option: 128 channels Priority Scan(PRI-SCN)-Menu 46 Option: 1: save; 0: not save CDCSS Scan(DCS-SCN)-Menu 42 Option: ON/OFF Default: OFF Function: To choose to scan CDCSS Initialize(RESET)-Menu 47 Option: 1: save; 0: not save Function: To initialize the menu functions of [VFO] and initialize [ALL] CSS Save Type (SC-QT)- Menu 43 Option: VFO/ALL Function: To choose the save type for scanned CSS in frequency mode Default: VFO 28 29...
- Page 22 Detailed Description of Some Functions Detailed Description of Some Functions I. Channel Memory: Example 2: To store channels with different frequencies (the receiving and transmittingfrequencies are different) When the current operation mode is channel mode, all parameters except the channel name will be copied to all stored channels. For example, to set Channel [18], the receiving frequency is 450.525MHz, the transmitting frequency is 460.525MHz When the current operation mode is frequency mode, different offset frequencies, offset directions and other frequency parameters can be and the transmittingCSS is 67Hz. setand then the channels can be stored. In doing so, channels with the same band but different frequencies, or channels with different bands and Step 1: Input [4], [5], [0], [5], [2] and [5] successively under VFO (frequency mode). different frequenciescan be set. Step 2: Press [FunctionKey], enter [LOCAL SETUP], select “Menu 6 Repeater Shift Direction”, press [Function Key] Example1: To store channels with the same frequency (the receiving and transmittingfrequencies are the same) For example,to set Channel [10], both the receiving and transmittingfrequencies are 450.525MHz. The receivingCSS is 67Hz and the to enter settings, select“+”, press [Function Key]to confirm and press [Esc] to return to the wait interface. transmittingCSS is DN023. Step 3: Press [Function Key], enter [LOCAL SETUP], select“Menu 17 Offset Frequency”, press [Function Key] to Step 1: Input [4], [5], [0], [5], [2] and [5] successively under VFO (frequency mode). enter settings and input [1] [0] [0] [0] [0] and [0] successively. Press [Function Key] to confirm and press [Esc] to return Step 2: Press [FunctionKey], enter [LOCAL SETUP], select “Menu 15 CTCSS Decode”, press [Function Key]to enter settings, select to the wait interface. “67.0Hz”, press [Function Key]to confirm and press [Esc] to return to the wait interface. Step 4: Press [Function Key], enter [LOCAL SETUP], select“Menu 13 CTCSS Encode”, press [Function Key] to Step 3: Press [Function Key], enter [LOCAL SETUP], select“Menu 12 CDCSS Encode”, press [Function Key] to enter settings, select enter settings, select“67.0Hz”, press [Function Key]to confirm and press [Esc] to return to the wait interface. “DN023”, press [Function Key] to confirm and press [Esc] to return to the wait interface. Step 4: Press [Function Key], enter [LOCAL SETUP], select“Menu 37 Channel Memory”, press [Function Key] to enter, input [0] [1] and Step 5: Press [Function Key], enter [LOCAL SETUP], select“Menu 37 Channel Memory”, press [Function Key] to [0]successively, press[Function Key]to confirm and press [Esc] to return to the wait interface. enter, input [0] [1] and [8]successively, press[Function Key]to confirm and press [Esc] to return to the wait interface. Special Tips: If no reception of CSS isset up, Step 2can be omitted. If no transmission of CSS is set up, Step 3 can be omitted. 31 30...
- Page 23 Detailed Description of Some Functions Detailed Description of Some Functions II. The Settingsof CSS For example, to set the receiving decodeto be CDCSS D431N, CSS is divided into two types: CDCSS and CTCSS.CSScan be set for both reception and transmission. Method:(1) Press [Function Key] in the wait state to enter [LOCAL SETUP]+[1]+[4]+[Function Key]. The range of CTCSS is 67-254.1Hz. There are a total of 50codes. Explanation: To enter Menu 14 Positive CDCSScodes are 023N-754N. There are a total of 105positive codes. (2) Press [6]+ [9] again. Negative CDCSScodes are 023I-754I. There are a total of 105 negative codes. Explanation: To input the serial number of D431N, i.e., 69 How to selectCSSquickly: (3) Press [Function Key]+ [Esc] Key For example, to set the receiving decode to be CTCSS156.7Hz, Explanation: To confirm and return to the wait interface. Method:(1) Press [Function Key] in the wait state to enter [LOCAL SETUP]+[1]+[5]+[Function Key]. Explanation: To enter Menu 15 (2) Press [2]+ [6] again. Explanation: To input the serial number of 156.7Hz, i.e., 26 (3) Press [Function Key]+ [Esc] Key Explanation: To confirm and return to the wait interface. 32 33...
- Page 24 Technical Parameters (CTCSS/CDCSS) Technical Parameters (CTCSS/CDCSS) 34 35...
- Page 25 Technical Parameters (CTCSS/CDCSS) Technical Parameters (CTCSS/CDCSS) 36 37...
- Page 26 GPS setup instructions GPS setup instructions GPS SETUP Distance Unit- Menu 5 Option: Kilometer/nautical mile/mile GPS POWER - Menu 1 Default: Kilometer Option: ON/OFF AltitudeUnit- Menu 6 Default: ON Position- Menu 2 Option: Meter/foot Default: Meter Option: Degree /degree and minute/degree, minute and second FixedSite- Menu 7 Default: Degree and minute Option: Fixed coordinates/GPS coordinates TimeZone- Menu 3 Default: Fixed coordinates Option: UTC-13 ̄UTC-0UTC+1 ̄UTC+13 Fixed Latitude- Menu 8 Default: UTC+8 Function: After entering the menu, press Up and Down Keys to select the desired latitude and press to confirm. SpeedUnit- Menu 4 Default: 3135.90N Option: Kilometer/nautical mile/mile FixedLongitude- Menu 9 Default: Kilometer Function: After entering the menu, press Up and Down Keys to select the desired longitude and press to confirm. Default: 12022.80E 38 39...
- Page 27 Beacon Setting Description Beacon Setting Description BEACON SETUP Function: Only 40 letters or Arabic numerals can be edited in the menu. How to edit: See p.40 for details. CALL- Menu 1 The Bluetooth programming softwareon the PCsidecan edit 60 letters or Arabic numerals or 20 Chinese characters. Function: To edit up to 6 digits consisting of capitalEnglish and Arabic numerals. Note: Chinese information cannot be displayed on a handheld radio. SYMBOL- Menu 5 How to edit: Step 1. To enter {Call} edit mode.Threerows ofnumbers/letterswill appear on the interface. Step 2.To press Up and Down Keys to select characters. Pitch on a character and press OK to confirm. If a wrong characteris entered, Option: See the symbol tableof handheld radio for details. pleasepress Backkey to delete it. MIC-EON/OFF- Menu 6 Step 3.To enter the calland press # key to confirm and save. SSID- Menu 2 Option: ON/OFF Default: ON Option: 0 ̄15 Default: 1 MIC-ETYPE- Menu 7 SSID Symbol Table- Menu 3 Option: M0:OFFDUTY/M1:EnRoute/M2:InService/M3: Returning/M4:Committed/M5:Special/M6:Priority Option: /\ Default: M0:OFFDUTY Default: / PATH1- Menu 8 Comment- Menu 4 To edit up to 6 digits consisting of capitalEnglish and Arabic numerals. [How to edit: See p.40 for details.] 40 PATH1COUNT- Menu 9 41...
- Page 28 Beacon Setting Description Beacon Setting Description Option: 0 ̄9 PressureReport- Menu 14 Default: 1 Function: To select whether to send atmospheric pressureparameteror not PATH2- Menu 10 Option: OFF/ON Function: To edit up to 6 digits consisting of capitalEnglish and Arabic numerals. [How to edit: See p.40 for details.] Default: ON PATH2COUNT- Menu 11 TXPressure- Menu 15 Option: 0 ̄9 Function: To select whether to send satelliteparameter or not Default: 1 Option: ON/OFF TXVoltage- Menu 12 Default: ON TXMileage- Menu 16 Function: To select whether to send voltage parameteror not Function: To select whether to send mileageparameteror not Option: OFF/ON Option: OFF/ON Default: ON TXTemp- Menu 13 Default: ON BEACONMODE Function: To select whether to send temperatureparameteror not PTTAfter- Menu 1 Option: OFF/ON Default: ON Function: Every time PTT is pressed, when it is released, a beacon will be transmittedonce automatically. 43 42 Option: OFF/ON...
- Page 29 Beacon Type Setting Description Relay Settings Description Default: ON Default: ON Smart Mode- Menu 2 Queue Interval- Menu 6 Option: OFF/TYPE1/TYPE2/TYPE3/ Function:Queue time, set as 0-59S Default: OFF Option: 0 ̄59 Time Mode- Menu 3 Default: 0 Function: To send a beaconregularly DIGISETUP Option: OFF/ON DIGICH- Menu 1 Default: ON Function: To turn to channel selection after receiving valid APRS information Time Interval- Menu 4 Option: CHA/CHB/CHA+CHB Function: To set how often a beaconwill be sent automatically How to set: To inputdirectly.For example, to set in such a way that a beacon will be sent every 10 seconds.Input 0010directly after entering the menu Default: CH A DIGI1ON/OFF- Menu 2 and press OK to confirm. Default: 20S Option: OFF/ON QueueMode- Menu 5 Default: ON To carry out APRS transmission after APRS is enabled, according to the presetpermutationtime, with60S as a cycle. DIGI1NAME- Menu 3 Option: OFF/ON 44 45...
- Page 30 Relay Settings Description Bluetooth Settings Description Function: To edit up to 6 digits consisting of capitalEnglish and Arabic numerals. BLUETOOTH SETUP How to edit: See p.40 for details. DATAOUTPUT- Menu 1 DIGI2ON/OFF- Menu 4 Option: OFF/KISSHex/UI/GPWPL/KISSAcs Option: OFF/ON Default: UI Default: ON GPSOUTPUT- Menu 2 DIGI2NAME- Menu 5 Option: OFF/ON Function: To edit up to 6 digits consisting of capitalEnglish and Arabic numerals. Default: ON How to edit: See p.40 for details. BTPOWER- Menu 3 DIGITXWAIT- Menu 6 Option: OFF/ON Option: 0 ̄9 Default: ON Default: 0 VERSION RemotePassword- Menu 7 HardwareVersion- Menu 1 Function: To edit up to 6 digits of numerical passwords. Function: To query the version of hardware. 46 47...
- Page 31 Advanced Settings Description Advanced Settings Description LocalVersion- Menu 2 Option: Talk/APRS Default: Talk Function: To query the version of this machine. APRSVersion- Menu 3 TXDelay- Menu 4 Function: To query the version of APRS. Option: 200ms-600ms ADVANCED SETUP Default: 350ms TXLevel- Menu 5 APRSRXCH- Menu 1 Option: -10.5dB/-9.0dB/-7.5dB/-6.0dB/-4.5dB/-3.0dB/-1.5dB/0dB Option: OFF/CH A/CH B Default: -9.0dB Default: CH A RXLevel- Menu 6 Special Tips: This menu is set as CH A or CH B. The battery saver will be turned off automatically. Option: -10.5dB/-9.0dB/-7.5dB/-6.0dB/-4.5dB/-3.0dB/-1.5dB/0dB APRSTXCH- Menu 2 Default: -9.0dB Option: CH A/CH B/CH A+CH B MileageZero- Menu 7 Default: CH A Function: To clear the mileage record TXPriority- Menu 3 48 49...
- Page 32 Advanced Settings Description Advanced Settings Description MileageMemory- Menu 8 TX-TONEO- Menu 12 Option: Clear at startup/auto totalizer Function: A prompt tone of the transmission of APRS Default: Clear at startup Option: OFF/ON CH AMUTE- Menu 9 Default: OFF RXPOPUP- Menu 13 Option: OFF/ON Default: OFF Option: OFF/ON CH BMUTE- Menu 10 Default: OFF ListClean- Menu 14 Option: OFF/ON Default: OFF Function: To clear the beacon list RX-TONEO- Menu 11 FactorySetting- Menu 15 Function: Aprompt tonethat shows that APRS has received decodesuccessfully. Function: To make APRS restore the factory settings Option: OFF/ON Default: OFF 50 51...
- Page 33 Detailed Description of APRS Functions Detailed Description of APRS Functions I. Brief Description of APRS Functions (3) Interface HG-V98 is a professional APRS dual-bandhandheld radio that uses standard APRS numerical codes and directlylocates each 1.8 inch color screen, Chinese/English Menu other using radioU/V signals. Support advanced GPS interface, beacon list interface, real-time beacon interface and beacon record analysis interface HG-V98 doesn’t need the support of a mobile network. It can directly send to and receive from each other and is widely used in (4)APRS Track outdoor sports, rescue and other occasions. Support2site modes: FIXED site and SPORT site. Brief Description ofFunctions: Support complete TRACK tracker, intelligent, timing, PTT linkage and queue beacons (1)Main unit: UV dual-band, 5W, the frequency is entirely input by hand Support additional information of beacons, such as mileage, number of satellites, voltage, temperature and atmospheric Support direct charge of battery using USB pressure, etc. Built-in temperature\atmospheric pressure, voltage and other auxiliary sensors Support mileage calculation, mileageaccumulation and automatic clearing. Support users’independentupgrade of firmware Support auto symbol (TRACK intelligent mode) (2) APRS channel Support GPS powersaver (TRACK PTT linkage mode and TRACK timing mode) APRS channel and voice channel can be set arbitrarily. A/B channel APRS, A/B channel voice (5) Bluetooth Support that CH A receives, CH A transmits, CH A receives, CH B transmits (transposes), CH A receives, A transmits+B transmits Built-instate-of-the-art2.0+4.0 dual-mode Bluetooth, compatible with Android and iPhone Support that CH B receives, CH B transmits, CH B receives, CH A transmits (transposes), CH B receives, A transmits+B transmits Support offline use,dispense with the need for a network,directlylocate each other The Bluetooth supports KISS HEX, UI, GPWPL, KISSASC, GS232 and other protocols Support GPS data (GPRMC+GPGGA)output through Bluetooth. Support mixed output 52 53...
- Page 34 Detailed Description of APRS Functions Detailed Description of APRS Functions Support two-way transparent transmission of KISS data via Bluetooth Built-in advanced solver. Support abundant data analysis functions Support EleCloud, APRSdroid, LOCUS, Ovitalmap and other apps Support the calculation of heading, due north bearing and relative bearing Support setting parameters using wireless Bluetooth Support Maidenhead network (6) APRS relay Support the calculation of APRS distance, horizontal angle, elevation angleand other trigonometric functions Support complete DIGI relay,user-definedrelay name and remote relayswitch Support automatic following control of G5500 aircraft and ships, etc. Support remote peripheral sensor input, relay and other telemetriccontrol modules (9) Software (7)GPS/BeiDou Attached PC software (Chinese/English) (NET4.0) Built-in high-performingmulti-mode hybrid positioning engine (GPS\BeiDou\GLONASS) (10) Interface switch of handheld radio (8)APRS solver Short press # to switch between GPS interface, beacon list interface and real-time beacon interface in turn (see Built-in advanced CMX hardware codecsolver Figure 4 for details) 实时信标 Built-in 8-level digital level controller (allows both transmission and reception) 10:24:07 IDX:001 NOCALL-7 速度: SPD:00000Km OL94GW NOCALL-7 O.0Km ---.-Kmh -- N Data analysis ALT: 00000M TEST-9 2.4Km 北...
- Page 35 Detailed Description of APRS Functions Detailed Description of APRS Functions IDX:001 (11) View beacon records NOCALL-7 O.0Km In the beacon list interface, press Up and Down Keys to select a stored beacon and press OK Key to view detailed TEST-9 2.4Km ----- -- ---- .-Km information about the beacon. ----- -- ---- .-Km ----- -- ---- .-Km (12)GPS interface OK NO Display the following information: Figure 6 Time, speed, altitude, longitude, latitude, heading, date, Maidenhead grid, auxiliary sensors, battery voltage, (14) Real-time beacon interface temperature, atmospheric pressure and number of valid satellites, etc. (see Figure 5 for details) Receive a beacon from the other party in real time and make an analysis and display 10:24:07 Display the following information: SPD:00000Km OL94GW Call, speed, heading, altitude, distance, longitude, latitude, direct north bearing, relative bearing, time and dateof ALT: 00000M 北 24 56.92 西...
- Page 36 Detailed Description of APRS Functions Detailed Description of APRS Functions (15) Basic operations: (16)Basic settings (see Figure 10 for details) Most of the APRS functions of this machine can be performed in menususing the keyboard by hand. Meanwhile, the attached software has a visual interface and provides more abundant options. It is recommended Figure 10 to set up APRS functions of this machine using the attached software.There are three connection methods. This ①CALL sets the local call. The default call is NOCALL. It is in numeral or capital English, up to 6 digits. machine can be set up using the attached APRSsoftware. ②SSID sets the SSID of the beacon. The default is 7. The range of parametervaluesis 0-15. 1. Use the standard upgrade cable of this machine (see Figure 8 for details) ③Site type: 2. The computer comes with Bluetooth. Connect the computerBluetooth with the Bluetooth module of this machine. SPORTS: to set this machine as a SPORT site 3. Use a special Bluetooth main unit module (optional) (see Figure 9 for details) Use real-timeGPS data to send various types of beacons Connect with the standardupgrade cable of this machine. This is also the upgrade mode of APRS of this machine. Calculate the relative distance, due north bearing and relative bearing, etc. fromthe other party using the real- Connect using a special Bluetooth main unit module (optional), to make the connection and pairing easy. timelongitude and latitude data of GPS. FIXED: to set this machine as a FIXED site Use the set latitude and longitude of the FIXED siteto send various types of beacons Calculate the relative distance, due north bearing and relative bearing, etc.fromthe other party using the set latitude Figure 9 and longitudeof the FIXED site. Figure 8 BluetoothMain unit Module ④GPS switch 58 59 Upgrade Cable Note: APRS setting software (The version is changedconstantly. The interface is for reference only). If this machine is used in a FIXED site, OFF can be chosen to save energy....
- Page 37 Detailed Description of APRS Functions Detailed Description of APRS Functions (17) Track settings ②Manual mode: After GPS positions, every time the PTTbutton of the handheld radiois released, abeacon will be transmitted once automatically. Note: When this machine is used in a SPORT site, whichever beacon mode is selected, the beaconwill not be ③Timing mode: transmitted, unless it is effectively positioned by GPS(see Figure 11 for details) After GPS positions, abeacon will be transmitted automatically according to the set time. ④Queue mode: To transmit according to the number of seconds in a minute that has been set Note: The time base is different from that of general timedtransmission. The actual transmission time is always the set time +1 second. For example, if the queue time is set to be 0 second,abeacon will be transmitted according to the following time law(see Figure 12 for details) Figure 11 ①Intelligent mode: AfterGPS positions, a beacon will be transmitted automatically, according to heading and speed. 60 61 Figure 12...
- Page 38 Detailed Description of APRS Functions Detailed Description of APRS Functions ⑩ Auto Symbol 2: ⑤GPS power saver When pressed by hand or the set time is up, GPS will be turned onautomatically. GPS will have a warm boot, position in a few seconds There are three parameters: wait time, Symbol 2 andSymbol Table 2 and then transmit. After that, GPS will be turned off. 180:Wait time, in seconds Note: Only the manual mode or timing mode is valid. / stands for Symbol Table 2 ⑥PATH1, PATH2 P stands forSymbol 2 To require the relaycalledWIDE1 or WIDE2 to relayaccording to the number of relays. When thequiescent timereaches the set wait time in the intelligent mode, the symbol will be converted to Symbol Default settings: WIDE1-1 WIDE2-0, that is, to require the relaycalled WIDE1 to relay once, but not to require WIDE2 to relay. 2automatically. ⑦MIC-E Comment 11 The beacon data are compressed and then transmitted. This can effectively shorten the transmission time, reduce the probability that the See p.40 [Comment] for details. data is interfered by other signals in the air and improve the success rate of the receiver’s decoding. ⑧PTT delay 12 Beacon options Before transmitting a signal, PTT will trigger a delay. When the SQL responsefrom the other party is slow, the PTTdelaycan be increased. Mileage: SPORT site beacons include mileage that is calculated automatically, while FIXED site beacons don’t ⑨Symbol 1: include it. ! stands forthe data type designator. The fixedlength is 1 character. Generally speaking, there is no need to change it. If need be, refer to Satellite: SPORT site beacons include the number of valid satellites, while FIXED site beacons don’t include it. APRS protocol manual. Atmospheric pressure: Both SPORT and FIXED site beacons include auxiliaryatmospheric pressuresensor data. /stands for the symbol table.Generally speaking, there is no need to change it. If need be, refer to APRS protocol manual. Voltage: Both SPORT and FIXED site beacons include battery voltage sensor data. >stands for the symbol pattern displayed on the server map. The fixedlength is 1 character. Refer to APRSSymbol Table to change it. 62 63 Temperature: BothSPORT and FIXED site beacons include auxiliarytemperaturesensor data. ...
- Page 39 Detailed Description of APRS Functions Detailed Description of APRS Functions Note:Subject to the machine size and structure, the temperature data are for reference only. (18) Bluetooth Setup(see Figure 13 for details) Note: The comment is the shorter, the better. The beacon options are the fewer, the better. The longer data, the ① OUT 1, Bluetooth data output 1, therate is 9600 longer transmission time and the greater probability of interference from the air. This may lead to a decline in the KISS HEX output standard andKISS data command, used for various Figure 13 decoding rateof the other party. standard APRS computers or PC software 13 Mileage Memory UI To output standardUItext data, used to upload to the serveror for the secondary development of users When this option is checked, every time abeacon is transmitted,the real-time mileage will be savedautomatically GPWPL To output standardGPWPLwaypointdata, the user’s Garminnavigator and accumulated in the next startup. KISSASC To output standardKISSASCdatacommand, used for the secondary development of users If this option is not checked, the mileage will be cleared automatically in the next startup. GS232B To output standardGS232Bdatacommand, used to control G5500 rotator 14 TXTest Key OFF To turn off dataoutput When the handheld radio is in a FIXED site, by pressing this key,the handheld radio will transmit a FIXED site ②OUT 2, Bluetooth data output 2, the rate is 9600 beaconautomatically. GPS To output GPS data (GNRMC+GNGGA). This data can be outputtogether with OUT1. When the handheld radio is in a SPORT site and GPS has effectivelypositioned, by pressing this key, the handheld OFF To turn off GPSoutput radio will transmitareal-time site beaconautomatically. ③Bluetooth power switch ON/OFF 64 65...
- Page 40 Detailed Description of APRS Functions Detailed Description of APRS Functions When a valid beacon is received and the beacon contains passwords and commands, the following operations (19) The DIGIfunction of APRS digital relay(see Figure 14 for details) shall be performed: 2 relay namescan be set 1. Command A0to close DIGI 1 Relay Name 1: WIDE1by default, in numeral or capital English, up to 6 digits 2. Command A1 to open DIGI 1 Relay Name 2: WIDE2by default, in numeral or capital English, up to 6 digits 3. Command B0 to close DIGI 2 Relaycondition: when themachine receives a valid beacon, the beacon contains the 4. Command B1 to open DIGI 2 relayname of the machine and the number of relays is greater than 1,the machine will 5. Command R0 resets and restarts relay once and reset the number of relays (minus 1), repackage and transmit the beacon. Figure 14 For example: to send a commentthrough 51 TNC and fill in 123456A0 as the comment. After sending the beacon, If among the beacons, the number of relays is 0, then the beacons will not be relayed. the relay DIGI 1 will be turned off (see Figure 16 for details) For APRS digital relay, eachrelay is aprocess of reception, decoding, recoding and transmission, so no matter how many timesit is relayed, the signal quality remains the best. This is a difference from traditional analog voice relay. For APRS digital relay, since there are a prescribed number of relays among the beacons, the beacons will not be relayed infinitely. 图16 (20) Remote password (see Figure 15 for details) (21) FIXED site setup(see Figure 17 for details) The default password is 123456. There must be 6 digits. Figure 15 It is possible to operate the remote relayswitch, external control relay andsensor, etc. Latstands for the latitude used by a FIXED site. The fixed length is 7 digits (including a decimal point), degree and minute, inminute format. 66 67 The fixed length of N/S is 1 digit. ...
- Page 41 Detailed Description of APRS Functions Detailed Description of APRS Functions Figure 17 lLon stands for the longitude used by a FIXED site. The fixed length is 7 digits(including decimal point), degree and minute, in minute format. The fixed length of W/E is 1 digit. Altitude, in meters. When tracking an aircraft, it is necessary to set the altitudeof the home site. Figure 18 After positioning, in theFIXED site mode, the set longitude and latitude will be used to transmit various types of This machine has a built-in multiple analysis solver, including distance, bearing and elevation angle, etc. When FIXED site beacons. receiving an aircraft beacon, the solver will analyze the relative bearing and elevation angle and control G5500 to Calculate the relative distance, due north bearing and relative bearing, etc. fromthe other party using the set achieve automatic tracking(see Figure 19 for details) longitude and latitude. When it is used to track an aircraft, it is necessary to set the local longitude, latitude, altitude and call of the target Figure 19 aircraft (see Figure 18 for details) 68 69...
- Page 42 Instructions on How to Querya Trackon the Computer Description about the Firmware Upgrade of APRS How to Query My Track on the Computer Steps of the Firmware Upgrade of APRS Step 1: First of all, download [APRS Firmware] from the official website of LANCHONLH and save it to the PC side. HG-V98 uses standard APRS encoding. When there is an APRS gateway nearby and a local beacon is Step 2: Insert the USB cable from the package of the handheld radio into the PC side and the headphone jack of the handheld received, the tracksand other information of this machine will be displayed on the APRS map. Step 3: Open [APRS Firmware]and a software window will pop up(see Figure 20 for details) At present, there are several commonmethods to browse APRStracks: The operation steps are as follows: BG6CQ server, 202.141.176.2, automatic positioning, quick and convenient to view data, multiple shortcut (1)Select a data port that has been searched automatically by the system, as shown in the figure below: references. (2)Click [Upgrade]. BA7CK APRSdata server is recommended: http://aprs.hellocq.net/. It is quick and convenient. Support track playback and direct view. APRS.ISmapserver is recommended: http://aprs.fi/ 70 71 Figure 20...
- Page 43 Description about the Firmware Upgrade of APRS Description about the FirmwareUpgrade of the Walkie-talkie Steps of the Firmware Upgrade of the Walkie-talkie (3)Press downSide Key PF1 of the walkie-talkie and then start up. An APRS UpDataupgrade interface will appear Step 1: First of all, download [HG-UV98 Firmware Upgrade Software] and [Walkie-talkie firmware] from the official website of on the walkie-talkie (see Figure 21 for details) LANCHONLH and save them to a separate folder on the PC side. Step 2: Insert the USB cableinto the PC side and the headphone jack of the handheld radiorespectively. Step 3: Open [HG-UV98 Firmware Upgrade Software]and a software window will pop up(see Figure 23 for details) Figure 21 (4)Until it is prompted that the operation succeeds(see Figure 22 for details) The operation steps are as follows: Figure 23 (1) Select [Serial Port Configuration]. (2) Select [Port Number] of theUSB cable. Note: How to query the port number - right-click the PC side [My Computer] > [Attribute] > [Device Manager] > [Ports (COM and LPT)] to query the port number. (5)Reboot (3) Select the baud rate [115200] and then press [OK] (4) Press [Connect]. 72 73 Figure 22 (5) Press down the PTT button of the walkie-talkie. At this point, the green light of the walkie-talkiewill stay solid on. ...
- Page 44 Description about the FirmwareUpgrade of the Walkie-talkie Description about the FirmwareUpgrade of the Walkie-talkie Move the cursor into the upgrade software interface and click the value[1] on the top leftcorner, until a characterC appears(see Figure 24 for details) Figure 24 (7) Press [Download] to enter the directory of the downloaded firmware and double-click to open [Walkie-talkie Firmware](see Figure 25 for details). Double-click on the downloaded firmware. Figure 26 (9) Reboot Figure 25 (8) After opening the walkie-talkie firmware, a download page will appear until it is prompted that the 74 75 downloadhas beencompleted.(see Figure 26 for details)...
- Page 45 Optional Accessories Troubleshooting Before deciding thatthere is indeed something wrong with the walkie-talkie, check against the following table. If the problem persists, you may initialize the walkie-talkie. Sometimes the incorrect operations can be corrected. Desktop Charger Headphone Cable Hand Mic Programming Cable 2A Car Charger Fault Solution >>The battery may have run out. Please replace with a new battery or recharge it. The walkie-talkie cannot be started. No >>The battery may not be installed properly. Please remove the battery and reinstall it. power >>The battery pack has entered theprotection state.
- Page 46 Statement When compiling this manual, we strive to make the content correct and complete.But LANCHONLH Electronics Co., Ltd. will not be liable for any Warranty Card possible omission or mistake in the writing of this manual. Client’s Name: Gender: Male/Female LANCHONLH Electronics Co., Ltd.reserves the right to change the design Client’sAdd and Zip Code: and specifications of the product without prior notice. Notes Tel: 1.This warranty card is only Model: applicable to the warranty service of the above walkie-talkie Serial No.: model and serial number. Date of Purchase: 2.This warranty card is an important certificatefor the end Invoice No.:...
- Page 47 Maintenance Record Dear walkie-talkie user, Hello! Received on Thank you very much for purchasing our walkie-talkie. We will try our best to provide you with stable, clear and highly efficient wireless communication services. To make you better enjoy high-quality warranty Completed on services that we provide for you, please keep a watchful eye onthe following information!
Need help?
Do you have a question about the HG-UV98 and is the answer not in the manual?
Questions and answers