
Related Manuals for Rioned flexJET+

Summary of Contents for Rioned flexJET+
- Page 1 USER’S MANUAL RIONED P.O. Box 5070 5004 EB Tilburg The Netherlands Telephone: +31 13 5479100 e-mail: info@rioned.com Internet: www.rioned.com...
- Page 2 RIONED. This restriction also holds for the corresponding drawings and diagrams. RIONED has the right to change parts at any time without any prior or direct warning to the client. Also, the contents of this manual can be changed without any prior warn- ing.
- Page 3 Foreword This user’s manual is a manual for the professional user. This user’s manual has the purpose to control the machine in a safety manner and must be saved with the machine. The photos and drawings help you understand the text easier. First the user’s manual gives you an overview of the most important safety aspects.
- Page 4 01/18...
-
Page 5: Table Of Contents
TABLE OF CONTENTS INTRODUCTION................3 1.1 Use ..................3 SECURITY ................... 5 2.1 Instruction indications in this manual........5 2.2 Descriptions security measures ..........5 2.3 Personnel protection outfit ............5 2.4 Warnings ................6 2.5 Personnel qualification and education ........6 2.6 Danger that can occur if the security regulations aren’t observed . - Page 6 7.2 Hose guide................41 7.3 Hour counter ............... 42 7.4 Run dry protection ............... 42 7.5 Water level control ............... 42 7.6 Suction Ventury ..............43 7.7 2e HP-reel instead of supply reel ..........44 7.8 Check valve in supply pipe ............ 44 7.9 License Plate Holders............
-
Page 7: Introduction
INTRODUCTION RIONED wishes to thank you for your purchase of the RIONED drain and sewer- clearing machine. We recommend that you read this manual thoroughly and see that the machine is handled and maintained in the proper manner. If your machine should give trouble and need servicing, when you want to order parts, or if you have any questions, contact your RIONED dealer. - Page 8 01/18...
-
Page 9: Security
SECURITY Be responsible for other people when you are working with this machine. This manual contains instructions for fundamental conditions that must be fol- lowed by use and maintenance of this machine. That is why it is necessary that authorised and qualified personnel must read the user's manual and the user’s manual must always be available with the ma- chine. -
Page 10: Warnings
Warnings It is strongly forbidden to spray on humans and animals. Fix the control levers never in any way whatsoever, except if it is indicated. The cover must always remain closed while working with the machine. Always use the auxiliary coupler during transport of the trailer. Never drive faster than 80 km/h with the trailer. -
Page 11: Security Regulations For Maintenance, Inspection And Mounting Activities
2.10 Making changes and fabricate spare parts Changes to the machine are only permitted if Rioned has given written author- isation. The use of original spare parts and accessories are for the safety nec- essary. Rioned is not responsible for injuries or damages if other spare parts are used. - Page 12 01/18...
-
Page 13: Technical Specification
TECHNICAL SPECIFICATION General Description (symbol) Unit Dimension see chapter 11.4 Dimension FlexJet page: 65 Weight (dry and without options) (m) ~340 kg /~ 540 kg (FJ+) Total weight (without options) (m) ~ 750 kg / ~1200 kg (FJ+) Quantity water tank Max 400 l / Max. -
Page 14: Engine
Engine Description (symbol) Unit Type Vanguard Briggs & Stratton Model 350400 Number of cylinders Bore x stroke (d x l) 72 x 70 mm Displacement (V) 570 cm (0,57 . 10 Power (P) 13,4 kW (18 PK) at 3600 Fuel Normal of unleaded petrol (Euro 95) Quantity fuel tank (V) 13 l... -
Page 15: Pump
Pump Description (symbol) Unit Type Speck P30 Number of plungers Number of valves Number of revolutions (n) 1420 min Maximum pressure (p) See type plate on frame Maximum output (V/t) See type plate on frame GX 80W90 Quantity 0,7 l (0,7 . - Page 16 01/18...
-
Page 17: Construction
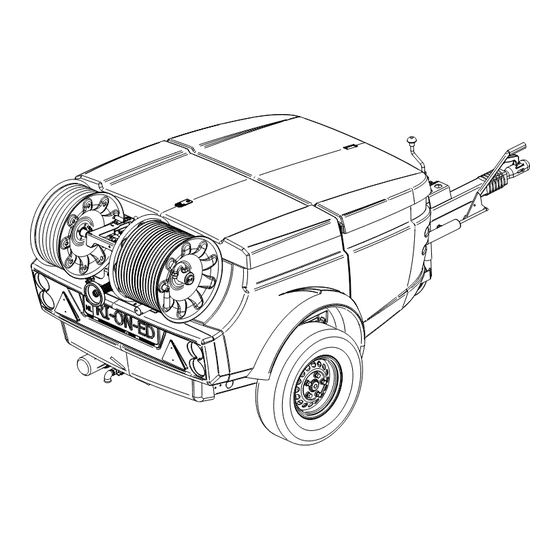
CONSTRUCTION This machine contains the following main parts: Tool box Supply valve water filter Water tank Drain valve Opening water tank Engine Reel with high-pressure hose Pump Reel with supply hose Nose wheel support Valve supply reel Swing nose wheel support High-pressure (HP)-valve Tow bar Machine cover... - Page 18 01/18...
- Page 19 01/18...
- Page 20 01/18...
-
Page 21: Control
CONTROL If you control, maintain or inspect the machine, you must have the right qualifications for this job. If you do not have the necessarily knowledge, you may not use the machine. Further, you must convince yourself that you understand this manual thoroughly. -
Page 22: Check Before Departure
Check before departure Before you drive away with the vehicle, check the following: Are the supports at its full height and locked? (Option) Is the high-pressure hose (4) been inserted into the hose holder and secured with the securing pin. Is the high-pressure hose reel (4) locked by means of the reel lock or is the hydraulic reel control handle been put into position “O”... -
Page 23: Control Box
Control box Emergency stop Oil pressure HP open / Start spraying Throttle open Hour counter Charging Run dry protection HP close / Stop spraying Throttle close Ignition key Radio remote control Put the 7-pins plug into the socket. Attention! When the 7-pin plug is into the connector, the functions of the control box will fall off. -
Page 24: Starting The Machine
The maximum water temperature is 60 °C (140 °F). Turn the control wheel of the pressure regulator (10) counter clock- wise. Screw the appropriate attachment onto the high-pressure hose. Unclogging of a drain: jet nozzle Cleaning a wall, a terrace or floor: spray lance gun Starting the machine Emergency stop: The machine is equipped with an emergency stop. - Page 25 • Do not use the button for normal stopping. • Only use is when dangerous situations occur. • After use, turn the emergency stop in order to be able to start up again. • Make sure the emergency stop can always be reached. 01/18...
- Page 26 Oil Alert lamp petrol engine: Execution: B&S Honda 20hp Honda 24hp Switch: Pressure Level Level Standard, without Oil alert engine lamp Lamp is off at “igni- not applicable control box lights when “ignition tion on” on”. Lamp goes out with Lamp is off with run- not applicable running engine.
- Page 27 Execution: B&S Honda Honda 24hp 20hp 5-channel Ignition on: remote (small print). Engine runs: Low oil level: Engine stop HP close; HP close; throttle throttle close; close; No engine stop No engine stop Start the engine. Important! If the machine has run out of water, ensure that the hose is unwound before pressurising! Starting on engine (B&S) Pull the choke handle.
- Page 28 Turn the ignition key to the right and keeps him there until the engine starts. Caution! Do not use the electric starter for more than 15 seconds. You will damage the starter. If the engine refuses to start, release the ignition start button and wait 1 min- ute to start again.
- Page 29 Starting on control box: Insert the key into the ignition (A). Turn the key one turn to the right. Check the indicator lights “Oil pressure” (B) and “Battery” (C) light. Turn the key (A) further and release the key once the engine starts. Starting with Riomote transmitter (optional): Press button 1 in (Engine starts).
-
Page 30: Unclogging A Drain
Unclogging a drain Attention! Ensure that the spraying nozzle does not leave the drain! Water under high-pressure may cause severe injuries! Screw a suitable nozzle onto the high-pressure hose. Unwind the hose (see chapter7.1 "Hydraulic reel control" page.: 41). Put the nozzle into the drain that is to be cleaned. Screw the high-pressure regulator (10) fully open (right). - Page 31 Control by Riomote remote control (option): Press button 3 or (HP pump on). Press button 5 or (Throttle Open). Via the Flexmote remote (option): Press short button 2 (HD on). Press long button 2 (Gas open). The hose will now unwind and work its way into the drain. Check that the water drains away.
-
Page 32: Stop Spraying
Important! Rewind hose onto reel under pressure to avoid crushing. If machine has run out of water, ensure hose is unwound before pressurising. Stop spraying: Control on machine: Press button I (Throttle close). Press button H (HP pump off). Control by Riomote remote control: Press button 6 (Throttle close). -
Page 33: Cleaning A Wall, Terrace Or Floor
Via the Flexmote remote (option): Press button 3 (Throttle close and HD off). Close the High-pressure valve. Treat the high-pressure hose carefully: • Always clean it after use. • Ensure that no sharp objects are near the hose. • Ensure that no traffic crosses the hose. •... - Page 34 Control: Control on machine with control box: Press button C (HP pump On). Press button D (Throttle open). Control by Riomote remote control (option): Press button 3 or (HP pump on). Press button 5 or (Throttle Open). 01/18...
-
Page 35: Spray With Spray Lance
Via the Flexmote remote (option): Press short button 2 (HD on). Press long button 2 (Gas open). 5.11 Spray with spray lance Screw the high-pressure regulator wheel upward on the high-pressure regulator until the required working pressure is reached. - The adjusted pressure can be read from the pressure gauge on the machine when the spray gun is open. - Page 36 Via the Riomote transmitter (option): Press button 6 (Throttle close). Press button 4 (HP off/stop spraying). Via the Flexmote transmitter (option): Press button 2 (Throttle close and HP off/ stop spraying). Close the HP valve. Mark! Pull the trigger of the spray gun once more to depressurise the HP hose.
-
Page 37: Stop The Engine
Always treat the high-pressure hose well! Illustration: Spray gun with NW 5 hose 5.12 Stop the engine With the control box: Turn the ignition key fully to the left. With the Riomote transmitter (option): Press button 2 (Engine stop). 01/18... -
Page 38: Ending Duties
5.13 Ending duties At the end of the duties you proceed as follows: Stop the engine. Tidy up the HP reel. Close the HP valve. Wind up the HP hose. Lock the HP hose in the hose holder. Lock the HP reel (position “O”). Lock the hose guide. -
Page 39: Additional Preparations When Preparing For Use
Push button (Stop spraying) on the control box and close the HP valve. Connect the high-pressure hose to the water fill hose using a special GK hose coupling. Push button (Start spraying) on the control box and open the HP valve. Let the high-pressure pump fill the supply hose with antifreeze. - Page 40 01/18...
-
Page 41: Symbols
SYMBOLS Control box Engine start. Engine stop. Start spraying (HP pump ON) Stop spraying (HP pump OFF) Throttle open (more water and more pressure) Throttle close (less water and less pressure) Signal lamp “Charging” (Burns if there is no charge to the bat- tery). - Page 42 Signal lamp “Oil pressure” (Burns if there is not enough oil in the engine). Signal lamp “Glowing” (Burns when the glow spiral in the engine is warmed up). Run dry protection 12 volt accessories Radio remote control Cable remote control on. Hand control on.
-
Page 43: Pressure Gauge
“Hand” or “Radio remote” control Signal lamp “Temperature engine to high” Back plate “Emergency stop” Pressure gauge Maximum allowed pressure Danger zone Working area Pressure regulator Less pressure More pressure 01/18... -
Page 44: Security Sticker
Security sticker 01/18... -
Page 45: Options
OPTIONS Hydraulic reel control By means of pushing the control lever upwards or downwards the high-pres- sure hose can be unrolled or rolled up. Due to the proportional functioning of this valve you can also control the speed of the reel. By putting the lever into the position you can unroll the hose manually. -
Page 46: Hour Counter
Hour counter This machine is equipped with an hour counter. The weight of the machine is shown by means of an hour counter. The hour counter indicates the number of working hours that the machine has worked. Run dry protection Purpose: The run-dry protection has the purpose to protect the high-pressure pump Functioning:... -
Page 47: Suction Ventury
el to low, the solenoid opens. You are always sure of water during working with the machine. Installation: Couple a supply hose on to the coupling of the supply pipe or use the supply hose. Open the water tap. Switch on the level control. Now the water tank gets filled with water. -
Page 48: 2E Hp-Reel Instead Of Supply Reel
The water tank is filled now with surface water. Suction stop: HP pump off. Close the tap. Disconnect the suction hose and store it. 2e HP-reel instead of supply reel The operation of a second high-pressure hose reel is equal to that of a high- pressure hose reel. -
Page 49: Pulsator System
7.12 Pulsator system Purpose: With less water use, quicker to the stoppage. Construction: The high-pressure pump has three cylinders. By normal use the three cylinders follows each other continuously. This gives a fluent volume stream. To stop one stroke, you get a pulsating water stream. Control: Unlock the HP reel. - Page 50 • Insert the 7-pin plug into the contact. • Switch on control box at “Radiographic operating” • Switch the transmitter on • Start the engine by means of button “START” • Push the “STOP” button The machine has to cut off now If this is not the case it is not allowed to work with the transmitter.
-
Page 51: Radio Remote Control (Flexmote)
Start the engine Stop the engine High-pressure pump on (start spraying) High-pressure pump off (stop spraying) Open gas of the engine Close gas of the engine Emergency stop Transmitter on/off Indication light battery Trouble shooting • Every system is checked on high quality before leaving the factory. -
Page 52: Water Circuit Circulate
If this is not the case it is not allowed to work with the transmitter. Contact your supplier. Technical specification: Receiver: Voltage : 8-38 Vdc Fuse : 10 A (fast)(5*20mm) glass fuse integrat- Current consumption : 15 mA Max. Output rated current : 4A (met 24 Vdc) per output Cable length : 2.5 meters... - Page 53 Couple the HP hose onto the water circuit circulation connection on the water tank. Open the HP tap. The water circulates now through the pipes. 01/18...
- Page 54 01/18...
-
Page 55: Maintenance
MAINTENANCE Attention! Always stop the engine first and depressurize the system before serving or repairing the machine. To depressurize the system, you open the HP valve. If the spray lance gun is attached you must also pull the trigger. Daily maintenance Oil level Check all oil levels once a week. -
Page 56: Maintenance Wheel Bearings And Wheel Nuts
Check the torque of the attachment bolts for the engine; tighten them, if necessary. For more information concerning the engine, you can find it in the book deliv- ered with this machine. Carriage: Lubricate all mechanical moving parts in the system. Check that all nuts and bolts have been correctly tightened. -
Page 57: Replacing Lamps In The Lighting Unit
Tension the brake rod. Turn it clockwise until the hinged lever touches the brake cylinder without clearance. Lock the brake rod by turning the lock nut against the fork of the brake rod. Check the functioning of the brakes by means of a brake test. Check the brakes on overheating (= brakes over tightened). -
Page 58: Maintenance Remote Control
You have to renew the environment friendly hydraulic oil at least ones a year! Only use oil HESTIA 46. Order number Rioned 71-003-500-046 Check, every time before use, if the level of the oil is sufficient. Proceed as follows: Stop the machine. -
Page 59: Extensive Periodical Maintenance
Stop the machine and repeat point 2 until 8. Maxi- Mini- Extensive periodical maintenance Have the high-pressure machine checked and maintained from time to time by the technical service of Rioned. In this way, long life and quality will be guar- anteed. 01/18... -
Page 60: Maintenance Scheme
8.10 Maintenance scheme Interval Check oil levels Every time before use Cleaning water filter Every time before use and with strong pollution. Cleaning carriage weekly or with strong pollution. Service engine Every 250 working hours or at least once every six month Lubricate moving parts Every 250 working hours or at least once every six month... -
Page 61: Troubleshooting
TROUBLESHOOTING Failure Reason Solution Engine does not start or stops Machine has run out of fuel Add fuel abruptly. Main or secondary fuse blown Replace the defect fuse and restart engine. If problem repeats, contact your dealer Battery voltage too low. Load or replace. - Page 62 Check all plugs. Plug in and push. Check control lights if functions are indicated Insufficient braking effect Excessive backlash in brake system Re-adjust brake system by Rioned Brake linings not “run in” Actuate hand-brake lever slightly; drive 2-3 kilo meters Brake linings glazed, oily or damaged Replace brake shoes completely;...
- Page 63 Failure Reason Solution Brake reacts by jerks Excessive backlash in brake system Re-adjust brake system by Rioned Shock absorber of overrunning hitch Replace shock absorber defective Backmat brake shoe is jammed in the Replace completely brake shoes with brake shoe holder...
- Page 64 01/18...
-
Page 65: Auxiliaries
AUXILIARIES With this machine are some auxiliaries standard delivered.: Two fork spanners ( Illustration 10.1) for mount and dismount the spray gun. Illustration 10.1 Fork spanners. Two nozzles ( Illustration 10.2). These nozzles are mounted at the end of the high-pressure hose. Con- nect always the O-ring on the screw thread of the high-pressure hose. - Page 66 One spray gun with lance( Illustration 10.3). Mount the spray-gun at the end of the high-pressure hose. It is used to spray facades, pavements and floors clean. Connect always the O- ring over the screw thread of the high-pressure hose. Mount the spray- gun on them high-pressure hose by means of the fork spanners.
-
Page 67: Appendix
11.1 EC declaration Of Conformity For Machinery RIOR B.V. / RIONED Centaurusweg 45, Tilburg,The Netherlands, Herewith declares that: High pressure device RIONED FlexJet/FlexJet+, • is in compliance with the Machinery Directive (2006/42/EC and 2007/46/EC); • is in conformity with the provisions of the following other EEC direc-... -
Page 68: Contact Sales Representatives
11.2 Contact sales representatives EXPORT D.Maas / H. de Laat Area Sales Manager, Rior B.V. / Rioned info@rioned.com www.rioned.com Centaurusweg 45 5015 TC Tilburg Tel.: +31 13-547 91 00 11.3 After Sales Service Rioned Centaurusweg 45 5015 TC Tilburg Tel.: +31 13-547 91 51... -
Page 69: Dimension Flexjet
11.4 Dimension FlexJet 01/18... -
Page 70: Dimension Flexjet
11.5 Dimension FlexJet+ 01/18... -
Page 71: Sound Level Report Flexjet67
11.6 Sound level report FlexJet 01/18... -
Page 72: Sound Level Report Flexjet
11.7 Sound level report FlexJet+ 01/18... -
Page 73: Coc
EC CERTIFICATE OF CONFORMITY COMPLETE VEHICLES PART I The undersigned: Twan Schellekens Function: Manager Customer Service hereby certifies that the vehicle 0.1. Make ((Trade name of manufacturer): Rioned 0.2. Type: FLEXJET+ Variant: Version: 0.2.1. Commercial name: FLEXJET+ 0.4. Vehicle category: 0.5. - Page 74 General construction characteristics Number of axles: … and wheels: … 1 / 2 Number and position of axles with twin wheels: Main dimensions Wheelbase: 2220 Axle spacing: Length: 3170 Width: 1410 Height: 1330 Distance between the centre of the coupling device and the rear 3140 end of the vehicle: Length of the loading area:...
- Page 75 01/18...
- Page 76 01/18...
-
Page 77: Index
46 ...... 54 renew oil ....... 54 hitch ......17 responsibility ....6 responsible ...... 5 riomote ..... 27 rioned ......2 accessories ..... 7 antifreeze ..... 35 injuries ......7 antifreeze tank ....35 attention ....26 safety break handle ..17 safety cable .... - Page 78 01/18...
Need help?
Do you have a question about the flexJET+ and is the answer not in the manual?
Questions and answers