Arjo Auralis Instructions For Use Manual
Hide thumbs
Also See for Auralis:
- Instructions for use manual (68 pages) ,
- Quick reference manual (4 pages) ,
- Quick reference manual (2 pages)
Table of Contents
Advertisement
Advertisement
Table of Contents

Related Manuals for Arjo Auralis


Summary of Contents for Arjo Auralis
- Page 1 INSTRUCTIONS FOR USE Auralis 04.AI.00_1EN • 07/2019...
- Page 2 © Arjo 2019. As our policy is one of continuous improvement, we reserve the right to modify designs without prior notice. The content of this publication may not be copied either whole or in part without the consent of Arjo.
-
Page 3: Table Of Contents
Overlay and overlay zip (Auralis 175 and 200 mattress replacement) ....... - Page 4 ..............20 Auralis mattress (3 steps) ......20 .
-
Page 5: Foreword
Foreword Thank you for purchasing Arjo equipment. Customer contact information Please read and fully understand the Instructions for Use (IFU) before using the Auralis system Support Auralis they are located. WARNING CAUTION NOTE Note means: This is important information for the... -
Page 6: Intended Use For Auralis
Intended use for Auralis Auralis Auralis Auralis mattresses Auralis The Auralis prohibited. Contraindication traction. Patient assessment Auralis mattresses. Auralis Cautions Auralis systems have been designed to INTENDED USE FOR AUR ALIS... -
Page 7: Safety Instructions
Safety instructions WARNING WARNING To avoid serious injur y or death, the To avoid severe burn injur y, do not use the Auralis pump in the presence of and accessible at all times. WARNING To avoid strangulation, always use WARNING... -
Page 8: Home Care
To avoid equipment damage, do not vulnerable persons and pets if inhaled or expose the Auralis system, especially swallowed. cigarettes. A leak in the Auralis mattress or Auralis seat cushion could propagate the Home care Use the Auralis system CAUTION... -
Page 9: Preparations
• Auralis • Auralis 110 mattress overlay, Auralis 175 or 200 mattress replacement or Auralis 4. Read this IFU. 5. Store the IFU in a designated area, where it is easily accessible at all times. Actions before every use (2 steps) 1. -
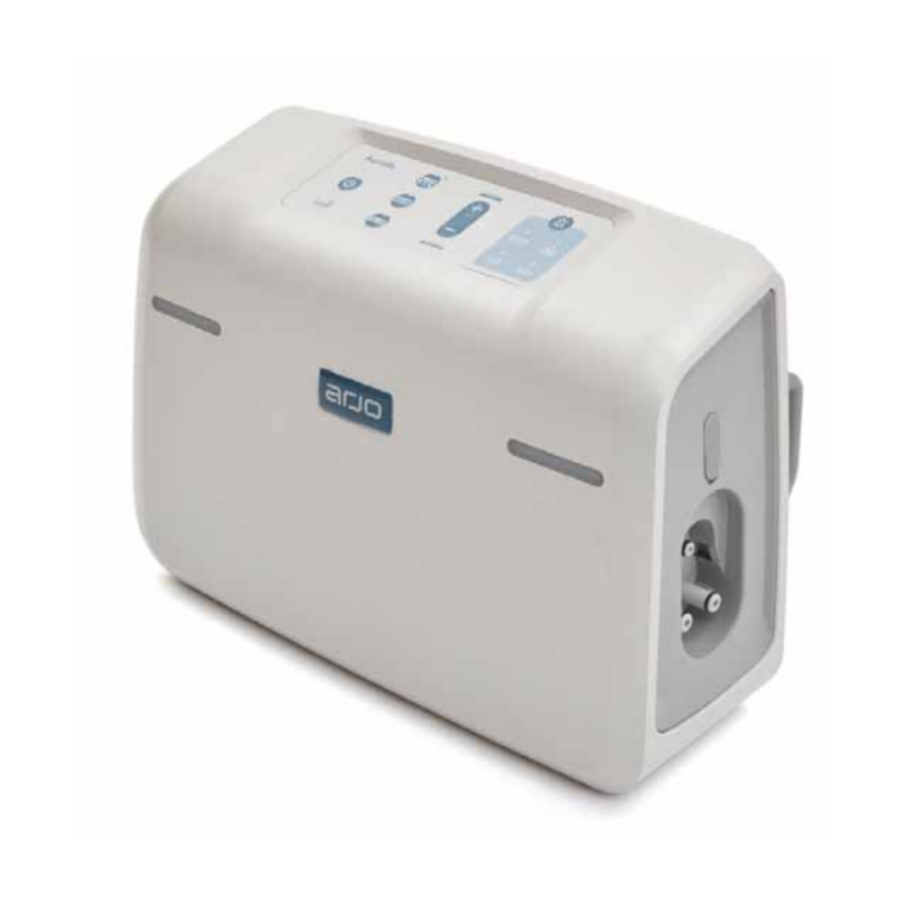
Page 10: Parts Designation - Auralis Pump
Parts designation - Auralis pump 1. Control panel (with indicators) 4. Connector socket 2. Alarm indicators 5. Skin IQ port 3. Power cable 6. Hanging brackets Control panel - buttons and indicators 7. Low battery indicator 2. Wait indicator 8. Battery charge indicators... -
Page 11: Parts Designation - Auralis 110 Mattress Overlay
Parts designation - Auralis 110 mattress overlay 2. Detachable cover 3. Cover attachment zip • Head cells (3) • Torso cells (12) • 5. Loop straps 7. Cell hooks 9. Fixing straps 11. Connector 12. Cable management... -
Page 12: Parts Designation - Auralis 175 And 200 Mattress Replacement
Parts designation - Auralis 175 and 200 mattress replacement 2. Detachable cover 3. Cover attachment zip • Head cells (3) • Torso cells (12) • 5. Loop straps 7. Cell hooks 10. Overlay 11. Overlay zip 13. Connector 14. Cable management... -
Page 13: Parts Designation - Auralis Seat Cushion
Parts designation - Auralis seat cushion 1. Detachable cover 2. Cover attachment zip 3. Alternating cells 5. Connector 7. Fixing straps... -
Page 14: Product Description - Auralis Pump
NOTE To turn the Auralis failure or battery operation, press the Run/ Standby button for four seconds. Wait indicator, Figure 3 The Wait indicator is shown when the Auralis Auralis mattress or Auralis Figure 3 Auralis mattress Figure 4 the indicator is shown. - Page 15 Mains power failure indicator, Figure 9 Figure 8 Service indicator, Figure 10 The Service indicator indicates two states: • The indicator shows constant when the Auralis Figure 9 • Low battery indicator, Figure 11 Figure 10 Auralis...
-
Page 16: Alarm Indicators
Alarm indicators The power and alarm indicators are located on the top (the control panel) and front of the Auralis Hanging brackets Auralis Power cable management on the left side of the Auralis mattress. Figure 14 Skin IQ port To power Skin IQ... -
Page 17: Product Description - Auralis Mattresses
® Loop straps The loop straps keep the cells aligned and in place. Heelguard cells heel area lower for longer. Cell hooks The cell hooks attach the cells to the Auralis mattress base. Figure 17 Tube-set Auralis mattresses. Connector The connector is clicked in to place in to the The connector is removed by pressing the two side Continue on the next page. -
Page 18: Cable Management (3 Steps)
• Auralis • Auralis mattress. Securing straps (Auralis 175 and 200 mattress replacement) 10 anchor points on the base of the Auralis 175 and mattress replacement. This allows the Auralis 175 and 200 mattress replacements to be attached to... -
Page 19: Product Description - Auralis Seat Cushion
Overlay and overlay zip (Auralis 175 and 200 mattress replacement) Both the Auralis 175 and the 200 mattress replacements can be converted to an overlay. Use The overlay can then placed on top of an existing bed mattress. Figure 20... -
Page 20: Auralis Mattress (3 Steps)
Auralis mattress (3 steps) Figure 24 15 seconds. unit Figure 25 Figure 26 CPR R APID DEFL ATION UNIT... -
Page 21: Assemble The Auralis System
To avoid damage to the cells, always use the Auralis mattress with the protective top cover. Figure 28 Place the detachable cover over the Auralis mattress located at the foot end of the Auralis mattress. Continue with steps on the next page. ASSEMBLE THE AUR ALIS SYSTEM... -
Page 22: Auralis 175 And 200 Mattress Replacement (8 Steps)
5. Zip the cover onto the Auralis mattress overlay, start from the head end. Do not trap any material closed position. at all times. Auralis 175 and 200 mattress replacement (8 steps) 1. Remove any existing mattress from the bed frame. -
Page 23: Auralis
Auralis mattress with the protective top cover. Place the detachable cover over the Auralis the foot end of the Auralis mattress. 7. Zip the cover onto the Auralis mattress replacement, start from the head end. Do not trap closed. closed position. -
Page 24: Auralis
• • • position across the chair, with the ‘V’ shape pointing towards the front. CAUTION To avoid inadequate pressure redistribution, do not use the Auralis Figure 36 seat cushion without a foam cushion beneath it. Auralis described below. •... - Page 25 CAUTION To avoid damage to the cells, always use the Auralis seat cushion with the protective top cover. Place the protective cover over the Auralis seat front part of the seat. 4. Zip the cover onto the Auralis WARNING To avoid falling, position the Auralis pump, the cable and the tube-set so that they do not create a trip hazard.
-
Page 26: Start The Auralis System
Battery charge indicator • Figure 40 2. When the Auralis head end of the bed. 3. Place the patient on the Auralis mattress with the head at the head end and the feet at the foot end. NOTE The Auralis Figure 41 mode”... -
Page 27: Select Mode
Select mode Activate (4 steps) Auralis mattresses. Figure 42 extended. Extend (3 steps) 1. Press 3. If not extended, the Auralis Deactivate of the other modes. Continue on the next page. SELECT MODE... -
Page 28: Transport Mode
Reactive CLP mode indicator is shown. Deactivate To deactivate Reactive CLP mode, select either Auralis Transport mode Activate (2 steps) Figure 45 Auralis Auralis mattress NOTE There is no Transport mode on the Auralis seat Figure 46 Continue on the next page. SELECT MODE... - Page 29 Deactivate set. The Auralis Figure 47 SELECT MODE...
-
Page 30: Auralis System
Figure 49 4. Roll the Auralis mattress tightly, allowing it to 5. Place the Auralis mattress in the protective bag. 6. Store the Auralis mattress in a designated area, in Figure 50 storage conditions” on page 41. TURN OFF AND STORE THE AUR ALIS SYSTEM... -
Page 31: Auralis
Auralis seat cushion (5 steps) WARNING To avoid cross- contamination, always clean and disinfect the Auralis system after each patient. 1. Clean and disinfect the Auralis Auralis Auralis 4. Place the Auralis clean and free from contamination and sharp 5. Store the Auralis... -
Page 32: Cleaning And Disinfection Instructions
WARNING Always read the instructions for use and the safety data sheet of the disinfectant. WARNING To avoid electrical shock, always disconnect the Auralis pump from the power source before cleaning and inspecting. WARNING To prevent cross-contamination, always follow the disinfection instructions in this Instructions for Use. -
Page 33: Cleaning And Disinfection (27 Steps)
8. After disinfecting the Auralis Auralis a dry cloth. 10. Allow the Auralis Clean the Auralis mattress / seat cushion 11. Spray all external areas of the Auralis mattress/ Auralis process. Continue with steps on the next page. CLE ANING AND DISINFECTION INSTRUCTIONS... - Page 34 14. If it is necessary to clean the inside of the Auralis mattress/ Auralis to access the internal components. wipe down the cells, bottom cover and straps (mattress only) of the Auralis mattress/ Auralis all the cells while wiping down.
-
Page 35: Care And Preventive Maintenance
WARNING Electrical equipment may be hazardous if misused. There are no user-serviceable parts inside the Auralis pump, Auralis mattress or Auralis seat cushion. The Auralis pump’s case must only WARNING To avoid injury and/or unsafe product, the maintenance activities must be carried out at the this device. - Page 36 CARE AND PREVENTIVE MAINTENANCE Before every use After each After 24 SCHEDULE or every week (if patient months for long term use) Caregiver obligations action/check Clean and disinfect Auralis pump Auralis mattresses and seat cushion Auralis system Auralis system CARE AND PREVENTIVE MAINTENANCE...
-
Page 37: Clean And Disinfect
If any part is damaged or missing DO NOT use the Auralis product. Visually check all labels Check that all labels are attached on the Auralis switched on. After 30 seconds, two green alarm system according to section Labels on Auralis on page 44 and Labels on Auralis mattresses and... -
Page 38: Troubleshooting
Auralis mattress is not closed. 3. The valves on the Auralis seat 3. Check the valves on the Auralis seat 4. There is a leak in the system. POWER FAILURE Check if power is available and check the power cable. - Page 39 2. The Auralis Auralis mattresses. OVER TEMPERATURE The Auralis Auralis 2. Disconnect the power cable. has entered the transport mode. 3. Check the position of the Auralis • Auralis • • the Auralis 6. Reconnect the power cable to the Auralis 8.
- Page 40 IP21 12.5 mm diameter and water droplets falling vertically. Mode of operation: Alternating Mode Cycle Time: ELECTRICAL OPERATING CONDITIONS 5 °C to 40 °C (41 °F to 104 °F) 700 hPa to 1060 hPa If the Auralis Auralis TECHNICAL SPECIFICATIONS...
- Page 41 TRANSPORT AND STORAGE CONDITIONS 0 % to 95 % 0 °C to 40 °C (32 °F to 104 °F) CAUTION To avoid damage to the Auralis • Do not store the Auralis • Store the Auralis Auralis • Do not store the Auralis battery damage.
- Page 42 END OF LIFE DISPOSAL Package • waste. • • COVER SPECIFICATION Removable Cover Low Friction Water Resistant/Repellent agent to control microbial deterioration of fabric Fire Retardant BS 7175: 0, 1 & 5 60 °C (140 °F) or air dry Max 80 °C (176 °F) Wipedown Chemicals Chlorine at strength of 1000 ppm or Alcohol at 70 % storage...
- Page 43 STANDARDS/CERTIFICATE DESCRIPTION performance. LIST OF STANDARDS AND CERTIFICATES...
-
Page 44: Labels On Auralis Pump
Labels on Auralis pump LABEL EXPLANATION SYMBOL EXPLANATION Medical Device according to EU Medical Device With respect to electric shock, CE marking indicating only in accordance with CAN/ legislation E348583 MEDICAL EQUIPMENT Type BF, Applied part: accompanied by the name and... - Page 45 label L ABELS ON AUR ALIS PUMP...
-
Page 46: Labels On Auralis Mattresses And Auralis Seat Cushion
Labels on Auralis mattresses and Auralis seat cushion LABEL EXPLANATION Top label Care and cleaning label States the washing conditions Law tag (US and Canada only) SYMBOL EXPLANATION for Use) for a description of the Device according to EU Medical... - Page 47 Example of mattress Law tag, if applicable (on base cover of Auralis 175 mattress only) Top label (inside the top cover) (inside the base cover) Care and cleaning label (inside the top cover and on base cover) L ABELS ON AUR ALIS MAT TRESSES AND AUR ALIS SE AT CUSHION...
-
Page 48: Electromagnetic Compatibility (Emc)
Electromagnetic Compatibility (EMC) The Auralis Auralis Electromagnetic Compatibility (EMC) • • • WARNING Stacking or placing other electrical equipment next to this device is not recommended, it can interfere with the equipment’s operation and safety. Portable and mobile radio frequency (RF) communications equipment can interfere with this equipment operation and safety. - Page 49 Auralis Emissions test Compliance RF emissions The Auralis Therefore, its RF emissions are very low and are not likely to RF emissions Class B Harmonic Class A emissions Voltage Complies emissions ELECTROMAGNETIC COMPATIBILIT Y (EMC)
- Page 50 The Auralis Auralis IEC 60601 test Compliance level level 3Vrms 6Vrms ISM, 10Vrms 80 % AM 1KHz the recommended separation distance Radiated RF 10 V/m 10 V/m 80 MHz to 2.7 GHz Recommended separation distance rating of the transmitter in watts (W) and d is the recommended separation distance in metres (m).
- Page 51 RECOMMENDED SEPARATION DISTANCES BETWEEN PORTABLE AND MOBILE RF COMMUNICATIONS EQUIPMENT AND THE PUMP The Auralis Auralis (transmitters) and the Auralis transmitter 150 kHz to 80 MHz 80 MHz to 800 MHz 800 MHz to 2.7 GHz 0.01 0.12 0.12 0.23 0.38...
- Page 52 70 % U (30 % dip in U (30 % dip in U for 25 cycles for 25 cycles that the Auralis <5 % U <5 % U (>95 % dip in U (>95 % dip in U for 5 s...
-
Page 53: Parts And Accessories
Parts and accessories Coiled Skin IQ power cable 636377 PARTS AND ACCESSORIES... - Page 54 Intentionally left blank PARTS AND ACCESSORIES...
- Page 55 AUSTRALIA FRANCE POLSKA Arjo Australia Pty Ltd Arjo SAS Arjo Polska Sp. z o.o. 78, Forsyth Street 2 Avenue Alcide de Gasperi ul. Ks Piotra Wawrzyniaka 2 O’Connor CS 70133 PL-62-052 KOMORNIKI (Pozna ) AU-6163 Western Australia FR-59436 RONCQ CEDEX...
- Page 56 Hans Michelsensgatan 10 211 20 Malmö, Sweden www.arjo.com...
Need help?
Do you have a question about the Auralis and is the answer not in the manual?
Questions and answers
Is there a setting i should use when not in bed ie I only will be in the bed at night not 24/7