Table of Contents
Advertisement
Quick Links
Advertisement
Table of Contents
Troubleshooting

Related Manuals for Stanton Deck Control Surface SCS.1d


Summary of Contents for Stanton Deck Control Surface SCS.1d
- Page 1 SCS.1d d Deck Con ntrol Surface e US S ER MANU ...
- Page 2 • Place your mixer on stable surfaces, away from vibration and from sources that generate hum or noise, such as transformers, or electric motors. • The location and position of the unit should not interfere with its proper ventilation. • Do not use this unit near water. For example, near a bathtub, washbowl, kitchen sink, laundry tub, in a wet basement, or near a swimming pool. • To reduce the risk of fire or electric shock do not expose the equipment to rain or moisture or use it in damp or wet conditions. • Protect the unit from excessive dirt and dust. • Avoid drinks spillage, tobacco ash, and smoke (especially that associated with smoke machines). • Do not place heavy objects on the unit surface. Cleaning: Unplug the unit from the wall outlet before cleaning. Never use benzene, thinner, or other solvents for cleaning. Use only a soft damp cloth. Service: • The unit contains no user‐serviceable parts. • The manufacturer is not responsible for any damage or personal injury resulting from unauthorized user servicing or modifications. Please read the warranty. • The warranty will be void if any unauthorized service by the user is detected. • If service is required, please contact Stanton Tech at +1 954.316.1500 (Option 3) ii ...
-
Page 3: Table Of Contents
Table of Contents Introduction .. 1 Welcome to the SCS.1d!... 1 Overview ... 2 Unpacking .. 2 Connecting the SCS.1 ... 3 Connecting to Your Computer ... 3 Connecting to the SCS.1d to the SCS.1m ... 4 SCS.1d Setups .. 4 SCS.1d Description ... 5 Top Panel Functional Groups ... 5 Encoder Section ... 7 ... -
Page 4: Introduction
1. Introduction Welcome to the SCS.1d! Thank you for purchasing SCS.1d! The SCS.1d (Stanton Control System 1 deck) is the premier deck control surface for laptop DJs, remixers, VJs, and producers. Before we begin, there are a few important issues we would like to bring to your attention. There is a software component to this hardware. It is called DaRouter. DaRouter is a kind of “MIDI processor” that allows the use of presets. These presets can be application specific mappings, or generic maps that can be applied to a number of different software packages. In fact, you may already be familiar with the DaRouter software because it is also used with our SCS.3 line of controllers. Well, DaRouter is even more important for the ... -
Page 5: Overview
Overview The SCS.1d was designed for high‐precision software control. Thanks to its straightforward interface and intuitive ergonomics, the SCS.1d provides a host of top‐notch features at your fingertips, such as high‐torque 10” motorized platter, 100mm motorized pitch fader, velocity‐sensitive pads, assignable encoder sections, and much more… The SCS.1d (deck) and the SCS.1m are the main components of the SC System 1; Stanton‘s most advanced digital control system for the professional DJ. You can use the SCS.1d in conjunction with the SCS.1m for tight integration and full control of your DJ/VJ application’s main parameters or with other audio interfaces. • Adjustable high‐torque 10” motorized platter with vinyl surface and superior tracking. • High‐resolution vinyl tracking system allows for super‐accurate mixing and scratching. • 100mm pitch fader motorized to maintain sync with software. • 4 Velocity‐sensitive pads assignable to loops, cue points, etc. • Assignable Encoder section with 360° of LED feedback. • LCD “scribble strips” for two‐way communication with selected software. • Familiar Transport section for direct music control. ... -
Page 6: Darouter 2
Connecting the SCS.1 Connecting to Your Computer Step 1: Locate the included power cable and adapter (24V) and connect it to the SCS.1d and to your power source. (Figure 2.1) Note If you own both the SCS.1m and the SCS.1d, the power adapters look very similar. Looking at the output voltage will tell you which is for which component, (e.g., 12V for the SCS.1m, and 24V for the SCS.1d). There is also a label on each of the power cords to specify which product they are to be used with. Figure 2.1 Figure 2.2 Step 3: Download and run the DaRouter installer for the SCS.1d. A dialog box will open telling you to connect your SCS.1d. At this point, turn the SCS.1d on and connect the FireWire cable to your computer’s FireWire port (Figure ... -
Page 7: Connecting To The Scs.1D To The Scs.1M
Connecting to the SCS.1d to the SCS.1m All of the SCS.1 controllers have two FireWire ports on them, so devices can be chained together if needed. So when connecting a single SCS.1d to the SCS.1m, you would go from the unused FireWire port on the SCS.1m (Figure 2.4), (the other port is connected to your computer) to an open port on the SCS.1d. (Figure 2.5) Figure 2.4 Likewise, if you’re connecting two SCS.1d’s to a SCS.1m, then you would go from the free FireWire port on the first SCS.1d to a port on the second. Any other FireWire devices should go at the end of the chain and not before any of the SCS.1 controllers. Let’s take a look of the SCS.1d Setups. SCS.1d Setups The following configurations can be used for the SCS.1d for typical use cases: SCS.1m + SCS.1d This mixer‐and‐deck configuration can be used to emulate a dual‐deck setup by using virtual decks for controlling transport, loop, and effects, while using the mixer to blend and EQ songs and sounds. This system is the perfect entry into the world of professional SC System laptop mixing. (Figure 2.7) Dual SCS.1d + SCS.1m This setup recreates the “traditional” DJ system, allowing users to have two physical ... -
Page 8: Scs.1D Description
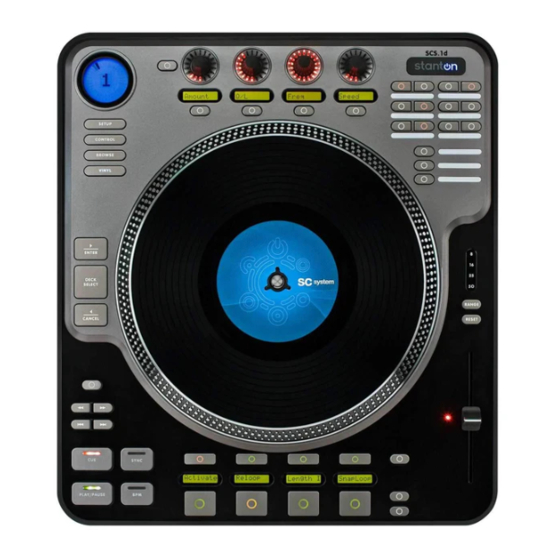
SCS.1d Description In this chapter, we will briefly describe the top panel of the SCS.1d. It’s important to understand that the SCS.1d is a traditional DJ turntable / CD player “analogy” in a control surface. This means that while the SCS.1d looks like a DJ turntable / CD player, at its core, it is really a control surface that sends and receives control data to and from a computer. As a control surface, the SCS.1d’s functionality is completely derived from the host application (software) that it is controlling. The SCS.1d also utilizes presets in DaRouter to define its capabilities, which can drastically change its functionality depending on how the preset is configured. So as we discuss the panel and layout it is important to remember that when running a specific preset its best to read the documentation associated with that preset as it will explain how the SCS.1d is tailored towards the application it is being used with. So in the below explanations we describe the controls and how they traditionally may be mapped into an application. Top Panel Functional Groups To easily understand the main SCS.1d Top Panel, we have divided it in six functional groups: ‐ Encoder Section ‐ Trigger Section ‐... - Page 9 Top Panel Functional Gro oups (continua ation) Figure 3.1 Now, let’s take a closer lo ook of each of the functiona l groups. 6 ...
-
Page 10: Encoder Section
Encoder Section Trigger Section This section consists of four rotary push encoders, each with an LED encoder ring to indicate the value of the encoder, and an LCD “scribble strip” that can be used to indicate the functionality of each encoder. Encoders are used to control variable parameters such as effect levels. Encoders do not physically stop when you turn them; instead the LED encoder rings indicate the position of the control you are adjusting. ... -
Page 11: Platter / Global Section
Platter / Global Section Depending on the control mode the ENTER and CANCEL buttons will allow for expanded functionality with the platter. SETUP button will allow for adjustments of the overall deck controller. Upon pressing setup you will see the current firmware version. Using the first encoder will allow you to select a value to change; the second encoder will allow you to adjust the value. ‐ Contrast: Adjusts the contrast of the LCD screens. ‐ Torque: Adjusts the torque of the platter to simulate different turntables. ‐ MIDI Ch: Changes the output MIDI channel of the device. It is suggested NOT to change this as presets usually expect the deck to send data from the default MIDI channel. ‐ Decay: Adjusts the acceleration curve of the encoders. This section controls the assignment of the platter as well as global functionality. The DECK SELECT button will allow you toggle virtual decks on screen. In this way when you switch virtual decks, the SCS.1d will also change its state to match the on screen ... -
Page 12: Pitch Section
Pitch Section Transport Section The pitch section represents a traditional pitch control found on a CD player or turntable. However, the key difference is that the pitch control is motorized to support functionality such as auto‐sync in an application and updating position when switching virtual decks. It’s important to not stop the motorized fader while it’s moving ... -
Page 13: Preset Switcher Section
Preset Switcher Section The preset switcher section controls switching of presets on the SCS.1d. Presets are generally related towards switching presets for the encoder section, trigger section or pitch slider. Presets are groups of controls with functionality focused towards doing a single task. For instance, a loop preset will contain all the controls needed to create, move and modify a loop. Preset configuration and functionality are highly dependent on the application the SCS.1d is being ... -
Page 14: Scs.1 Software Installation
SCS.1 Software Installation Before installing the SCS1 software (DaRouter and drivers) make sure you follow these guidelines: 1) Windows: Do NOT connect the SCS.1 controller(s) until prompted by the driver installer. 2) Windows: When intending to use multiple SCS.1 controllers at once (mixer + decks) make sure you connect ALL the devices during the driver installer. 3) Always check the Stanton website (listed below) for the latest drivers and firmware. To fully maximize SCS.1 capabilities and take advantage of its great features, some software needs to be installed with it. In fact, the SCS.1 Software Installation process differs greatly between Mac and PC computers. ‐ On a Mac, the SCS.1d is a class compliant FireWire device, which means that it will connect to the system without drivers, however, because the SCS.1d uses a proprietary high speed MIDI system it is necessary to install DaRouter to communicate with the SCS.1d and create a virtual MIDI port for the host application to receive MIDI messages through. On the Mac you will simply need to install DaRouter, connect the unit(s) ... -
Page 15: Windows Xp 1
Windows XP 1. Double click the executable file (.exe). If the following Open File‐ Security Warning appears, click Run. (Figure 4.1) Figure 4.1 2. The Stanton SCS.1 DaRouter Setup Wizard will guide you through the installation process. Click Next. (Figure 4.2) Figure 4.2 12 ... - Page 16 3. To install the software for the first time, choose the Standard option. To update your previously installed version, choose Custom. In this example, let’s choose Standard. (Figure 4.3) Figure 4.3 4. Read the License Agreement, select the “I accept the agreement” option, and then click Next. (Figure 4.4) Figure 4.4 13 ...
- Page 17 5. The installation of the ASIO / high level FireWire driver will begin. When you are ready, click Next. (Figure 4.5) Figure 4.5 6. In this step, you are able to choose where to install the driver. However, if you do not really need to change the location, leave the default setting and click Install. (Figure 4.6) Figure 4.6 14 ...
- Page 18 7. Files will begin to copy or if you are installing a new driver the old drivers will be uninstalled before new files are copied. When prompted to connect your devices (Figure 4.7), turn ON all SCS.1 devices to be used and then connect the FireWire cable from the device(s) to your computer and click OK. Figure 4.7 8. Wait for a few seconds, normal operation will resume shortly. (Figure 4.8) Figure 4.8 15 ...
- Page 19 9. Once the files are done copying click Next to continue. (Figure 4.9) Figure 4.9 10. Click Finish. (Figure 4.10) Figure 4.10 16 ...
- Page 20 11. Read information regarding this build of the installer then click Next. (Figure 4.11) Figure 4.11 12. Click Finish. (Figure 4.12) Figure 4.12 That’s it. You have installed the SCS.1d driver and DaRouter. 17 ...
- Page 21 You ca an also click th e Start button Figure 4 4.14 You w will see a driver program grou ftware are pro operly installed d, open Device Properties. In n the System P Properties win (Figure 4.13) Stanton 1394 4 Audio Device es that include each controlle er you have co onnected. Chec attached to yo our computer. and verify tha at all associated d applications p, along with a an SCS.1 DaRo uter icon. That 18 e Manager. On n your desktop p, right ndow, click the e Hardware ta b, and ...
-
Page 22: Mac Os
Mac OS X To install DaRouter, first make sure that your SCS1 controller is not connected and then follow the next instructions 1. Double click the .dmg file to expand it. (Figure 4.16) Figure 4.16 2. Double click the DaRouter.pkg file to start the installer. (Figure 4.17) Figure 4.17 19 ... - Page 23 3. Once the installer has started, click Continue. (Figure 4.18) Figure 4.18 4. Read the license agreement and click Continue. In the next dialog, click Agree. (Figure 4.19) Figure 4.19 20 ...
- Page 24 5. Next, you can set the default path of the program. Click Install unless you want to install DaRouter to a specific destination. (Figure 4.20) Figure 4.20 6. DaRouter will be installed. Once done, click Close. (Figure 4.21) Figure 4.21 21 ...
- Page 25 7. DaRouter will be installed into your Applications folder and the presets will be placed in your home directory. Plug in your SCS.1 controller, power it ON, connect the FireWire cable to your computer, start DaRouter, and read the rest of this documentation. (Figure 4.22) Figure 4.22 Now that you have installed DaRouter, let’s learn about it. 22 ...
-
Page 26: Darouter
Every single a action on the SCS.1 ns evolve, so do presets… More what SCS.1 con trollers can do o, thus tly check the S Stanton websit te and plication they a are being used d with. s have some f functionality to o load ore we load a preset, let’s t take a ... - Page 27 5.2.1 ection A ‐ Figure 5.2 Preset Doc cumentation B Button The Preset t Documentati on button (sho preset. Th e preset docu mentation inc was design ned for. To ful lly take advant Documenta ation button a nd read its con 5.2.2 ection B Figure 5.3 Options Below each h Device Drop down menu th important ...
-
Page 28: Troubleshooting 2
Deferred Procedure Calls (DPC) Latency Checker (for more information please read the Appendix), and select the Sampling Rate, FireWire Latency, and ASIO Buffering settings. (Figure 5.4) Start / Stop Streaming – Use this to start or stop the audio stream between the driver and hardware. If streaming has been stopped, then no audio will be passed to the hardware. DPC Latency Tool – Stanton includes a troubleshooting tool for detecting high DPC latency. When there is high DPC latency apparent on a machine it can affect the performance of audio and MIDI streaming. You must have low DPC latency to achieve consistent performance and low latencies. ... - Page 29 Figure 5.5 Pitch Bend d Sensitivity – – The SCS.1d a hand to slo ow or speed th he track up. Th (whereas w with scratching g the platter k and once again, making g it too sensiti application n. 5.2.3 ection C Figure 5.6 Now, if you cl ick the SCS.1d d ...
-
Page 30: Using Darouter
1 controllers th oading a Pres set Confirm th hat no preset is s loaded and y you wish t o use and then n read its inclu Stanton w website for the e latest preset application ns! sing a Preset t for the Firs 1) Select the desired pr reset you wou 2) Move any faders, s witches ... -
Page 31: Troubleshooting
I cannot find the driver for my controller. In Windows, the driver installer is combined into the SCS.1 DaRouter software. In OS X, the SCS.1m controllers is Core Audio compliant and doesn’t need a driver, however both the SCS.1d and SCS.1m require DaRouter to translate their control data into MIDI. As stated in the installation procedure, make sure you download the latest driver from the Stanton website. My computer does not have a 6 pin FireWire port on it. Use the 6 to 4 pin adapter included in the packaging. ... -
Page 32: Specifications
Specifications Motor Type Motor Speeds Starting Torque Start / Stop Time FireWire Speed Power 16 Pole, 3 phase, brushless DC motor 33 1/3 rpm, 45 rpm >4.5 kgf.cm .2 seconds FireWire 400 24 VDC / 3.0 Amps 29 ... -
Page 33: Appendix
When using any computer for live audio applications it is always suggested to perform certain optimizations to ensure consistent performance. For the most part live audio is not always the highest consideration for both hardware designers and software programmers. With that being said, Stanton has put together this guide and included one of the most widely used troubleshooting tools (DPC Latency Checker) with the SCS1 to help optimize ... - Page 34 Figure A.1 The green Bar Graph sh ows the curre occurred w within one seco ond. Every sec hand side, (representing the most rece DPC Late ncy Checker updates its The Curre ent Latency value indicat The Absol lute Maximum m value repr Click Reset t to clear this v value. To stop the e Latency click Stop, and to e ent latency val ue over time. ...
- Page 35 For examp ple, a typical pr roblem is show Figure A.2 So let’s op en Device Man nager to find o click My C omputer icon and click Prop click the D evice Manage r button. In th wn in the next f figure. Red bar s indicate exce out the driver t that causes the e excessive DPC perties. In the System Prope erties window, e next page, p lease check Fig gure A.3. 32 essive DPC late ency. (Figure A .2) C latencies. On n your desktop p, right click the Hard dware tab, and d then ...
- Page 36 Figure A.3 Now, befo ore you start f finding out wh these sugg gestions: You should d not disable: • any device listed i n Device Mana • the hard disk that contains the s • the IDE/ATAPI or S SATA controlle • the system keyboa ard • the mouse, track p point or touch • the USB controller r external keyb •...
- Page 37 To disable a device, right t‐click on it (e. marked wi th a red cross. (Figure A.4) Figure A.4 Now, che eck the DPC Latency Che If yes, we have found th he problem, if context me enu. After you h have identified d the device dr or contact its Customer S Support depar moment, y you may decide e to disable tha .g. on the Ethe ernet adapter) and choose D cker to see if ...
-
Page 38: Windows 1394A Bandwidth Limiting Issue / Sidspeed Fix (Windows Xp-Vista)
Windows 1394a Bandwidth Limiting Issue / SidSpeed Fix (Windows XP‐Vista) First, let’s explain a little about what the SidSpeed Fix is. Basically, SidSpeed is a value in your windows registry that regulates the speed of your FireWire bus. It can have a value from 0‐3 (0=S100 speed, 1=S200 speed, 2=S400 speed, and 3=800 speed). If a SidSpeed value larger than 3 is used, then Windows will reject that and use a value of 0 instead, so it’s important to use a value of 0‐3. Normally, the default value for SidSpeed is 2, which corresponds to a transfer rate of 400 mbps (FireWire 400). This speed is standard for most audio interfaces, including ours. The problem is that there are situations where this ... - Page 39 This will op pen your Regis stry Editor, wh Figure A.7 Now, befo re we go any f further, we nee The registr ry is a dangero ous place to be installation n of Windows. Please do not about wha at you should b be doing, stop a OK, now w we’re ready to backup your hand side o of the split pan ne in regedit a it. (Figure A A.8) Figure A.8 ich will look lik ke this…(Figure e A.7) ed to give you a warning and back some th e playing arou nd. Using this ...
- Page 40 Now click F File, and then c click Export. A Figure A.9 At the bott tom of the new w window, the and that th he text in the f field there say drop down n. Select a loca ation to save t File Name field and type e in a name for You have n now backed u p a registry br saving the registry backu up you just ma there are p problems boot ting into Wind for the SidS Speed value. Expand HK KEY_LOCAL_MA ACHINE (Figur Figure A.10 new window w will pop up. (Fi igure A.9) ...
- Page 41 Then expa nd the SYSTEM M branch. (Figu Figure A.11 Then expa nd CurrentCon ntrolSet. (Figur Figure A.12 ure A.11) re A.12) 38 ...
- Page 42 Now expan nd Enum. (Figu u re A.13) Figure A.13 39 ...
-
Page 43: Wire Controller
Then expa nd the PCI bra nch. (Figure A. Figure A.14 Now we n eed to find th e specific key way that d oes not seem to make a who .14) for your FireW Wire controller . As you can s ole lot of sense e. It is not as ha ard as it may lo 40 ee, all the dev vices are name e d in a ook. ... - Page 44 Leave the Regedit windo ow open and go o back to Start t > Run. Type in n devmgmt.ms sc and then pre ess OK. (Figure e A.15) Figure A.15 This will op pen your Devic ce Manager. Lo ook for your Fi ireWire control ller (commonly y called IEEE 13 394). One exam mple is highlight ted in Figure A .16). Figure A.16 Right click on your FireW Wire device and d click Properti es. 41 ...
- Page 45 Now click o on the Details tab. (Figure A. Figure A.17 See this str ring of text? Th his is what we Going back k to Regedit, w we can see that Figure A.18 .17) are going to lo ook for in the P PCI branch we h t I got a little lu ucky and have it as the first k 42 have open in R Regedit. ey. (Figure A.1 18) ...
- Page 46 If you expa and out the de evice subkey, y look in the e right pane. (F igure A.19) Figure A.19 In the exa mple above, t the SidSpeed k SidSpeed v value and a w indow will ope CHANGE IT T to a 3 and pre ess OK. If you d Figure A.20 you’ll find ano ther subkey ca alled Device P key actually ex xists, but it is set to the inc en. In that win ndow will be a ...
- Page 47 If you do n not have the S SidSpeed value DWORD V alue. (Figure A A.21) Figure A.21 Once you h have created a a new string, na Figure A.22 Finally, do uble click SidS Speed and cha Editor. If you enco ounter an erro r during any st rights to a alter a registry y value), pleas restore yo ur registry, jus st double click Reboot aft terwards. e, you will need d to make one e. Right click in ame it SidSpee ed (Figure A.22...
-
Page 48: Firewire Chipsets
FireWire C Chipsets High defin ition audio flow wing over FireW and the ch hipset in the SC CS1 device. Unf reliability a and synchroni zation require cards such h as Adaptec® when your PC cards will u use chipsets of f FireWire that not work at all. Stanto on recommend suggested to stay away from Agere® c Apple com mputers utilize T Texas Instrume to Agere ch hipsets for som me production The easies t way to check k if you have a your host c controller. (Fig gure A.23) ... - Page 49 Model Type _________ Model No. _________ Serial No. ________________ Date of Purchase ________________________________________________ Thank you for choosing Stanton! Your satisfaction is extremely important to us. We proudly stand behind the quality of our work and appreciate that you put your trust in us. Registering your product will help us guarantee that you are kept up to date on our latest advances. Warranty Service in the United States: Please contact Stanton Tech Support BEFORE sending your product. In some cases, our Tech Support team can resolve your problem immediately, avoiding down time due to shipping delays. However, if Tech Support determines that a repair is needed; please call us at +1 954.316.1500 (Option 3) to obtain a Return Authorization Number (RA#) PRIOR to shipping your product to us. Warranty Service outside the United States: To initiate a warranty repair, please contact the authorized Stanton dealer from whom you purchased your product, and follow the dealer’s return policy. Save your shipping boxes and all packaging materials! For the fastest and safest product return to Stanton, please use the original shipping carton and packaging materials. Stanton cannot be responsible for any damages incurred during the shipping process due to poor or inadequate packing. Please remember to insure your shipment! 46 ...
- Page 50 Stanton Warranty Through Stanton's authorized dealers around the World, Stanton, or one of Stanton's authorized distributors outside the U.S., will, without charge, repair or replace, at the sole discretion of the entity responsible for making the repair or providing the replacement, any Stanton merchandise proved defective in material or workmanship for a period of one (1) year following the date of original purchase. Exceptions to this warranty are as noted below: The warranty for mechanical parts which are subject to wear and tear are limited to either the earlier of thirty (30) days following the date of original purchase or for 10,000 cycles for switches. Stanton will warrant all replacement parts and repairs for ninety (90) days from the date of original shipment. Repairs made necessary by reason of misuse, alteration, normal wear, or accident are not covered under this warranty. Returns Authorized Stanton dealers are only authorized to sell and distribute merchandise within a specific country. All goods requiring warranty repair or replacement must be returned (freight prepaid if not hand‐delivered) to the authorized Stanton dealer from whom the merchandise was purchased and in the same country where the merchandise was purchased. For purposes of purchases made via the Internet, the merchandise must be returned to the authorized Stanton dealer in the country where the authorized Stanton dealer which sold the merchandise to purchaser is located and not the authorized Stanton dealer in the country where the purchaser is located or the country in which the merchandise was received. Any returns to a non‐authorized dealer or to an authorized Stanton dealer not in the same country as the merchandise was intended to be sold or as set forth above will void this warranty. To initiate a warranty repair, you must contact the authorized Stanton dealer from whom you purchased the merchandise, and follow such authorized Stanton dealer's return policy. Stanton assumes no risk and shall be subject to no liability for damages or loss resulting from the specific use or application made of the merchandise. Stanton's liability for any claim, whether based on breach of contract, negligence, infringement of any rights of any party, or product liability, and relating to the merchandise shall not exceed the price received by Stanton from your purchase of such merchandise. In no event will Stanton be liable for any special, incidental or consequential damages (including loss of use, loss of profit and claims of third parties) however caused, whether by the negligence of Stanton or otherwise. To the extent permitted by law and except as otherwise provided above, Stanton disclaims any express or implied warranties of merchantability or fitness for a particular purpose. The above warranty provides you with specific legal rights. You may also have additional rights, which are subject to variation from state to state and country to country. ...
- Page 51 SC System, DaRouter, SCS.1m, and SCS.1d are trademarks of the Stanton Group. All other trademarks are property of their respective owners, who are in no way affiliated with Stanton DJ or SC System products. All information included in the User Manual is subject to change without notice.
Need help?
Do you have a question about the Deck Control Surface SCS.1d and is the answer not in the manual?
Questions and answers