Advertisement
Advertisement
Table of Contents

Related Manuals for Vytronix NC22V


Summary of Contents for Vytronix NC22V
- Page 1 N C 2 2 V C o r d l e s s 3 i n 1 V a c u u m I N S T R U C T I O N MA N U A L...
- Page 2 BLANK PAGE...
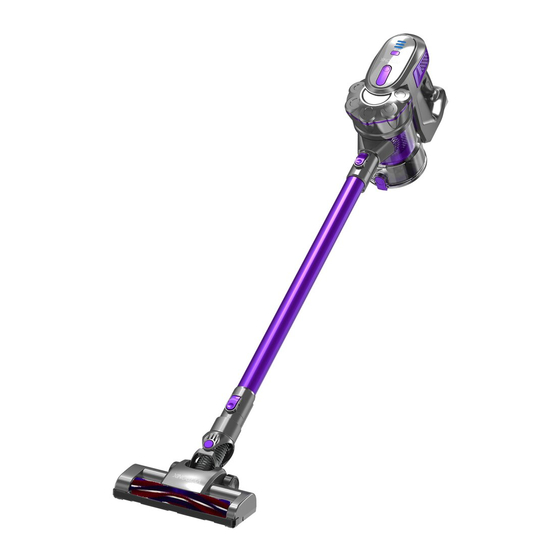
- Page 3 1. Floor head 11. Dust container emptying button 2. Floor head release button 12. Accessory storage hook 3. Crevice nozzle 13. Extension wand 4. 2-in-1 Upholstery & Dusting brush 14. Battery pack 5. Extension wand release button 15 Wall mount 6.
-
Page 4: Important Safety Instructions
19. Do not leave this product under direct sunlight for extended periods. 20. This vacuum cleaner is not intended for use by children or persons with reduced physical and capabilities. Unless they are under supervision. 21. If the appliance needs repairing, please contact Vytronix Ltd... - Page 5 ASSEMBLY INSTRUCTIONS Assembling the main body: Install the battery into the housing by sliding it into the appropriate slot. It will "click" into place. 2. Install the dust container by inserting the clip at the base of the container as indicated below, then push the top part of the canister back into the upper body.
-
Page 6: Before First Use
BEFORE FIRST USE With the battery in place, plug the cable into the power inlet hole located on the side of the battery. When charging, the blue battery indicator lights on the top of the main body will flash. As the battery becomes more charged, the lights will remain solidly on. - Page 7 ACCESSORIES Extension Wand: Use for extended reach when using as an upright unit or for those hard to reach places. 2. Motorized Floor Head: Use this for hard floors and carpets. Easily picking up dirt dust and small debris. 3. 2-in-1 Upholstery & Dusting Brush: Use this for vacuuming fabric furnishings such as sofas armchairs and curtains.
- Page 8 3. If using the floor head without the wand, simply attach it to the main body via the dust inlet. It will "click" when secure. Assembling accessories: 1. Attach the extension wand to the main body by slotting it into place the via the dust inlet. 2.
-
Page 9: Operating The Vacuum
3. If using accessories without the wand, simply attach them to the main body via the dust inlet. It will "click" when secure OPERATING THE VACUUM CAUTION: The vacuum must be fully charged before using for the first time. 1. Remove the vacuum cleaner from the wall mount. 2. - Page 10 MAINTAINING THE VACUUM Cleaning the dust container: 1. Press the dust container release button to take the dust container out. 2. Press the dust release button to open the bottom cover and expel trash. Wipe to clean the dust container, do not immerse in water. Cleaning the filter: 1.
- Page 11 3. Lift to remove the sponge filter and high-efficient filter. 4. If the filter is heavily soiled, rinse the filter thoroughly under the running cold water. Do not use soap or other cleaning solvents. 5. COMPLETELY air dry the filters for 24 hours before reassembling. Do not use hair dryer or tumble dryer to dry the filter as this may cause the filter to warp.
- Page 12 Cleaning the brush roll: Remove the brush roller from the brush housing. Slide the brush roller fastener (A) away from the brush as below. Carefully clean and remove the hairs and debris from the brush roller. Wipe to clean only, do not use any soap or harsh cleaning solvents.
-
Page 13: Troubleshooting
TROUBLESHOOTING The appliance will not power on: This may be caused by a flat battery. This can occur if the appliance has been used or stored for an extended period. Connect the vacuum to the charger and allow for a full charging cycle to complete. -
Page 14: Warranty Registration
WARRANTY REGISTRATION To register you free one-year Vytronix warranty visit www.vytronix.com using product code: brandnew-vytronix-nc22v SAFE DISPOSAL This marking indicates that this product should not be disposed of with other household waste throughout the EU. To prevent possible harm to the environment or human health from uncontrolled waste disposal, recycle it responsibly to promote the sustainable reuse of material resources. - Page 15 BLANK PAGE...
- Page 16 R e g i s t e r y o u r w a r r a n t y a t w w w . v y t r o n i x . c o m...
Need help?
Do you have a question about the NC22V and is the answer not in the manual?
Questions and answers
I have just purchased a new battery for my Vytronix NC22 and I want to know does it have to be charged up? It is showing 2 blue lights when I start it but if I plug in the charger it is not showing any lights at all. It is definitely receiving 12 v.
Yes, the Vytronix NC22V battery needs to be charged before first use. The manual states that with the battery in place, the cable should be plugged into the power inlet, and the battery indicator lights will flash during charging. Once all three lights are solid blue, the battery is fully charged and should be unplugged.
This answer is automatically generated